Friday, June 28, 2013

Vangibath Powder Recipe | Vangi Bhath Masala Recipe

vangibath masala powder
I always stock up home made masalas and powders like Sambar Powder, Rasam Powder, Vangibath Powder and few podi varieties for rice.Its a breeze to prepare a south Indian meal if we have these kind of powders and masalas handy.
Vangibath is a famous Karnataka rice dish which is prepared with brinjals.The addition of vangibath masala powder makes the rice extra delicious and also gets an unique flavor when combined with brinjals.This vangibath masala powder is quite versatile and you can even use it prepare various bhath varieties and to spice up various south Indian stir fries and curries,see notes for more details.

Check out few recipes in my blog which are prepared using Vangibath powder.
vangibhath masala powder

Vangibath Powder | Vangi Bhath Masala Recipe:
Shelf life: 1-2 months
Prep time:20 mins | Total time:20 mins + cooling time
Cuisine:South Indian | Catgeory:Spices|Masalas - Basic Cooking

Ingredients:
1/2 cup Chana dal
1/2 cup Urad dal
1 big lemon sized Tamarind
1 heaped cup grated Dry Coconut
12-15 Byadige Red chillies(gives nice red color)
12-15 Guntur Red Chillies
1/4 cup Coriander seeds
2" Cinnamon,2 pieces
8-10 Cloves
7-8 Marathi Moggu
3-4 Star Anise
Salt
2 tsp Oil 

Method:
  • Heat oil in a kadai and fry chana dal and urad dal until they turn red in color.Remove them and keep aside.
  • Add red chillies(both the varieties) and fry them and keep them aside.
  • Add cloves, marathi moggu , cinnamon, star anise and fry them and keep them aside.
  • Just warm the coriander seeds and grated dry coconut for few minutes in the same pan.
  • Grind all the roasted ingredients with salt and tamarind to a coarse powder.
  • This can be stored in a air-tight container for about 2-3 months.I generally keep it in fridge and take out enough quantity when required.
Use it in the recipe as required.

Notes:
  1. As we use dry coconut in the recipe,it would not stay for long.Hence I suggest you to refrigerate some portion and just keep the required portion in an air tight container outside.
  2. You can even avoid tamarind in the recipe and instead add lemon juice while making Vangibath.
  3. You can use Vangibath powder for the preparation of rice varieties like Vangibath, Vegetable Bhath, Methi Peas Bath and also in Rava Vangibath.
  4. Vangibath powder is quite versatile and it can be used to spice up various south indian stir fries and curries like brinjal, tindora and ladies finger curries.Stir fry brinjals/tindora and sprinkle this spice powder at the end and add extra salt required.
  5. You can even use for vegetable curries like french beans, broad beans, cluster beans, yard long beans , carrots, beetroot, cabbage and cauliflower.
vangibath powder


Thursday, June 27, 2013

Idli Dosa Batter | Idli Recipe using Idli Rice

soft idli recipe
Idli is the most common breakfast in many south Indian homes,though I do not make it on a daily basis, I do prepare it at least once in two weeks.I have already posted a version of Idli recipe using Idli rawa which is the usual way in which it is prepared in Andhra.In Karnataka and Tamilnadu,Idlis are usually prepared by using boiled rice or Idli rice.I usually prefer using Idli rice for my Idlis as I like the taste and texture of Idlis better than the Idli rawa ones.Today I am posting the Idli recipe with idli rice and a complete guide to get soft and fluffy idlis
idli recipe using idli rice
Idli might sound like a very simple dish to get soft, fluffy and airy idlis one needs to practice a lot.I don't think that even all South Indians manage to make good idlis.There are many factors which dictate the quality of idli, like the quality of urad dal or idli rice used, the climatic conditions and the procedure of grinding the batter, i.e using a grinder or a processor.I have shared a few tips based on my experience and advice from elders to help prepare soft idlis,I hope it would help you.This recipe is meant for beginners and hence I have tried giving more details.Please go through the notes thoroughly before you start preparing it.
idli recipe
Check out few Idli varieties and their variations using the basic Idli batter here..
idli recipe using idli rice
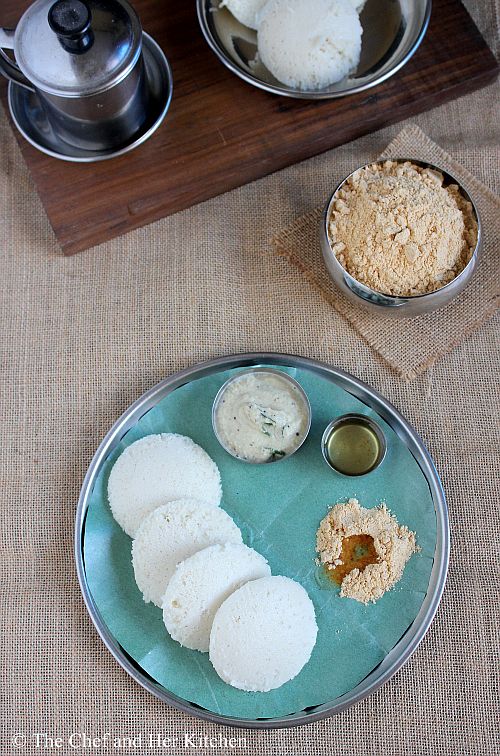
Idli Recipe using Idli Rice Recipe | Idli Batter :
makes 30-32 Idlis
Preparation time: 8 hrs | Cooking time: 15 mins | Total time: 8 hrs + 15 mins
Recipe Cuisine:South Indian | Recipe Category: Breakfast

Ingredients:
4 cups Idli rice(Salem rice)
1 cup whole white Urad dal
3/4 cup Poha(atukulu)
3/4 tsp Fenugreek seeds
Salt to taste

Method:
  • Soak idli rice and fenugreek seeds overnight or at least for 5-6 hrs.
idli batter
  • Soak urad dal and poha in a separate vessel next morning and let them soak for at least 2 hrs.
idli batter
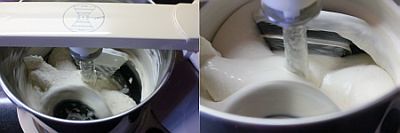
  • Grind urad dal in the wet grinder until it is smooth,soft and frothy.Add enough water(approx 1.5- 2 cups,it took 2 cups of water for me) at regular intervals while grinding the urad dal.It would take approximately 20-25 mins to grind urad batter.The batter should double in size.To test whether the batter is completely done or not,put a small dollop of batter in a vessel of water,if it floats then the batter is done.Remove it from the grinder and put it in a big vessel.
  • Grind idli rice with poha and fenugreek seeds in the wet grinder by adding enough water(approx 1.5 -2 cups,it took 1 3/4 cups of water for me) at regular intervals to a slight coarse paste.You should feel the slight grainy texture of rice when you touch the batter.
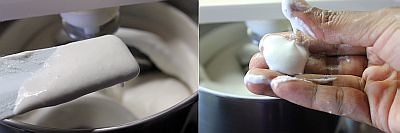
  • Remove the batter and mix the mixture with the ground urad dal and add enough salt to it and mix well with your hand.You can add some water to the wet grinder and add it to the batter to get the desired consistency,the batter should be thicker(not very thick as well) and not thin.Let it ferment for 8-9 hrs.Some times fermentation depends on the weather,so if the weather is cold it might need another an hour or two extra for fermentation.You will get to see the rise in the level of idli batter once it is fermented and it is the indication.
idli batter
  • Take out the required portion of batter(do not mix the whole batter while scooping out) and refrigerate the rest of batter.
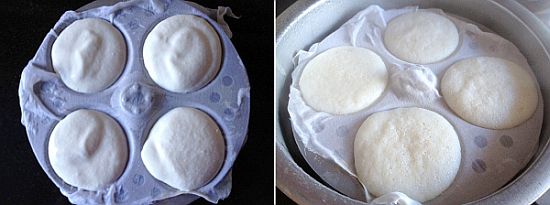
  • Grease the idli plates with oil and pour a ladle of idli batter until each impression is filled 3/4th.You can even line it with a wet muslin cloth and pour the batter on top of it.
  • Steam it in idli steamer or pressure cooker(with out whistle) for 10-12 mins.Let it rest for another 5 mins.
  • With a idli spoon cleanly remove the idlis.Dip the idli spoon in water in between which helps to remove the idlis easily from the plate.If you have used muslin cloth just invert them into the hot box.
  • Keep them in hot box or serve directly on to a plate.Always serve idlis hot.

idli recipe
Notes:
  1. Use an air-tight container for storing the batter.I usually remove the batter into my tupperware container and cover it with a normal loose steel plate while it is fermenting and once it is fermented I cover it with a lid and refrigerate the batter,this way the batter will be fresh and does not turn sour.
  2. Fermentation largely depends on the climatic conditions.In places like Mumbai it takes around 8-9 hours for the fermentation.If you are living in cold place you can even place the batter in a preheated oven and turn the oven light ON,this helps in quick fermentation.If you still have problem with it you can add a ladle of idli batter from the previous batch or ready made idli batter which helps the fermentation process to happen without fail.
  3. The idli batter turns sour quickly if you add salt while grinding the batter and that is the reason few add salt while making idlis.It is your wish to follow which way you want.
  4. I prefer to use whole urad dal,if you do not get it use regular ural dal(broken).But always use good quality fresh urad dal for preparing idlis.
  5. Addition of poha is optional but it gives you very soft and fluffy idlis.You can even use a handful of sago instead of poha for the same.You can even add a handful of cooked rice while grinding which ensures to get the softest Idlis.
  6. If you are using mixer you can use 3 cups of idli rice for 1 cup of urad dal for making idlis.Use cold water while grinding the batter in mixer as the batter tends to get heated while grinding in mixer.
  7. If you use muslin cloth for lining idlis,idlis remain soft for a long time and it does not form any layer on top as well.Though there is a drawback of washing that cloth,hence most of the time I just grease my idli plates and prepare idlis.
  8. Once the batter is fermented do no stir it much which makes the batter looses its air bubbles and in return the idlis will not be softer.
  9. After 2-3 days the idlis might not turn soft with the same batter,you can add a fat pinch of cooking soda mixed with 2 tbsp water into the batter and mix it well and make idlis.Your idlis would be definitely soft.
  10. If your idli batter turn soar,try this Masala Idli which is a perfect fix for the sour idli batter.
  11. You can use the same batter for making paper thin crisp dosas.Add enough water to make the batter little thin and then spread the dosa as thin as possible.
idli
Try these accompaniments for Idli:
    idli recipe
    You can use the same batter to prepare crisp dosas.You need to add enough water to make the batter bit thin and spread the dosa as thin as possible and roast it with either ghee/butter or oil to get crisp dosa.You can fold it in the shape of a cone like how I did,just have a look at it.
    cone dosa

    Tuesday, June 25, 2013

    Usirikaya Pulihora | Amla Rice Recipe

    usirikaya pulihora
    Amla(known as 'usirikaya' in telugu and 'nellikai' in tamil and kannada) is rich in vitamin C and is very essential to include it in our diet frequently.During amla season I usually buy them in bulk and prepare Niluva Usirikaya Pacchadi and store it upto an year so that I can prepare Amla Pacchadi or Amla rice with it.Usirikaya Pulihora(Amla rice) is one of those easy rice varieties which can be made in jiffy and it tastes delicious too.It is a good lunch box option too.
    nellikai chitranna
    Check out other Pulihora variety recipes in my blog here.
    amla rice

    Amla(Gooseberry) Rice | Usirikaya Pulihora | Nellikai Chitranna:
    Serves 2
    Prep time:5 mins | Cooking time:30 mins | Total time:35 mins+cooling time
    Cuisine: South Indian | Category: Rice varieties - Main Course

    Ingredients:
    1 cup Rice (sona masoori or equivalent)
    15 Gooseberries or 3-4 tbsp Niluva Usirikaya pacchadi
    1/4 tsp Turmeric powder
    10-12 Green Chillies
    8-10 Cashew nuts,broken
    1 tbsp Chana dal
    1 tsp Urad dal
    1/2 tsp Mustard seeds
    10-12 Curry leaves
    2 tbsp Oil
    Salt to taste

    Method:
    • Wash and soak the rice for 10 to 15 minutes with 2 cups of water.Prepare the rice either in pressure cooker or rice cooker.Cool the rice completely.
    • Remove the seeds from amlas and cut them in to fine pieces.
    • Slit the green chillies into 2 pieces and keep them ready.
    • Heat oil in a big thick kadai and crackle mustard seeds.Add chana dal,urad dal and cashew nuts and fry until they turn light golden in color.
    • Add slit green chillies,curry leaves and fry well.
    • Add chopped amla pieces and fry for 2-3 mins.Add turmeric powder and mix.Cover it and cook for 6-8 minutes until it is cooked on low flame.Cool the mixture completely.Mash the cooked amla mixture gently with hands to form a pulpy mix.If you are using niluva usirikaya pacchadi,add it and sprinkle some water and let it cook in steam for a couple of minutes.
    • Add the cooked rice to the mashed amla mixture and add enough salt and mix nicely.Adjust the seasoning according to your taste buds.
    Serve it with chips/fryums or sliced cucumber.

    amla rice
    Notes:
    1. I used niluva usirikaya pacchadi(stored ground amla mixture) which we use for making pacchadi instead of amlas in the recipe.You need to cook the amla for sometime otherwise it will taste slightly bitter.
    2. Adjust the number of green chillies in the recipe accordingly.I prefer to make this rice spicy and tangy.
       gooseberry rice

    Monday, June 24, 2013

    Sabudana Tikki | Sago Cutlets | Easy Snacks Recipes

    sabudana tikki
    Sabudana plays a key role during fasts in North India as well as in states like Maharashtra. People prefer eating various varieties with Sabudana like, Kuttu ka Atta,Rajgira etc.I sometimes feel that fasting is like feasting as we get to eat different varieties on that day.Though I have not explored much with "Kuttu ki atta", I mostly use Sabudana and Rajgira in many recipes on those fasting days.While the way the fast is practiced in south India is a bit different, I usually try to follow the customs of both South and North India so that I can try new recipes on those days.
    sabudana tikki
    Other Sabudana recipes in my blog which might be interesting for you:
    Sabudana Tikki | Sago Cutlets Recipe:
    makes 12-14 tikkis

    Ingredients:
    1/2 cup Sabudana/Sago
    2 medium Potatoes
    2 tbsp Rajgira flour or 1 Bread slice for binding
    1/4 cup roasted Groundnuts,coarsely ground
    5-6 Green chillies,finely chopped
    2-3 tbsp chopped Coriander leaves
    1" Ginger,grated
    juice of 1/2 Lemon
    Salt to taste
    Chaat masala,to sprinkle (optional)
    Oil,to fry

    Method:
    • Wash sago twice and add enough water until it is just above the level of Sago.Soak it for 4-5 hrs or overnight.
    • Pressure cook potatoes for 3 whistles until they are soft.Peel the skin and mash them nicely while they are still warm.
    • In a bowl add the mashed potatoes,coarsely ground roasted groundnuts,chopped green chillies,grated ginger,chopped coriander leaves,salt,lemon juice and mix it nicely.
    • Add soaked sago pearls and rajgiri flour(or bread slcie)to it and mix it nicely.Check the binding now and try to make one tikki,if you are not able to make it add little more rajgira flour if necessary.If you are using bread slice dip it in water for 10-15 seconds and squeeze the extra water from it and add it to the potato mixture while mixing.
    • Make tikkis out of the mixture.Do not press the tikkis hard while making,try not to apply any pressure.
    • Heat a tawa and add a couple of tbsp of oil and spread it nicely and place the tikkis and fry them on both sides until golden brown.They cook pretty fast and takes around 2-3 mins on each side.You can even deep fry them if you want.
    • Sprinkle some chaat masala on top,this is optional.
    Serve them hot with Green Chutney and Meetha Chutney or Tomato Ketchup.
    sago cutlets
    Notes:
    1. If you are preparing this during fast you use Sendha namak instead of regular salt and also use rajgira flour or arrow root powder(do not use bread slice) in the recipe and avoid chat masala.
    2. I like to add more green chillies and ginger to sabudana based recipes as they are quite bland and tastes nice only when they are nicely spiced.So adjust the quantity of green chillies accordingly.
    3. The addition of groundnut powder adds a nice taste to tikkis.I usually use my mortar and pestle to crush groundnuts and also I keep them slightly coarse.The bits of groundnuts adds a nice crunch and taste while eating tikkis.
    sago cutlets

    Saturday, June 22, 2013

    Niluva Usirikaya Pacchadi | Preserved Gooseberry Chutney Recipe

    usirikaya pacchadi
    During the season of gooseberries we usually buy the gooseberries in large quantity to prepare Usiri Avakaya(Gooseberry pickle) and this niluva Usirikaaya(preserved  Gooseberry chutney).My MIL prepares a special Amla candy which tastes really nice too.This preserved chutney can be stored for almost an year and can be used to prepare Usirikaya pacchadi,Usirikaya Pulihora or raita when ever needed.The process is quite simple to make and if you have this raw gooseberry chutney you can whip the chutney in no time.

    Niluva Usirikaya | Preserved Gooseberry Recipe:
    shelf life:1 year
    Prep time: 20 mins | Cook time: nil | Total time: 20 mins
    Cuisine: South Indian | Category: Accompaniments

    Ingredients:
    1/2 kg big plump Gooseberries
    2 tsp Turmeric powder
    Salt(roughly 2-3 tbsp)

    Method:
    • Wash and wipe gooseberries and spread them on a kitchen napkin to let the extra water dry off. 
    • Cut the gooseberries into pieces by removing the seeds. 
    • Grind chopped gooseberries with salt and turmeric powder to a coarse paste in whipper mode.Make sure all the pieces were ground.
    • Remove the mixture and store it in a clean glass bottle.This can be stored up to an year.
    Prepare Chutney or Rice with it when needed.

    Notes:
    1. This can be stored for an year and can be used to prepare chutney and rice variety with it.
    2. The amount of salt I mentioned is approximate,please feel free to add the salt accordingly.Also do remember that it should be prepared more on the salty side so that it can be stored for long period as salt acts as a preservative.
    3. Use a clean spoon to remove the required portion and also do not store it in steel containers. 
    4. The color changes over a period of time.
    niluva usirikaya pacchadi

    If you are interested check other gooseberry recipes here.

    Friday, June 21, 2013

    Mango Banana Smoothie | Easy Smoothie Recipes

    mango banana smoothie
    I have posted mango recipes non stop from the last 2 weeks and I hope this would be the last recipe for this mango season unless I prepare something new.Hope you liked my mango recipes and did not get bored of them .Check out my complete list of Mango recipes here.
    Smoothies are one of the easiest breakfast option but somehow I am not a person who can live on smoothie for breakfast.But it is a different story all together during the mango season.I do not mind having smoothies for breakfast everyday provided the smoothie has mango in it.Mango can be paired with various fruits like Mango-Banana,Mango-Strawberry,Mango-Papaya etc and my most favorite combination is Mango-Banana which works well for a Smoothie.
    Smoothies are very versatile,you can add cornflakes or oats to the smoothie while blending and convert a simple smoothie to a wholesome breakfast.Some times I even add dry fruits like cashew nuts or almonds or figs or dates as it adds a nice nutty taste to the smoothie.

    Check out few Smoothie recipes in my blog:
    mango banana smoothie

    Mango Banana Smoothie Recipe:
    serves 2
    Prep time:10 mins | Cook time: nil | Total time: 10 mins
    Cuisine: International | Category: Beverages

    Ingredients:
    1 ripen Mango(Alphonso/Kesar or similar variety)
    1 big ripen Banana
    2 tbsp Sugar or honey *
    1/4 cup cold Milk *
    few Ice cubes,to blend and serve

    Method:
    • Remove the skin and cut the mango and banana into pieces.
    • In a mixer/blender add mango and banana pieces,ice cubes,sugar(or honey) and milk and blend into a smooth puree.Check the sweetness and if needed add extra sugar.
    • If you want you can add more milk to make it bit thin and also adjust the sugar accordingly.
    Serve the chilled mango banana smoothie immediately.You can even top them with ice cubes during serving it. 

    mango banana smoothie
    Notes:
    1. Sugar or honey should be adjusted according to the sweetness of mango and to your desired sweetness.
    2. Milk also is to be adjusted according to your desired thickness.
    3. You can choose the mango varieties like alphonso,kesar,badam,raspuri which tastes best for this smoothie.
    4. You can even add oats or corn flakes while blending the smoothie for a wholesome breakfast.
    5. You can also add nuts like cashew nuts or almonds while blending for a rich and nutty smoothie.
    mango banana smoothie

    Wednesday, June 19, 2013

    Mango Shrikand | Amrakhand | Aamkhand Recipe

    mango shrikand
    One can prepare several desserts with mango ranging from a simple Aamras, Kulfi  to Ice-Cream, Cheesecakes, Souffles etc and of course everything tastes nice -how can a dessert go wrong with mangoes right?? This year I enjoyed the mango season thoroughly.Though I prefer to eat the whole fruit most of the time followed by Mango Kulfi,I prepared few recipes using mangoes so that they can make their way to my blog.
    mango shrikand
    Mango Shrikand is another version of Shrikand prepared in mango season.Mango Shrikand is also known as Amarakhand or Aamkhand,is a popular dessert in Maharashtra and is usually served with Poori.Though we get Amrakhand  easily in the market, I usually do not buy it, as I find it too sweet for my taste buds and I prefer a home made version of it where I can reduce the sweetness.I like Amrakhand mildly sweet with lot of chopped nuts. 

    Check out various dessert recipes with mangoes in my blog.
    amrakhand

    Mango Shrikand | Amarakhand Recipe:
    Serves 4-5
    Prep time: 15 mins | Cooking time: nil | Total time:15 mins + straining time
    Recipe Cuisine: Indian | Recipe Category: Desserts

    Ingredients:
    2 ripen Alphonso Mangoes(or kesar)
    1/2 liter fresh Curd(prepared with whole cream milk)
    1/3 cup Sugar
    1/4 tsp Cardamom powder
    2 tbsp chopped nuts(almonds,pistachios)
    few Saffron strands

    Method:
    • Place a thin muslin cloth on a strainer and pour the curd over it and loosely cover it with the edges of the cloth.Fit the strainer into a clean vessel so that it will collect the whey from the curd.Refrigerate this and let the curd sit in the strainer overnight or for a minimum of 4-5 hrs. You can even hang the curd in a muslin cloth outside but I prefer to refrigerate it as I do not like to turn it sour.The resultant hung curd should be really thick and creamy.
    • Wash and peel the skin of mangoes and cut into pieces.
    • In a blender add chopped mangoes,sugar and cardamom powder and blend to a fine puree.
    • Whisk the hung curd using a wire whisk until smooth.
    • Add the blended mango pulp to it and mix well.You can pass this mixture through a fine sieve to yield smooth shrikand,it is optional though.
    • Crush few saffron strands with your finger tips and add it and mix well.
    • Now check the sweetness and add more sugar if needed.
    • Refrigerate it for 1-2 hrs before serving.
    Garnish it with finely chopped nuts and serve it with hot Puris or Chapati or as a dessert after your meal.
    amrakhand
    Notes:
    1. I usually prefer to use alphonsos for it,but you can even use kesar or any other sweet mango variety
    2. The addition of sugar depends on the sweetness of mangoes,so add accordingly.
    3. You can even add saffron while blending the mangoes.
    4. You can make it slightly rich by adding a couple of tbsp of condensed milk to it while mixing.Also reduce the sugar quantity accordingly.
    aamkhand

    Monday, June 17, 2013

    Mango Thokku | Sweet and Spicy Mango Pickle

    mango thokku
    As promised in my Mango Pickle Post last week,I am posting the Mango Thokku recipe which is my favorite pickle from childhood.We call it as 'Noone Uragaya' at our place.This Mango Thokku(pickle) is a nice combo of flavors and tastes best when well balanced with the right amount of seasonings.My mom used to make a big bottle of this mango thokku as it goes well with Paniyaram, Akki roti, Ragi Rotti , Chakli, Murukku ,Thengolu and any roti,chakli and few breakfast varieties.
    mango thokku
    Check out various Mango pickle posts here:

     Sweet and Spicy Mango Thokku Recipe:

     Shelf life: 1 year
     Prep time:15 mins | Cooking time:1.5 hrs | Total time: 2 hrs
     Cuisine: Indian Category: Pickles

     Ingredients:
     2 large Raw Sour Mangoes(weighs 1 kilo)
     150 gms (1 cup approx) Jaggery,grated
     1/3 cup Red chili powder 
     1 tbsp + 2 tsp Mustard seeds
     1 tbsp Fenugreek seeds
     1 tsp Turmeric powder
     1/4 tsp Asafoetida
     1/4 cup Salt,approx
     1 cup Sesame Oil

     Method:
    • Wash and wipe the mangoes with a dry cloth.Peel the skin of mango and cut the mango into very thin slices as shown in the picture.You would get roughly 5-6 cups of mango slices with a kilo of mangoes.

    • Dry roast 1 tbsp mustard seeds and fenugreek seeds separately until they turn fragrant and cool them and grind to a fine powder.
    • Heat oil in a thick large kadai and crackle 2 tsp mustard seeds and asafoetida. 

    • Add the thinly cut mango slices and fry them for 2-3 mins until the oil coats the mango slices.Continue frying them until the mango pieces start becoming soft,once it becomes soft add turmeric powder and grated jaggery to it and mix well.Let it cook on low flame for 15-20 mins until it forms a thick mass,keep stirring in between.

    • Add red chili powder,salt,roasted mustard-fenugreek powder to it and mix well.Taste the pickle a bit now and adjust the seasoning like salt, red chili powder or jaggery if necessary, it should be a good balance of salt, spicy, sour and sweetness.Let it cook for another 10-15 mins until the pickle forms like a big bowl and oil separates from the pickle.It starts leaving the pan with out sticking to it which is an indication that the pickle is done.You would see small mango bits in the pickle,but it is fine.

    • Let the pickle come to room temperature.
    • Store it in air tight sterilized bottles.It can be stored for an year under normal conditions if handled properly or you can even keep it in refrigerator and store it.
     Serve it with Khakras/ Roti/ Chapati/Paniyaram/ Thengolu/ Chakli/ Murukku/ Thalipeeth/ Akki roti/ Ragi Rotti.

    Notes:
    1. Because of the addition of jaggery this pickle turns to dark brown in color.
    2. Always transfer a small portion of pickle into a small jar and use a clean and dry spoon.
    3. The most important part of the recipe is to balance the salt,spicy ness,and sweetness with the sourness of mangoes which makes a tasty pickle.Hence I suggest you to taste it once or twice after you add all the ingredients to the pickle and balance the pickle accordingly.
    4. This pickle would be sweet and spicy at the same time and goes well with Thengolu/ Chakli/ Murukku/ Thalipeeth/ Akki roti/ Ragi Rotti.
    mango thokku

    Friday, June 14, 2013

    Totapuri Mango Chutney | Easy Chutney Recipes

    mango chutney
    Totapuri mango is one variety which can be eaten raw as it is slight sweet and sour in taste.It is usually sold in front of parks,schools etc where the vendors would drizzle a liberal amount of masala(salt,chili powder with a hint of sugar) on the mango pieces and I must say that the combination is a bliss!!I am sure many of you would agree.
    In Bangalore, we get really good ones which tastes better than the ones we get in Mumbai.But when ever I find them in market I usually buy them to relish them raw with salt and chili powder or prepare this mango chutney or instant pickle.You can even use totapuri mangoes in salads,bhel puri etc.
    Coming to today's post,this is a very simple and quick chutney made up of totapuri mangoes.Please make a note that you cannot substitute Totapuri mango with any other variety in this recipe.You can prepare this chutney in two ways - you can grind it in whipper mode to retain tiny bits of mango pieces or you can grind it into a smooth paste.It tastes good either ways.I like to prepare coarse chutney with mango pieces which is best suitable with Curd rice and I make it smooth if I want to use it as a dip or serve with any breakfast variety.This chutney is not suitable to mix with rice,if you want to prepare mango pacchadi for rice,check out my Mango-Coconut Pacchadi recipe which tastes best with rice.

    Check out few recipes using totapuri mangoes in my blog.
    mango chutney

    Totapuri Mango Chutney Recipe:
    shelf life: 3-4 days
    Preparation time: 10 mins | Cooking time: nil | Total time: 10 mins
    Recipe Cuisine: Indian | Recipe Category: Chutney|Pacchadi

     
    Ingredients:
    1 Totapuri raw Mango
    4-5 Green chillies
    1 tsp Sugar
    Salt to taste

    to temper:
    1 tsp Oil
    1/2 tsp Mustard seeds
    5-6 Curry leaves
    a pinch of Asafoetida(strong rock variety)

    Method:
    • Wash and peel the skin of mango and chop it into small pieces roughly.
    • Grind the mango pieces with green chillies,salt and sugar in the mixer to a coarse paste.Check the taste and adjust seasoning if required.Here you can grind it in two ways- you can grind it in whipper mode to retain tiny bits of mango pieces or you can grind it into a smooth paste with the addition of little water if needed.It tastes good either ways.
    • Heat oil in a small tempering pan and crackle mustard seeds and add curry leaves and asafoetida and switch off the flame.Add this tempering to the mango chutney.
    Serve it as an accompaniment with khakras/rice/roti/ Curd rice/dosa/paniyaram etc.

    Notes:
    1. Use only totapuri mango variety for this,other varieties would not suit for this chutney.
    2. This chutney is a nice blend of flavors,hence taste the chutney once when you grind and adjust the salt,sugar and spicyness of chutney.
    3. You can prepare the chutney in two ways- you can grind it in whipper mode to retain tiny bits of mango pieces or you can grind it into a smooth paste with the addition of little water if needed.It tastes good either ways.I like to prepare coarse chutney with mango pieces which is best suitable with curd rice and I make it smooth if I want to use it as a dip or serve with any breakfast variety.
    4. This chutney is not suitable to mix with rice,if you want to prepare mango pacchadi for rice,check out my Mango-Coconut Pacchadi recipe which tastes best with rice.
    5. You can store it in an air tight container for 3-4 days in refrigerator.
    mango chutney

     
    back to top