Thursday, January 28, 2010

Gunta Ponganalu/Appe/Paddu/Paniyaram

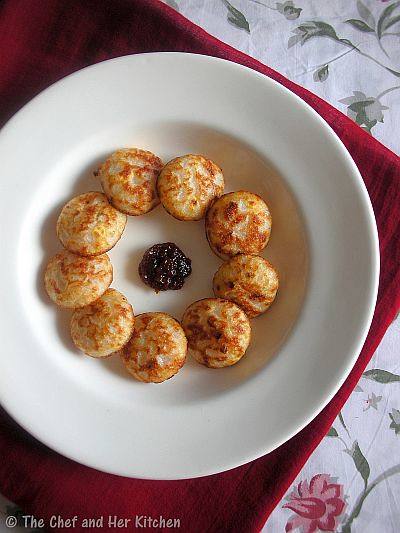
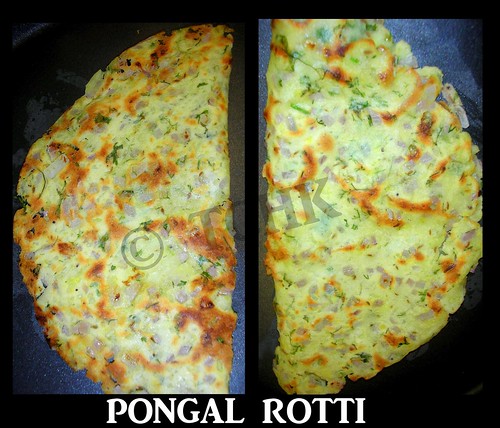
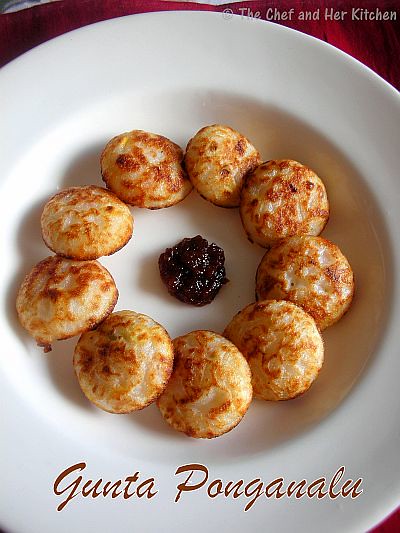
Every place has given a unique name to these delicious golden fried balls like gunta ponganalu in telugu,appey/paddu in kannada and paniyaram in tamil.This is one of my favorite breakfast which I prefer making it on a weekend to enjoy these hot,crispy and yummy balls.You can even prepare with left over dosa batter,these taste better when the batter turns very sour.These balls turn out very crispy on the outer side and soft inside.This is a ideal breakfast to pack for your kids lunch box and can also be served as a snack.Here,comes the yummy recipe.

Ingredients:
2 medium onions,finely chopped
1 medium carrot,grated
1/4 cup chopped coriander
3 tbsp soaked chana dal(atleast for 1 hr)
1 sprig of curry leaves,finely chopped
2 tsp green chilli paste,coarsely ground
salt to taste
oil for frying

for Batter:
2 cups Idli rice
1/2 cup levelled urad dal
1/2 cup levelled rice flakes(beaten rice)
1/2 tsp methi/fenugreek seeds
salt to taste

for tempering:
1 tsp oil
1 tsp mustard seeds

Method:
  • Soak the rice and dals with fenugreek seeds separately for 4-5 hrs.Soak rice flakes in enough water for 1/2 hr.
  • Grind soaked urad dal and rice flakes in wet grinder until very smooth and fluffy mixture.Remove it and keep aside.
  • Now grind the rice until it is almost done,slightly coarse mixture.Mix both the mixture and add enough salt to it and let it ferment overnight.
  • Add finely chopped onion,grated carrot,green chilli paste,soaked chana dal,chopped curry leaves and coriander to it and mix well.
  • Heat 1 tsp of oil in a small tadka pan and crackle mustard seeds in it and add that to the batter and mix well.
  • Heat the paniyaram/gunta panganalu pan/Aebliskever pan and add few drops of oil in it.when it is piping hot pour the batter using a table spoon until it covers 3/4 th and pour some more oil over it and cover it with a lid.Let it roast on medium flame until golden brown in color.
  • After a couple of minutes using a fork or sharp knife run around the edges of each paniyaram and turn to the other side and roast until golden brown on both the sides.
  1. You can even add finely chopped spring onions to the batter.
  2. You can use left over dosa or Idli batter to make these paniyarams.
  3. If your paniyarams are not turning out crispy add a couple of tea spoons of barik rava/hollige rava to the batter before making paniyarams.

Monday, January 25, 2010

Aratikya Ava Pettina Kura...Raw Plantains cooked in mustard paste

These days if I ever get to visit any book store my concentration is more on the cook book's section rather than any other section.During one of my such visits a couple of months back,this book called "Cooking at home with pedatha" caught my attention as I have read about this book in a couple of blogs.This book is quite interesting for anyone who loves to try traditional and authentic Andhra recipes.When I was just flipping through the recipes this recipe seemed very interesting because of the blend of ingredients used in the curry and I quickly noted down the recipe in my mind which I tried almost immediately the next day so that I wont forget the recipe but forgot to post immediately.All I remember was that the curry was very simple and loaded with lots of flavors from mustard and coriander.This post was sitting in my drafts from almost several months and as I said I am clearing off my drafts in the coming weeks I thought of posting this recipe too but I forgot the recipe.When I searched the internet for the recipe luckily I found the same recipe here which helped in refreshing my memory.So here I am reproducing the recipe for you guys and also for my future reference.

Ingredients:

2 plantains(raw banana)
a pinch of turmeric
salt

To grind :
2 tsp mustard seeds
1 tbsp raw rice
1/4 cup fresh grated coconut
5-6 green chilies
1 " ginger ,chopped
1/4 cup chopped fresh coriander
salt to taste

For tadka:
1/2 tsp mustard seeds
1 tsp urad dal
1 tsp cumin seeds/jeera
a sprig of curry leaves
a pinch of asafoetida(hing)

Method:
  • Chop raw banana into 1/2 " cubes and immerse them in water.Boil them in salted water mixed with turmeric until it is cooked completely.Drain and keep them aside.
  • Soak raw rice and mustard seeds in warm water for around 15 mins.
  • Grind the ingredients mentioned under the section To grind to a coarse paste adding some water if required.Take care of the addition of salt as we are adding salt when cooking the plantains.
  • Heat oil in a skillet/pan and crackle mustard seeds and jeera.Add urad dal and fry until light golden in color and then add curry leaves and hing and fry for a minute.
  • Add ground paste to it and fry until the raw smell goes away and now add cooked plantain pieces to it and mix well.Sprinkle some water over it and cover and cook for 5 mins on low flame.
Serve it hot with rice and ghee.

Wednesday, January 20, 2010

Sabsige soppu Chitranna / Fresh Dill leaves rice

Eating greens is always a healthier option for healthy life style.My mom used to include lots of green in our diet right from our child hood but these dill leaves were not available at my place.When ever we used to go to my grany's place for holidays I used to see these greens in the local markets/sabji gaadiwaala's there and I loved the fancy look of these leaves(looks like christmas tree leaves for me..he he)and we used to eat various dishes made out of these greens there in my grany's place.
Here in Mumbai these greens are easily available and so I started exploring more recipes using these greens.I got few recipes from my mom in which these greens are used and here comes the first recipe which I tried using dill leaves.This is like our usual chitranna(lemon rice) just that the addition of onions and dill leaves will completely change the flavor of rice.Dill leaves have very strong flavor and so they need to be well sauted or nicely cooked before using it in any dish.

Ingredients:


1 medium bunch fresh dill leaves / Sabsige soppu (approx 1/2 cup when chopped)
1 cup Regular rice

1 big onion,sliced thin

6-7 green chillies,slit
2-3 tbsp groundnuts

1/4 tsp turmeric powder

1 lemon,squeezed
2 tsp chana dal
1 tsp urad dal

1/2 tsp mustard seeds

a sprig of curry leaves
2 tbsp oil

salt to taste


Method:
  • Cook rice with 2 and 1/4 cups water in pressure cooker.Cool the rice slightly by spreading it over a wide plate.
  • Wash and chop dill leaves into fine and keep it aside.
  • Heat oil in a big kadai and crackle mustard seeds and add ground nuts and fry for a couple of minutes until they are fried and the skins start splitting up.Add chana dal and urad dal to it and fry again for until they turn light brown in color.
  • Add green chillies,curry leaves and fry until they wither.
  • Add finely sliced onion and fry for a couple of minutes until translucent.Now add chopped dill leaves and fry for a couple of minutes.This process takes some time,the raw smell of the leaves should go away otherwise it tastes very raw.Sprinkle some water while frying if necessary.
  • Add turmeric powder to it and mix well.Now add cooked rice,salt and lemon juice and mix well until everything is incorporated properly.
Serve it warm or at room temperature with some chips/murukku and dahi.

Variations to the rice:
  • You can avoid ground nuts and add fresh peas instead and follow the same procedure.
  • You can avoid onions in the above recipe if you want.

Monday, January 18, 2010

Mooli Paratha or Radish Paratha

My knowledge for parathas was limited only to few varieties like Aloo paratha,gobi paratha,paneer paratha and mooli paratha before marriage. Hubby is very fond of parathas as he was completely brought up in Delhi and he introduced me to various varieties of paratha's and I actually started liking parathas only after marriage.Here in Mumbai,there is a place called "Only Parathas" for all the paratha lovers,they have an amazing range of parathas with single layer,double layer and single filling,double filling or multiple choice of fillings and served with kala chana, Dal makhani, raitha, pickle and onions.We end up visiting that place atleast once a week as both of us are very big fans of their yummy parathas.
And coming to today's post I am posting a simple paratha which is stuffed with a mixture of grated radish paired with some spices .Radish is very strong in flavor when compared to other vegetables and because of this some people might not like to use it in their cooking.But radish/mooli when paired with ajwain will reduce the flavor from mooli to a great extent and also enhances the taste of paratha.

Ingredients:


for Outer covering:

2 cups Whole wheat flour

2 tsp Oil
Salt to taste

ghee/butter
water to mix the dough

for Filling:
5-6 big Radish/mooli
5 Green chillies,finely chopped
3 tbsp chopped Coriander

1/2 tsp ajwain/carom seeds
1 tsp Jeera powder

1 tsp Coriander powder

1/2 tsp
Garam masala
1/2 tsp dry mango powder
/Amchur
salt to taste

Method:

To make dough:

  • Take wheat flour in a bowl,add enough salt to it and mix well.
  • Make a well in between and pour enough water and slowly mix in the dough until it forms soft dough.
  • Smear oil over it and knead again into a smooth elastic dough and cover it with lid and keep it aside for half an hour.
To make Filling:
  • Grate radish and add some salt to it mix well and keep it aside for 15 mins.Squeeze out the water completely and leave it aside for some more time.Ssqueeze it again to remove all the moisture from the radish.You can add this squeezed out water while mixing the dough so that the taste of radish retains inside the paratha.
  • Add ajwain,finely chopped green chillies,chopped coriander,coriander powder,jeera powder,amchur powder and garam masala to it and mix well.do not add salt to it as it leaves the water in the mixture which makes it difficult while rolling.
To make paratha:
  • Take a big lemon sized dough ball and make into a cup shape using your fingers.Run your fingers in the wheat flour which eases the process of making cup.Make the cup in such a way the edges are thin and the center portion is thicker.(Or you can simply the roti to around 3 inches dia and place the filling and get all the edges together and seal and roll it again into a 6" diamenter paratha.)
  • Place the radish mixture in the center until it stuff the dough cup completely.Bring both the edges together and seal it and then make in the form of sealed pouch and slowly flatten it and roll it gently into thick paratha.Do not apply much pressure while rolling otherwise the filling may come outside.
  • Fry it on tawa on both side smearing oil until it forms dark brown spots on it.Grease it with ghee or butter at the end.Frying paratha's take longer time than roti's as they are quite thick and needs to get cooked evenly.
Serve it hot with Achaar,Boondi raitha and Green Chutney.
For the Mirch Achaar's recipe check here.

Note:
  1. You can even add jeera or ajwain to the dough for outer layer while mixing,which gives different taste.
  2. Make the dough little softer than the roti dough,it helps in sealing the edges properly and also avoids the filling from spilling out.
  3. Roll the paratha's thicker than the chapathy's/roti's and fry them for long until crisp.
  4. Avoid butter and ghee for a Vegan version.Use oil instead.

Friday, January 15, 2010

Pongal Rotti....Make over to Left over pongal


Happy Makara Shankranti Wishes to all ...!!!
I hope every one have enjoyed the Pongal festival with all the festive food.As this is the first festival in the year all are very enthusiastic and would be looking forward to celebrate the festival.Traditionally in our house we prepare sweet/sakkara pongal and paal pongal and we also do mixed vegetable and lentils sambar to go along with paal pongal.The tradition of making sweet and khara pongal on this festival every year is quite common all over the country and especially in south India.Pongal gets hardened after some time and I would not prefer having left over pongal later in the day.Whenever there was a left over pongal at home my mom used to do a quick make over to it and completely transforms the hard looking left over pongal into hot,crispy and yummy rotti's for dinner.These pongal rotti's taste similar to akki rotti and they are very easy to make and taste best when you have it piping hot right off from the pan and on to the plate.Hope you guys try it with left over pongal and enjoy these rotti's like me.
Ingredients:


1 cup left over khara pongal

1/3 cup
Rice flour
1 big onion,finely chopped

3 tbsp finely chopped coriander

1 tsp cumin seeds/jeera

1/2 tsp green chili paste

salt to taste


Method:
  • Mash pongal slightly if it is necessary.
  • Add rice flour,finely chopped onions,chopped coriander,cumin seeds,green chili paste and salt to taste and mix properly.Add little water if required to bind it into a rotti dough.
  • Take a big lemon sized ball and pat the rotti with your hands on a greased pan/bandli into a thin layer.pour oil all over the rotti and cover it with lid and keep it on medium flame and roast it until crispy and brown.
Serve it hot with any chutney/pickle/thokku and masala dahi.

Note:
You can even add carrot or finely chopped spinach or grated cucumber or grated coconut or grated bottle gourd or finely chopped spring onions to the above dough.

Tuesday, January 12, 2010

Ragda Patties.....popular Street food..!!!

Ragda patties is a popular street chaat in India especially in Mumbai and Delhi.Hot tikki's are covered with piping hot ragda and drenched in green and Imli chutney's and sprinkled generously with sev make this chaat more appetizing and tastes yummier.I love this chaat a lot and I always end up making this in large proportion and serve as dinner at home.If you are a regular follower of my blog,seeing these framed pictures you would have understood by now that this is a very old post and was sitting in my drafts for over 7 months.Finally I have decided to clear off my drafts before I start posting the newer one's.So for the next few weeks you will get to see my older posts getting published with a very amateurish photography(my initial stages of learning photography for blogging).I will update the new pictures definitely when I get a chance to cook them again definitely.Finally here comes the recipe of this popular yummy street Chaat to try in your kitchen's.

Ingredients:
2 medium onions,finely chopped
2 tbsp chopped coriander
1 large tomato,finely chopped
3 tbsp beaten curds
1/4 cup fine sev/bhujia
1/2 tsp roasted jeera powder
1/2 tsp sugar
salt to taste

For Patties:
3-4 Big potatoes(Alu)
2-3 Bread slices
1 tsp chilli powder
1/2 tsp garam masala
1 tbsp chopped coriander(optional)
Salt
oil for shallow frying

For Ragda:
1 1/2 Cup yellow dry Peas
2 medium onions,finely chopped
1" Ginger
5-6 cloves of garlic
1 tsp red chilli powder(can be replaced by 3-4 green chillies)
2 tbsp chopped coriander
1/2 tsp turmeric
1/2 tsp Garam masala
1 tsp roasted cumin powder
1 tbsp Amchur powder(can be replaced by 2 tbsp tamarind pulp)
1 tsp Cumin seeds
a pinch of hing
Salt to taste

For Green Chutney:
1 cup Coriander leaves
1/2 cup mint leaves
4-5 green chillies
1" ginger,chopped
1 lemon,squeezed
salt to taste

For Tamarind Chutney:
1/4 cup tamarind pulp
7-8 seedless dates
1/4 cup grated jaggery
1 tsp black salt/kala namak
1/2 tsp roasted cumin powder
1/2 tsp red chilli powder
salt to taste(add less)


Method:

For making Patties:
  • Boil the potatoes or pressure cook for 2 whistles.Cool them,mash or grate potatoes in a bowl and keep it aside.
  • Cut the brown edges of bread and slowly dip in water for few seconds and squeeze out extra water from it.Add the squeezed out bread chunks to the potato mixed and season with enough salt.
  • Add red chilli powder,garam masala and coriander to it and mix well.
  • Make Patties(either round,heart or oval shaped ones) around half inch thickness and keep them aside or keep in refrigerator for an hour.
  • Take a wide bottom tawa/pan pour oil over it and shallow fry the tikki's until golden brown on both sides over medium heat.(I did it on the hot pan/tawa with minimum oil usage)
For making Ragda:
  • Soak the yellow peas overnight and pressure cook with little salt and turmeric for 1-2 whistles.Do not pressure cook for long otherwise it will become very mushy.
  • Grind Ginger,garlic,green chillies and coriander to a fine paste.(if green chillies are not used,do not add them).
  • Heat oil and fry the finely chopped Onions till brown,now add the ground paste and fry until the oil leaves the sides and now add cooked peas and enough water and boil it until the gravy thickens,slightly mash some peas to get a thick and nice gravy.
  • Add garam masala,roasted cumin powder,amchur powder,turmeric and enough salt to it and mix well.
  • Keep it simmered while the patties are almost ready.
  • Taste the ragda at this stage and adjust the salt,spicyness and sourness according to your taste.
For making Green Chutney:
  • Wash coriander and mint leaves and drain them completely.
  • Grind the leaves with remaining all ingredients(chillies,ginger,lemon juice and salt) to a smooth paste.
  • You can store this in refrigerator in an air-tight bottle up to a week.Make it in a large proportion and you can even pour them in ice cube tray and freeze them to form ice cubes which can be stored for months together.
For making Tamarind Chutney:
  • Boil tamarind pulp with chopped dates and jaggery until it forms a thick syrupy liquid and cool the mixture completely.
  • Grind it into a fine paste and bring it to a boil again and add red chili powder,kala namak/black salt,roasted cumin powder and salt to it and mix well.
  • Cool the mixture and pour them in air-tight bottles in refrigerator for months together.
Assembling them together:
  • Beat curds with sugar until uniform and smooth.
  • Arrange two patties on a serving plate and pour hot ragda over it.
  • Sprinkle with onions and tomatoes over the ragda mixture.
  • Drizzle green chutney,beaten curds all over and generously drizzle tamarind chutney over it.Add the chutney's according to your taste buds.
  • Sprinkle roasted cumin powder and a pinch of salt and generously sprinkle sev over it.
  • Garnish with coriander.
Serve hot immediately.

Saturday, January 9, 2010

Kaakarakaaya nuvvupindi koora /Bitter gourd sesame fry

As I mentioned earlier,bitter gourd is seen regularly at our place as hubby likes this vegetable a lot.I have not seen anyone who is crazy about this vegetable,he can eat any variety cooked with this vegetable for rice/roti or as a starter(yes..,u heard it correct..he likes thsi vegetable so much..).Even though I am not a big fan of this vegetable I keep on experimenting this vegetable especially for my husband.I saw the recipe in Mallika Badrinath's book and liked the idea of adding sesame powder to the vegetable and the end product was even liked by me as it was not at all bitter.The bitterness from the bitter gourd is reduced by prior cooking process marinating and cooking in tamarind mixture and the addition of sesame powder added extra taste to the curry which suits perfectly with rice.If you are a bitter gourd lover like my husband you can give a try just for change.This recipe is sitting in my drafts from so many months,thought of posting it as it perfectly suits for priya's own event which is calling for "cooking with seeds-sesame seeds".

Ingredients:

4-5 Bitter gourds
1 medium onion,finely chopped
1 tbsp Sesame seeds
1/4 tsp turmeric powder
1/4 cup thin tamarind pulp
1 tbsp grated jaggery
1 tsp red chilli powder/sambar powder
1 tsp coriander powder
1/2 tsp mustard seeds
2 tsp oil
Salt to taste


Method:
  • Wash and wipe bitter gourds,cut it into half lengthwise and remove the seeds and slice into thin half moon pieces.Add some salt and turmeric powder to it and mix well,leave it aside for half an hour and squeeze the water from it and keep aside.
  • Mix tamarind pulp with salt,turmeric and enough water and let it boil and add the bitter gourd pieces and cook until soft.Drain the pieces and let them cool.This process helps in removing the bitterness of bitter gourd.
  • Dry roast sesame seeds until they bulges up,cool them and grind it to a fine powder.
  • Heat oil in a pan and crackle mustard seeds,curry leaves and then onion and fry till transparent.
  • Add dhania powder,chilli powder to it and fry for a minute.
  • Add bitter gourd pieces to it and fry on high flame until it changes its color.Add salt,jaggery and fry again for a couple of minutes.
  • Sprinkle sesame powder and mix well and remove from the stove.
Serve it hot with hot rice and ghee.

Thursday, January 7, 2010

Matar/Mutter Paneer

Hubby is a very big fan of paneer,so he insists me to prepare paneer dishes very frequently at home.Paneer in any form either in curries,rolls,gravies,pulao's,stir-fries,tikka's,soup's,salad's,sweets,paratha's or simple fried panner is very much loved by both of us and ofcourse who says NO to this yummy vegetarian delight.These days I have reduced using paneer at home because of its high calories,but including paneer in our diet regularly helps in attaining some essential proteins which vegetarians do not get in other food stuff.You can make this dish very creamy or low-cal curry according to your necessity.Matar paneer is a classic recipe and always turns out good even when no cream or nut paste is added to the gravy as the paneer itself gives nice taste to the curry.

Ingredients:

250 gms Homemade Paneer (or store bought),cut into 1" thickness pieces
3/4 cup fresh/frozen green peas,boiled
3 medium ripen tomatoes
2 medium onions,sliced
1" ginger,chopped
4-5 garlic pods,chopped
12-15 cashew nuts or 1/4 cup water melon seeds
1/4 cup fresh cream
1 tbsp tomato ketchup
a pinch of turmeric
1/2 tsp Garam masala
1 1/2 tsp kashmiri red chilli powder
1 tsp coriander powder
1/2 tsp jeera powder
1/2 tsp kasuri methi
1/2 tsp jeera
salt to taste
a pinch of sugar
2 tsp oil,oil for deep frying
1 tsp butter


Method:
  • Deep fry paneer pieces until light golden brown in color,drain them and immediately drop them in a bowl of water until its usage.This process will keep the paneer pieces soft.(Here,I did not deep fry the pieces,instead I fried them on both sides in a tawa applying a bit of oil on both sides and then soaked them in water)
  • Make a cross on tomatoes and blanch them in hot water for 3-4 mins.Remove the skin and chop them roughly.
  • Blanch the cashew nuts in the same hot water for a couple of minutes and remove them.
  • Heat 1 tsp oil in a pan and fry ginger and garlic pieces until slight brown,add sliced onions and fry until it is brown in color.Add a pinch of sugar while frying onion,it speeds up the caramelize process of onion.Let this mixture cool a bit.
  • Grind the onion mixture and chopped tomatoes into a very fine paste adding water if required.
  • Grind the cashews also to a very fine paste using the same water in which it is soaked.
  • Heat 1 tsp of oil in the same pan and crackle jeera and then add the pureed onion-tomato mixture into it and add coriander powder,jeera powder,turmeric,enough salt and let it come to a boil.
  • Add the finely ground cashew mixture and mix well,let it cook for a couple of minutes.Add more water to get the right consistency.
  • Now add paneer pieces,boiled green peas,tomato ketchup,red chili powder,garam masala and kasuri methi(slightly roast it on pan and crush it with your hand before adding) to it and mix well.
  • Stir in fresh cream and let it come to a boil on low heat and turn off the flame.( Here I did not add cream to the gravy)
  • Add butter to it and garnish with coriander.Adding butter atthe end will enhance the taste.
Serve it hot with Roti's/Paratha's/Naan/Kulcha/Jeera chawal/pulao.

Note:
  • I added watermelon seed paste instead of cashew paste as the fat content in water melon seeds is lesser than the cashew nuts.More over the taste provided by water melon paste to the gravy is better than the cashew nut paste,it gives a particular dhaba style gravy.
  • You can avoid cream in the above recipe and add little milk instead or completely avoid it for low-fat version.

Check out other Paneer recipes in my blog:

Monday, January 4, 2010

Vankaaya Ullipaya Kaaram / Stuffed Brinjal with Onion

Stuffed brinjals are famous in Andhra Pradesh,we generally make different kind of stuffings for brinjal like ulli karam(Onion spice paste),kothimeera kaaram(coriander spice paste) and gutti vankaya(filled with spice powder mix).I learnt this stuffed brinjal from my MIL when she visited us last time.This is a very simple and tasty curry which can be prepared with easily available ingredients at home,and if you are a onion lover like me you are definitely going to love this.When I posted this recipe,many of you liked this stuffed brinjal more than the dal I posted(..ha..ha..) and have requested for the recipe,so here comes the recipe of this simple and yummy brinjal curry for you gals especially.

Ingredients:


6-8 small Brinjals

2 medium onions,roughly chopped
2 garlic pods(optional)
1 and 1/2 tsp red chilli powder(add according to your spice level)
1/2 tsp tamarind pulp
a pinch of turmeric
1/2 tsp mustard seeds
5-6 curry leaves
1 tsp chopped coriander
salt to taste

Method:
  • Wash and wipe brinjals and slit into 4 keeping the stem intact and immerse it in salted water.
  • Grind onion,red chilli powder,salt,tamarind pulp,turmeric and garlic pods to a coarse paste.
  • Heat 1tbsp oil in a kadai and add the ground paste and fry until the raw smell goes away(approximately 8-10 mins).Remove the paste and keep it aside.
  • In the same kadai heat 1 tbsp oil and drop the brinjals carefully in the oil and fry for 2 mins.Add little salt while cooking.
  • Cover it with a lid and pour some water into it and simmer the flame and let it cook for 8-10 mins until brinjals are tender and cooked.Switch off the flame and let them cool and stuff the brinjals with the fried onion mixture.
  • Heat a tsp of oil in the same kadai crackle mustard seeds and curry leaves and place the stuffed brinjals back in it and add remaining onion mixture to it and fry on medium high flame for 5-6 mins until it is evenly browned.
  • Garnish with coriander.
Serve it hot with hot rice and ghee or roti's.

Note:
1.You can follow the same process for making Tindora/Tendli ,Bitter gourd and Lady's finger.Cook the vegetables until they are tender based on the cooking time required for it and stuff it with the mixture.
2.The onion spice mixture can be used as a chutney for dosa,it tastes very nice when spread on the dosa.

Friday, January 1, 2010

Kopra pak..Kobbari Mithai..Coconut Burfi...Happy New Year to all..!!


First of all lemme wish you all a HAPPY and PROSPEROUS NEW YEAR..!!!

Let us start the new year with a sweet post wishing this new year brings lots of happiness,health,wealth and fun in our lives.Kobbari Mithai is one of my favorite sweets as it is loaded with lot of nuts along freshly grated coconut and when mixed with sugar/jaggery makes an excellent combo.Even though the process is time consuming and bit difficult in scraping the coconut and making the syrup and stirring the mixture constantly,the end product is all worth the effort you put in it.These Burfi's are very soft to bite in and the crunchy nuts add the extra kick to this sweet.Let us get into the recipe soon before we get more tempted to take a bite..

Ingredients:

1 big coconut,grated fresh only white part(it yields 3 cups approx)
2 cups sugar
1/2 to 3/4 cup milk
20 cashew nuts,chopped
1/4 cup raisins(optional)
3 tbsp ghee for fudge
1 tbsp ghee for frying nuts
1 tsp ghee for greasing

Method:
  • Grate the coconut carefully,scrape only the white part leaving the brown edges behind in order to get an appealing snow white burfi.
  • Heat 1 tbsp ghee in a small pan and add chopped cashew nuts and fry until light brown in color.Remove them and add raisins and fry until it forms a bubble.Remove them and keep aside.(I did not use raisins here,just added only cashewnuts)
  • Grease a rectangular plate or square cake pan with ghee and keep it aside.
  • Mix milk and sugar in a thick wide bottomed vessel and place it on medium heat and let it come to boil.Let the sugar dissolves completed and blends well with milk and forms syrupy liquid(to reach one-string consistency).Using milk instead of water makes the burfi looks more white in color.The process of achieving string consistency syrup liquid is important in order to make a proper burfi.
  • Now add grated coconut and 3 tbsp ghee to it and stir well.Let it cook by stirring it constantly until the edges of the mixture in the vessel is bit dry and flaky.It approximately takes 10-12 minutes.
  • Now remove the mixture and spread it roughly on the greased plate/tin around 1/2" thickness.Sprinkle the fried cashews and raisins all over and gently press them all over with the ladle.
  • Level it using a flat ladle and let it cool and set for some time for about half an hour.
  • Run the knife to make markings in the burfi mixture.After some time carefully remove the burfi's.It approximately yields 24 square burfi's.
Store it in air-tight containers,stays good upto 5 days to 1 week.If you want longer shelf life keep them refrigerated.I am sure it will not last that longer,they are surely irresistible and would be over within 2 days.

Image source:google
 
back to top