Monday, December 28, 2015

Aloo Choliya Recipe | Aloo Hara Chana | Hara Chana Recipes

aloo hara chana
Winters are here and the markets are full of fresh winter vegetables.Fresh Chickpeas is known as Choliya which is also called as hara chana in hindi and is available abundantly during winters.Though its time consuming to clean and shell the fresh Chickpeas but its really worth for the taste and freshness of these winter vegetables. My mom used to roast these fresh chickpeas in pods with salt until they turn slight black and the skin wilts.It used to be fun to shell out the chickpeas from the hot pods and eat them warm with a gossip session with the family members.
aloo hara chana
Aloo Choliya is popular in North India and is a must prepare winter delicacy. It can be paired with steamed or hot phulkas, but one needs to adjust the consistency of gravy. I usually prefer a thinner version when it is to be served with rice and a slightly thick and creamy version when served with rotis.The preparation process of Aloo Choliya is very similar to Aloo matar and is a very simple recipe which can be directly prepared in cooker.
aloo choliya
I have posted few recipes with Choliya earlier - Choliya Paneer Curry and Choliya Pulao if you are looking out for few more interesting recipes with Choliya. You can even prepare a simple Choliya salad with tomato-onion which tastes delicious in its own way. Utilize this winter season and prepare various varieties with these fresh ingredients.
aloo choliya

potato fresh chickpeas curry

Check out various Winter recipes in my blog:
potato fresh chickpeas curry

Aloo Choliya | Potato-Fresh Chickpeas Curry Recipe:
Serves 2-3 | Author- Prathibha Garre
Prep time: 10 mins | Cooking time: 20 mins | Total time: 30 mins
Cuisine: North Indian | Category: Gravy/Sidedish

Ingredients:
2 Potatoes,diced into cubes
1 cup fresh Chickpeas/Choliya
1 Onion,sliced
2 Tomatoes,chopped
1/2" Ginger
4-5 Garlic cloves
1 tsp Red chilli powder
1/2 tsp Coriander powder
1/4 tsp Cumin powder
1/2 tsp Garam masala
1/2 tsp Amchur powder
1/2 tsp Turmeric powder
2 tbsp chopped Coriander leaves
1/2 tsp Cumin seeds
Salt,to taste
2 tbsp Oil

Method:
  • Grind onions ,chopped tomatoes, garlic and ginger to a smooth puree.
  • Heat oil in a pressure cooker and crackle cumin seeds.Add the ground Onion-tomato paste and fry until the masala leaves the oil over the edges.
  • Add coriander powder, cumin powder, red chili powder, turmeric powder and fry a couple of minutes.
  • Add fresh chickpeas and potato cubes and fry for 2-3 mins in the masala.
  • Add salt, amchur powder,garam masala and few coriander leaves to it and fry for a minute.
  • Add 1 cup water to it and pressure cook it for 2 whistles and reduce the flame and cook it for 8-10 mins.
  • Once the pressure is down adjust the consistency of gravy- thin or thick.
  • Garnish it with chopped coriander leaves.
Serve the curry hot with Steamed Rice or any Indian flat bread - Roti/Naan/Phulka/Chapathi.
aloo choliya
Notes:
  • If you want to serve it with rice- slightly prepare a thin gravy and if you want to serve with roti make it bit thick,in that case reduce the water in it.
  • You can replace fresh green chickpeas with fresh peas in the recipe and follow the same process for a tasty fresh aloo matar gravy.
  • One can even replace the potatoes with paneer in the recipe and make Choliya Paneer gravy.Both tastes nice in the recipe.
aloo choliya

Monday, December 21, 2015

Moist Carrot Cake Recipe | Classic Carrot Cake | Christmas Cakes Recipes

carrot cake
Christmas is nearing by and the holiday season begins in just few days. All the public places like shopping malls etc have been already decorated with the Christmas tree and looks so festive that one would feel that the holiday season has already begun.I love the feel of the festive season especially during the Christmas and New year.
carrot cake

carrot cake
Christmas is not complete without indulging on sweet treats like Plum Cake, Cookies, Ginger Bread etc.Its been a while I have posted any Cake recipe in my blog- the reason simply is that my little one keeps me on my toes all day and I hardly get any time for my self. Though I bake simple cakes occasionally but I was not able to click and post them in my blog.
carrot cake

carrot cake
Coming to today's post - Carrot Cake, I have prepared it last year for my anniversary but I could not post it and was lying in my drafts.When I was clearing off my drafts recently this Carrot cake sought my attention to get posted this year.
I have followed the recipe from Dorie Greenspan's book-"BAKING from my home to yours" and I must say this is one of the best carrot cake I have tasted.The recipe is quite simple with the easily available ingredients.I have made very few changes to the original to suit my requirements, but I mentioned a few in my notes in case if you want to follow the original recipe to the T.
carrot cake

carrot cake
Carrot Cake is usually frosted with Cream cheese and it makes the cake more delectable.But we do not prefer a frosting for our cakes and hence I made it plain and as I was doing it for an occasion I topped it with glazed carrot ribbons and icing sugar for a festive look.I must warn you that the glazed carrot ribbons topping will reduce the shelf life and hence I suggest you to either refrigerate the cake or avoid using it and instead go for cream cheese frosting.
carrot cake

carrot cake
Check out other festive Cakes recipes here:
carrot cake

Carrot Cake Recipe:
Yields one 7" Bundt Pan | Recipe Source: Dorie Greenspan
Prep time:20 mins | Cooking time 30-40 mins | Total time: 1 hr
Category:Cakes/Baking

Ingredients:
1 cup All purpose flour
1 tsp Baking Soda
1 tsp Baking Powder
1 tsp Cinnamon powder
1/4 tsp Salt
1 1/2 cup peeled and grated Carrots
1/2 cup chopped Walnuts or Pecans
1/4 cup plump Raisins/Cranberries
2 large Eggs
1/2 cup Oil
1 cup Sugar

for glazed carrots:
1 Carrot
2-3 tbsp Sugar
Icing sugar, to decorate

Method:
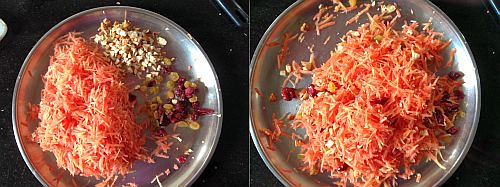
  • Peel and grate 3 carrots in a food processor or grater and keep it ready.
  • In a bowl,stir together the carrots, chopped nuts, and raisins/cranberries.
  • Preheat oven to 180 deg C or 350 deg F.
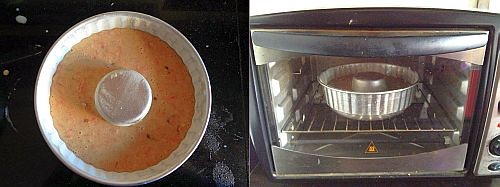
  • Grease a 7" Bundt Pan or 8" square/round pan with oil and flour the insides and tap the excess and keep it ready.
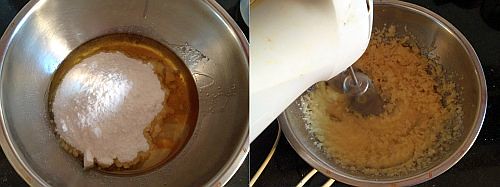
  • Whisk together the flour,baking powder,baking soda, cinnamon powder and salt or you can even sieve it a couple of times to get a uniform mix.
  • Beat sugar and oil together on medium speed in your stand mixer or by using a hand mixer in a large bowl until the mixture turns smooth.
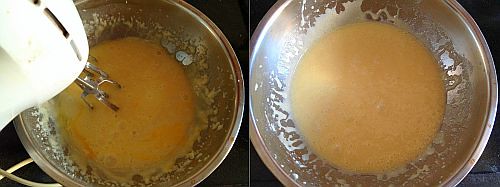
  • Add eggs one by one and continue to beat until the batter is even smoother.
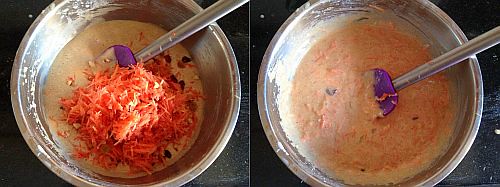
  • Reduce the speed to low and add the flour mixture,mixing only until the dry ingredients disappear.Gently mix in the carrots, walnuts and raisin/cranberry mixture.
  • Pour the mixture into the greased pan and bake about for 30-35 minutes or until the toothpick inserted in the center comes out clean.
  • Let the pan cool for 10-15 mins.Run a sharp knife around the edges and slowly invert the cake on to a rack and let it cool completely.
  • for glazed Carrots- Using a sharp peeler,peel the carrot into thin ribbons and keep it.In a pan add the carrot ribbons and sugar and mix it gently and cook until the sugar melts and coats all the carrots.Let it cool and decorate them over the carrot cake.Sieve icing sugar on top of the cake.
Cream Cheese Recipe:

Ingredients:
4 ounces/ 115 gms Cream cheese, at room temperature
4 tbsp unsalted Butter,at room temperature
3/4 - 1 cup Icing sugar
1 tsp Lemon juice or 1/4 tsp Lemon extract or 1 tsp Vanilla Essence

Method:
  • In a stand mixer or with a hand mixer in a large bowl, beat the cream cheese and butter together until smooth and creamy.
  • Gradually add sugar and beat until it is velvety smooth.
  • Beat in lemon juice/extract or vanilla essence.
To decorate:
  • Use an offset spatula or a spoon and frost the sides and top of the cake as you wish.You can even cut the cake into two layer and frost the center layer too.
  • Refrigerate the cake for 30 mins,just to set the frosting before serving.
carrot cake

carrot cake
Notes:
  1. Dorie mentioned the addition of 1/2 cup sweetened shredded coconut in the recipe along with carrots.But I did not add it.
  2. Also she mentioned lemon extract or juice for the cream cheese frosting but I mentioned vanilla essence for your convenience.
  3. The glazed carrots are completely my creation.As I prepared this cake for a celebration wanted to decorate with something as we don't prefer the frosting always.But the addition of glazed carrots reduce the shelf life, so please keep it in mind.It is completely optional, the cake tastes good just like that or with cream cheese topping.
carrot cake

Monday, December 14, 2015

Gojju Annam | Tamarind Rice using Sambar Powder | Hunasehuli gojju Anna


gojju annam
Puliyogre aka Tamarind Rice is a popular rice variety which is prepared during festivals and also is usually served as prasadam in South Indian temples. At our place there are various versions of tamarind rice - Karnataka style Puliyogre, Andhra style Pulihora, Pulusu Annam(Tamarind Rice using Onions), Gojju Annam(Tamarind rice using Sambar powder) and another variation where we use Tamarind Gojju to prepare Tamarind Rice.Each version tastes different and I absolutely love any version of Tamarind Rice.

Coming to today's version - this tamarind rice is prepared using spicy Sambar powder and jaggery and hence the outcome is tangy,sweet and spicy and to nullify it we add roasted sesame powder at the end.On the whole it has very balanced flavours and a great feast to your taste buds.
hunasehuli gojju anna
Also check out other Pulihora Recipes in my blog:
Gojju Annam | Tamarind Rice Using Sambar Powder:
Serves 2
Prep time:10 mins | Cooking time:40 mins | Total time: 50 mins
Cuisine: South Indian | Category: Lunch-Rice Varieties

Ingredients:
1 cup Sona masura rice(or equivalent)
1 big lemon size Tamarind
3-4 tbsp Groundnuts
1.5 -2 tbsp grated Jaggery(optional)
2-3 tbsp roasted Sesame powder
1 tsp Turmeric powder
Salt to taste

to temper:
1/2 tsp Mustard seeds
2 tbsp Chana dal
1 tbsp Urad dal
3-4 dry Red chillies
a pinch of Asafoetida
a sprig of Curry leaves
2-3 tbsp Sesame Oil(or any other regular oil)

Method:
  • Wash the rice and add 2.5 cups of water and soak it for 15-20 mins.Pressure cook the rice or cook it in electric rice cooker or how ever you usually do.
  • Once the rice is done,cool it completely by spreading it over wide plate smear with 1 tsp of oil and 1/2 tsp turmeric powder.
  • Soak tamarind in 1/4 cup of water for 10-15 mins or microwave the tamarind mixture for 1 min.Microwave method is quite quick when u have lack of time.After it is cooled down remove the pulp and add grated jaggery and mix well until it is melted completely.
  • In a kadai heat oil and crackle the mustard seeds,add groundnuts and fry until they turn slight red.Add chana dal,urad dal,red chillies,green chillies and fry for a couple of minutes until done.
  • Add curry leaves,asafoetida and turmeric powder and fry for a minute and then add tamarind pulp mixture and mix until the mixture starts to thicken for at least 5-6 mins.Add turmeric powder,sambar powder,jaggery,enough salt to it and mix and cook for another 4-5 mins until the mixture thickens completely.
  • Now remove it from the stove and let it cool a bit and reserve some mixture and pour the remaining mixture over the cooled rice, roasted sesame power and mix properly until everything is well blended.Now check the taste of it and add more tamarind mixture or salt according to your taste.It should taste sour when you taste it as the sourness will reduce and blend well along with the time it sits.
  • Let it sit for 2-3 hrs before serving.
Serve it at room temperature.

Notes:
  1. Use rice varieties like sona masuri,ponni,jeeraga samba for these kind of rice varieties,I do not suggest basmati rice.
  2. Always make it bit tangy,spicy and slightly sweetish so that it will taste nice once it settles down.
  3. This rice is ideal to pack for travel as it does not get spoilt,you can keep it for long upto a day.
  4. Do not use Andhra style sambar powder for this recipe, only Karnataka style or Tamilnadu style Sambar powder works for it.
  5. Sesame oil works best for this rice, if you do not have use regular cooking oil.
tamarind rice using sambar powder

Monday, December 7, 2015

Kathal Dum Biryani | Raw Jackfruit Biryani | Jackfruit Dum Biryani Recipe

jackfruit biryani
I have already posted Kathal Dum Masala and mentioned that I would post few more recipes with the raw Jackfruit and this Kathal Dum Biryani is one recipe which adds to the list of Jackfruit recipes. This is an exotic Biryani recipe which you can try for your sunday special or when you have guests at home,I am sure that they would love it.
jackfruit biryani

raw jackfruit biryani
Preparing a good traditional Dum biryani needs lot of time and patience,so try it on a leisure day.You can take few short cuts like using a ready garam masala but I would warn you before that nothing beats the taste of the freshly ground spices- or at least you can use Homemade Garam masala for a good Biryani.Also the cleaning process of raw jackfruit is so tedious that I would suggest to get it cleaned much before you start cooking,otherwise you would get exhausted by the time you start cooking.If you have some prior preparations done, preparing the Biryani would not actually take much time.Now off to the recipe.
raw jackfruit biryani

jackfruit biryani

Check out other Biryani Recipes:
kathal dum biryani

Kathal Dum Biryani Recipe:
Serves 3-4
Prep time:30 mins | Cooking time: 1 hr | Total time: 1 hr 30 mins
Cuisine:North Indian | Category: Main Course-Biryani

Ingredients:
for Rice:
2 cups Basmati Rice
6-7 cups Water
1 Bay Leaf
1" Cinnamon
3-4 Cloves
1 Mace flower(Javithri)
2 tbsp Ghee
1 tsp Salt

for Kathal gravy:
500 gms Raw tender Jackfruit,cleaned and chopped into 1" thick cubes
1/2 cup frozen Green Peas
3/4 cup beaten Curd
3 Tomatoes
2 Onions
6-8 Garlic cloves
1 1/2" Ginger
1 1/2 tsp Biryani Masala,recipe follows (or Homemade Garam masala)
1 tsp Cumin powder
1 1/2 tsp Coriander powder
1 tsp Red chili powder
Salt to taste
3-4tbsp Oil

Spices to temper for Kathal gravy:
2 Green Cardamoms,slightly crushed
1 Green chili,Slit
1/2" Cinnamon
3-4 Cloves
1/2 tsp Shajeera/Black Cumin seeds
1 Bayleaf

to roast and grind to a powder- Biryani Masala:
2" Cinnamon
4-5 Cloves
1 tsp Coriander seeds
1/2 tsp Cumin seeds
1 Cardamom
1 tsp grated Nutmeg

other Ingredients:
1/4 cup chopped Coriander leaves
1/4 cup chopped Mint leaves
a handful of Raisins
10-12 Cashew nuts
2 tbsp warm Milk
12-15 Saffron strands
2 large Onions,thinly sliced
Oil,to deep fry
2 tbsp Ghee

Method:
prior preparations:
  • for Saffron milk: In 2 tbsp warm milk add slightly mashed 12-15 saffron strands and set it aside for 10 mins.
  • for Caramelized Onions: Deep fry finely sliced onions in oil until they turn crispy and slightly brownish in color. Drain them onto a paper towel.
  • to prepare spice powder: Dry roast all the ingredients mentioned under to roast and grind for biryani masala and grind to a fine powder.
  • to fry Cashewnuts: Heat 2 tsp ghee in a pan and add whole cashew nuts and fry them until they turn light brown in color and remove them and keep aside.
to prepare rice:
  • Wash and soak basmati rice for 15 mins.
  • In a large pot bring water to a boil add bay leaf,cinnamon,mace and cloves,ghee,salt and soaked rice and cook until the rice is 3/4th cooked. Drain all the water and run cold water through the rice to stop any further cooking.
to prepare Kathal gravy:
  • Grind ginger,garlic and onions to a fine paste and remove the mixture and keep it aside.In the same mixer grind the tomatoes to a fine puree and keep it aside.
  • Heat oil in a pressure cooker and crackle shajeera and add all the spices - bayleaf, cinnamon,cardamom, cloves and green chilli and fry them for a minute.
  • Add the ground puree of ginger-garlic-onion paste and fry it until the raw smell goes away.
  • Now add tomato puree and fry until the oil leaves the edges.
  • Add all the masalas - red chili powder,coriander powder, cumin powder, 1 tsp biryani masala or garam masala and salt and fry well for a couple of minutes.
  • Now add the raw jackfruit pieces and frozen peas and fry for 3-4 mins and add 1-1.5 cups of water and pressure cook for 2 whistles.
  • Once the pressure drops mix the nicely beaten curd into the gravy and boil it on low flame for 8-10 mins by stirring it continuously.Keep the gravy slightly thick.
Putting the Kathal biryani together:
  • Divide the cooked rice into 3 equal parts and the Chole gravy into 2 equal parts.
  • Take a heavy bottom pan (I used heavy steel here) and apply generous amount of oil/ghee at the bottom of the pan and start the layering process in the following way.
  1. a layer of thinly sliced onions(optional,I added it as I did not deep fry many onions for the other layers)
  2. Spread one layer of kathal gravy on the onions(if using) or at the bottom.
  • Spread one layer of Rice.
  • Sprinkle one half of the caramelized onions,1/4 tsp of freshly ground Biryani Masala, half of Saffron Milk,few raisins, 2 tbsp of Coriander leaves and 2 tbsp of Mint leaves.
  • Spread one more layer of Rice.
  • Spread the rest of the Kathal Gravy.
  • Spread the last layer of Rice.
  • Top it with the left over caramelized onions, fried cashew nuts, remaining raisins, 1/4 tsp ground biryani masala, saffron Milk and the remaining coriander leaves and mint leaves.
  • Then add 2-3 tbsp milk and  2 tbsp of ghee from the top and seal the gaps between the lid  and container with soft chapati dough as shown in the picture or you can even cover it with aluminium foil and cover it with lid and fold the foil carefully and try to seal the gap in between the vessel and the lid. 
  • Place this vessel/pot back on a heavy tawa and back on heat and cook on medium flame for 20-30 mins or till it is completely cooked.You can alternatively bake this in oven at 170 deg C for 15-20 mins.
  • Break the dough seal with a sharp knife.
Serve it with Onion-tomato raita or Boondi raita with chips/papad/salad.
kathal dum biryani

kathal dum biryani

Notes:
  1. How to clean Raw Jackfruit: Spread paper on the platform or on the floor.Apply oil to your palms,knife and chopping board and cut jackfruit into two halves.Then cut each half into small portions and remove the green thick skin part and also the center thick stalk.Cut the remaining portion into 1" or 1/2" cubes and immediately immerse those pieces in a bowl of water.You can add 2 tbsp buttermilk to the water as it helps in retaining the color of the jackfruit pieces.
  2. You can even deep fry the kathal pieces before adding to the gravy.
  3. You can follow the same procedure to prepare mixed vegetable biryani by using all mixed vegetables, you can even deep fry the vegetables if you want it more rich.
  4. You can add potatoes to the kathal gravy if you like it.
  5. Use good quality basmati rice for a delicious biryani as the flavor adds to the taste.
  6. I used minimal spices while boiling the rice, you can use more spices like peppercorns,star anise along with the spices I used.
  7. I highly recommend to use deep fried onions as it gives a nice taste to biryani. Here I used deep fried onions just for the top layer and hence I used sauteed onions as the first layer.
  8. You can use Garam masala instead of the freshly ground masala mentioned in the recipe.
kathal biryani

raw jackfruit biryani

Monday, November 30, 2015

Chintakaya Pandu Mirapakaya Pacchadi | Red Chili - Tamarind Chutney

raw tamarind fresh red chili chutney
Andhra Cuisine has lots of varieties of pacchadis(Chutneys) which is usually mixed with rice and hence is a part of the main meal. Pacchadi is usually prepared with few vegetables or dals. My MIL and Mom,they both prepare various varieties of pacchadis . My MIL usually gives me a supply of niluva pacchadis like Chintakaya pacchadi, Gongura Pacchadi , Usirikaya Pacchadi etc. I just need to grind the niluva pacchadi with a couple of ingredients to prepare the Pacchadi, it is  the easiest option which I can think of when I am not in a mood to cook or when I want to add more dishes to my meal to make it more appealing.
Coming to today's recipe I have used fresh raw tamarind and fresh red chillies to prepare this pacchadi and one can store this pacchadi in refrigerator upto a week(with out the addition of onions). I am posting my mom's version of pacchadi today where as even my MIL's version is also similar just that she does not add fenugreek-mustard powder to it.But I personally liked my mom's version as the roasted mustard-methi powder added a nice flavor to the pacchadi.One can follow the same recipe and prepare either Chintakaya(Raw Tamarind) Pacchadi or Pandu Mirapakaya Pacchadi avoiding the other ingredient.
chintakaya pandumirapakaya pacchadi
Check out other Pacchadi recipes in my blog:
Chintakaya Pandu Mirapakaya Pacchadi Recipe:
Serves 3-4
Prep time: 10 mins | Cooking time: 10 mins |  Total time: 20 mins
Cuisine: Andhra | Category: Pacchadi/Accompaniments

Ingredients:
7- 8 Raw Tamarind pieces(3" inches long)
1 big Onion, finely chopped
12-15 fresh Red Chillies
1/2 tsp Fenugreek seeds
1 tsp Mustard seeds
1/8 tsp Asafoetida
1/2 tsp Turmeric powder
Salt to taste

to temper:
2 tbsp Oil
1 tsp Mustard seeds
8-10 Garlic pods,peeled and slightly crushed
1 Red Chili, broken
a sprig of Curry leaves

Method:
  • Wash and pat dry raw tamarind and red chillies separately using a dry kitchen towel .
  • Dry roast mustard seeds and fenugreek seeds separately and grind it to a fine powder along with asafoetida in the coffee grinder or in a small jar.If you are using rock asafoetida,dry roast it and grind it along with mustard and fenugreek seeds.
  • Cut tamarind into small pieces and grind it to a coarse paste.
  • Add red chillies, turmeric powder, salt and ground mustard-fenugreek powder and grind it again to a coarse paste.
  • Add finely chopped onion to the mixer and pulse it a couple of times in whipper mode. Remove the chutney to a serving bowl.
  • Heat oil in a small tadka pan and crackle mustard seeds.Add crushed garlic pods and red chillies and fry until they turn slight golden bown and add curry leaves at the end.
  • Add this tadka to the prepared chutney and cover it immediately.Mix it nicely before serving.
Serve it with hot steamed Rice and ghee. You can even serve onion along with it for extra crunch.

Notes:
  1. You can prepare only raw tamarind pacchadi in the same way by avoiding red chillies and also vice versa for red chilli pacchadi, avoid raw tamarind in the recipe.
  2. The addition of mustard and fenugreek powder is optional.My MIL does not add it but my mom add it.It gives a nice flavor to the pacchadi.
  3. If you want to store this for long, do not add onion while grinding, you can store the chutney for long in refrigerator.Mix finely chopped onions in the required portion before serving.
chintakaya pandumirapakaya pacchadi

 
back to top