Monday, October 31, 2011

Spring Onion-Bread Uthappam | Instant Dosa Recipes

This post is lying in my drafts from such a long time and finally I am posting it today.I don't claim that this is my own version of dosa as I have come across several bread dosa recipes on the net. With my experience I have used the ingredients that I felt could make this dosa perfect. I am sure you all know my linking for dosas and how particular I am in terms of its crispiness, color and softness. While so far I have posted only traditional dosa recipes in my blog , I do make many instant dosa varieties and this one is very regularly prepared by me. I always end up with stale bread slices and this is really a rescue when you have lots of bread slices with you.The addition of rava and rice flour gives the crispiness to the dosa while the curds and murmur/poha does its job in making it soft. There is no need to add cooking soda to it0 the breads add t0 the softness. I like the flavor of spring onions in this dosa and if you do not have them handy then you can proceed with the regular onions or shallots which should not alter the taste very much.You can get more creative and add more ingredients to make this uthappam healthier and tastier.

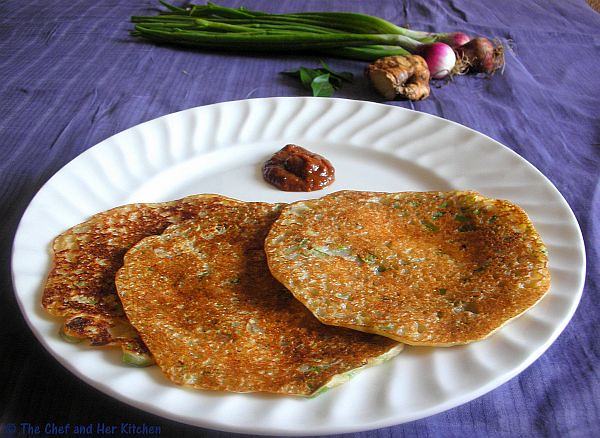
Spring Onion-Bread Uthappam Recipe:
(Serves 2)

Ingredients:
8 wheat bread slices with edges
1/2 cup rava
3-4 tbsp Rice flour
a handful of puffed rice(mur mur) or pressed rice(poha)
1/4 cup curds
3-4 spring onions with whites,finely chopped
a sprig of curry leaves,finely chopped
2 tbsp chopped coriander
1/2 " ginger
1 tsp green chilli paste
1 tsp cumin seeds
salt to taste
Method:
  • Grind the bread slices to a powder.Add rava,rice flour,mur mur or poha,ginger and curds to it and grind again to a nice paste.
  • Add enough water to it to get the consistency of dosa batter and just give a turn again in mixie.
  • Remove it to bowl and add jeera,green chili paste and finely chopped spring onions(along with the white part) and finely chopped curry leaves to it.
  • Add salt(remember bread has already salt in it,so add less) to taste and mix everything well.Leave it aside for 5-7 mins.
  • Now heat a non stick tawa and slight grease the tawa with oil and when it is hot enough pour a big ladle of batter on it and spread slightly.Do not make it thin as this is uthappam and it should be slightly thick.Do not spread too thick or too thin,it should be medium thickness.
  • Pour oil over the edges and on top and cover it with a lid and let it roast on a low flame.This takes more time to get roasted as the bread makes it sticky,so fry on one side for longer time.
  • Once the base is nice golden in color turn on to the other side and roast again.
Serve it hot with coconut chutney/tomato chutney/peanut chutney.

Notes:
  • If your batter sticks to the pan and if the uthappam is soggy,add 1-2 tbsp of rice flour to the batter and mix well and start again pouring the dosas.
Variations:Bold
  1. If you want to make thin and crispy dosas instead of uthappam then do not add spring onions and curry leaves to the batter.After pouring the batter spread it thin and pour oil over it and roast until crispy.
  2. You can even add shallots or regular onions instead of spring onions.
  3. You can even add grated carrot,chopped coriander,grated coconut to the batter.

Thursday, October 27, 2011

Lychee Custard

Happy Diwali to all my friends and readers!!!
Any festival is incomplete without sweets and especially Diwali is one festival where all the Indian households are busy making various varieties of sweets and snacks.Though I did not make many varieties I celebrated the festival in a simple manner.
Lychee is one of my favorite fruits and as it is seasonal and hence not available through the year, I always keep a tin of lychees for my desserts. The tin was about to expire and that's when I decided to make something quickly with it.I was planning to mix lychees with vanilla ice cream, like how we get in corner house(Bangalore) but I wasn't in a mood to eat ice cream because of my bad throat hence I decided to use the second option , which was to mix it with custard.I generally use various kinds of fruit combinations in custard although the base(custard) is the same.The addition of various fruits gives custard a different and distinct taste.The fleshy and juicy lychees adds a nice taste to custard and when paired with vanilla ice cream it tastes divine.It is a very simple dessert with not much of effort required to prepare it and also can be made in advance.
Ingredients:
1 tin Lychees or 15 fresh Lychees
3 tbsp Vanilla custard powder
4-5 tbsp Sugar
500 ml Milk
2 tbsp finely chopped Almonds
2 tbsp finely chopped Pistachios

Method:
  • Take 1/4 cup milk aside and boil the remaining milk.Mix the custard powder in the remaining 1/4 cup milk until very well dissolved.
  • Pour this in the boiling milk and mix simultaneously until it is mixed well and boil over low flame.
  • Add sugar to this and boil until the custard is thick and coats the backside of the spoon.If you draw a line on the back of the spoon it should stay like that which means the custard is perfectly done.
  • Cool this and refrigerate it until it is cold.
  • Meanwhile drain the lychees from tin and give a fresh water bath to it and cut into quarters or big chunks.If you are using the fresh ones remove the skin and seeds from it and cut into big chunks.
  • Mix the lychee chunks and finely chopped dry fruits in the custard and refrigerate for 4-5 hrs before serving.
Serve it cold with some chopped pistachios over it.You can even serve it with vanilla ice cream.

Notes:
  1. You can serve the lychee custard with vanilla ice cream which tastes divine.
  2. Take care that custard is neither very thick nor thin and also adjust the sweetness according to your preference.
  3. Always cut lychees into big chunks as the lychee flesh in each bite gives a special taste to the custard.
  4. Also add more number of nuts as they give special crunch while eating.
LinkI am sending this to Pari's 'Only-Sweets and Desserts' event which is being hosted by Gayathri.

Monday, October 24, 2011

Phool Makhana Kheer | Puffed Lotus Seeds Kheer(Sweet)

Blogosphere is currently flooded with lots of Diwali recipes. While the Diwali festival is meant to be celebrated with lots of sweets and savories, I limit myself with one variety of sweet and savory each.
Lotus seeds/makhana is a good source of calcium and also you can make various items like kheer,snack or curry with it.It is mostly used during fasting days especially in north India.This kheer is very easy to prepare and it is very light and tasty.I generally add lots of dry fruits to it as I like the taste and crunch of them in each and every spoonful of kheer.Though the process to make this kheer is similar to that of other kheer recipes, I wanted to share some tips and hence thought of posting this. Let us take a peek into the recipe.

Phool Makhana Kheer | Lotus Seeds Kheer Recipe:
(Serves 2-3)

Ingredients:

1 cup Phool makhana/Puffed lotus seeds
1/2 litre full fat milk/low fat milk
5-6 tbsp Condensed milk or 1/4 cup Sugar
2-3 tbsp chopped Cashewnuts
2 tbsp chopped Almonds
1 tsp Pistachios,sliced(for garnish)
15-18 Raisins
1/2 tsp Elaichi powder
6-7 strands of Saffron
2 tbsp Ghee
Method:
  • Boil milk until it reduces to half and thick by stirring it occasionally taking care that the milk does not get burnt at the bottom.
  • Tear puffed lotus seeds into halves using knife or hands.
  • Heat ghee in a small kadai and add chopped almonds and cashew nuts and fry until light golden brown and remove them into a plate.
  • Add raisins and fry until they bubble up and remove them aside.
  • In the remaining ghee add the torn puffed lotus seeds and fry until they are slightly crisp and light brown in color.
  • Take half the portion and grind it to a fine powder.
  • Add the remaining half fried lotus seeds and ground lotus seeds powder to the milk and boil until it is soft,it takes around 7-8 mins.
  • Add condensed milk(or sugar) to it and also the saffron strands(dissolved in 2 tsp milk) to it and boil for 5-7 mins.
  • Add elaichi powder to it and also fried dry fruits to it and boil for 2 mins.
  • Pour into individuals bowls.Garnish with finely sliced pistachios.
Serve it hot/warm/cold.

Notes:
  1. You can avoid grinding lotus seeds,but I recommend to do this as it gives the thickness to the kheer.If you wish you can even add 1/2 tsp cornflour (mixed with 1 tbsp milk) to the milk while it is boiling for thickness.
  2. You can use condensed milk or sugar according to your choice.Also add the required quantity of condensed milk/sugar according to your preference.
  3. Though we add less ghee,it floats on top giving us a feeling of rich dessert.

I am sending this to Pari's 'Only-Sweets and Desserts' event which is being hosted by Gayathri.

Thursday, October 20, 2011

Mullangi Leaves(Radish Greens) Pacchadi

Radish greens have very strong flavor when compared to any other greens and that is the reason I never bothered to even make it at home.I tried making curry out of it pairing it with ajwain once and did not like it because of it's strong flavor.Recently my M-I-L made this chutney assuring that I would not find any smell in this chutney and as she said,this pacchadi did not have any strong flavor of radish and we thoroughly enjoyed it with hot rice and ghee.Selecting tender greens and frying it in oil will remove the smell completely,try it out if you are a radish lover.
Ingredients:
1 bunch tender Radish greens,finely chopped
5-6 Green chillies,slit
3-4 Garlic pods
a small amla sized Tamarind
1 tsp Cumin seeds
1/2 tsp Mustard
2 tsp Urad dal
1 tsp Chana dal
1 tsp Sesame seeds
2 tbsp Oil
Salt to taste

for tadka:
1/2 tsp Mustard seeds
1/2 tsp Urad dal
a sprig of Curry leaves
2 Red chillies,broken
a pinch of Hing
2 tbsp Oil
Method:
  • Heat 2 tsp oil in a kadai and add mustard seeds and slightly crackle them.Add jeera,urad dal and chana dal and fry until they turn slight brown in color.
  • Add slit green chillies,garlic pods and sesame seeds and fry well.Slightly cool the mixture.
  • Meanwhile in another kadai heat 1 tbsp oil and add radish greens and close it with lid(with some water) and steam cook it over low-medium flame.It takes 12-15 mins to cook completely and they get wilt.
  • Add tamarind and salt to the greens and cook again for 3-4 mins.Slightly cool the mixture.
  • Grind the roasted spices to a coarse powder first and then add sauteed greens and grind in whipper mode until you get a coarse paste.Do not add water while grinding it.
  • In a kadai heat 2 tbsp oil and crackle mustard seeds and add urad dal,red chillies and curry leaves to it and a fry.Add ground chutney to it and fry well over low flame until the chutney leaves the edges and does not stick to the pan.
Serve it with hot rice and ghee.

Notes:
  1. The radish greens should be absolutely tender otherwise the chutney would have strong flavor of radish.
  2. Frying the ground chutney in oil at the end is an important step otherwise the radish smell would dominate in the chutney.

Monday, October 17, 2011

Yam fry | Kandagadda Fry

If you ask me about my comfortable meal, my answer would be always 'a simple fry and rasam with rice' and I never get tired of eating this kind of meal as I grew up eating it.But the real challenge is how to make a crispy and tasty fry with out much oil. Thanks to the oven, my job is easy as it always gives a perfect low fat crispy fry. Though many deep fry the vegetable to get crispy fry,my mom used to fry the vegetables over low flame with less oil but it is really time consuming and also requires constant attention. After I started using the oven, I started using it for various things like this on daily basis other than just baking cakes and breads in it.I have mentioned three different ways to make this fry and you can follow it according to your preference and liking.

Ingredients:
250 gms Yam/Kandagadda
3/4 tsp Red chili powder
1 tbsp Tamarind pulp
1/4 tsp Turmeric powder
Salt to taste
2 tsp Oil
Method:
  • Cut the outer layer of the skin using a sharp knife and cut yam into thin slices(4-5mm) into triangles,rectangles and squares.Drop them in water until its usage.
  • Pressure cook yam slices with tamarind water and turmeric powder for 1 whistle or cook on stove until it is 3/4th cooked.Drain them and let it cool completely.
  • Now follow any of these 3 methods which I mentioned below.I followed the oven method which is healthy and less calorie version and also yields very crispy fry.
method1:
  • Line the baking tray with silver foil and arrange these slices in a single layer and sprinkle some oil over it and bake in oven at 150 deg for 25-30 mins.Keep an eye after 20 mins so that they will not get burnt.If the edges are crispy and changes its color means its done.
  • Heat 1tsp of oil in a non stick pan and add the oven fried yam slices and fry over medium flames for 3-4 mins.Add salt and red chili powder and give a nice saute at the end which helps in coating the slices with red chili powder.
method2:
  • Deep fry them in oil until golden brown and crisp.
  • Heat 1tsp of oil in a non stick pan and add the oven fried yam slices and fry over medium flames for 3-4 mins.Add salt and red chili powder and give a nice saute at the end which helps in coating the slices with red chili powder.
method3:
  • In a wide non-stick kadai heat 2 tbsp oil and arrange the yam slices in a single layer and let them fry for 4-5 mins until crisp on one side and turn them to the other side and fry them again for 4-5 mins.
  • Add salt and red chili powder and give a nice saute at the end which helps in coating the slices with red chili powder.
Serve it fresh and hot with hot rice,dal/rasam and papad.

Notes:
  1. Do not cover the fry once it is done as it will make it soggy,so always try to make it fresh before having it.
  2. You can follow any of these same methods for vegetables like arbi/colocasia and potatoes (pressure cook first peel skin and slice into rounds and follow any of the three methods),ladies finger,tindora and brinjal(just slice it and follow any of the methods).
  3. You can add different masalas like garlic chili powder or curry powder or sabzi masala instead of red chili powder for different variations.
  4. You can even add curry leaves while frying the vegetable on the tawa.
  5. Do not bake in oven for long time until it is very crisp as it makes the fry very hard and crispy,once the edges are crisp and the top layer is slightly crisp it is enough to remove.This gives a crispier bite with soft flesh inside for the vegetable.

Thursday, October 13, 2011

Oats Kharabath | Indian Oats Recipes

Kharabath is a specialty of Karnataka and is available in almost all upahara darshinis in Bangalore.I have earlier posted the recipe of authentic kharabath here.Today's recipe is a twist to the regular kharabath as I used oats and adapted the same kharabath recipe.Oats is one of the not-so-interesting things to eat as it turns out bit sticky when cooked and hence I am not very fond of regular upma made with oats.But this kharabath recipe does a trick in spicing up the boring oats and also improves the texture of oats with not much of stickiness.Generally kharabath is made very rich with a good amount of ghee in it,it is completely left to your choice to use it but it is highly recommended at least in small quantity to get the texture and taste of it.One thing I can assure you is this Oats Kharabath tastes really good though not comparatively as good as the regular kharabath(with rawa) but definitely better than the boring oats upma.I suggest you to go ahead with the recipe if you want to include healthy oats in your diet.

Oats Kharabath Recipe:
(serves 2)

Ingredients:
1 heaped cup quick cooking oats(I used quaker)
1 big onion,roughly chopped(neither too fine nor too big)
2 tomatoes,finely chopped
1 small carrot,finely chopped
1 small capsicum,finely chopped
3-4 green chillies,finely chopped
3/4 tsp Ginger-Garlic paste
1/2 tsp red chili powder
1/4 tsp Garam masala
1/4 tsp turmeric powder
2-3 tbsp chopped coriander
juice of 1/2 lemon or 1 tbsp lemon juice
6-8 cashew nuts,broken
salt to taste
1 tbsp ghee

for tadka:
1 tbsp chana dal
1 tsp urad dal
1/2 tsp mustard seeds
8-10 curry leaves
2 tsp oil
2 tsp ghee

Method:
  • Dry roast the oats over medium flame for 2-3 mins until to remove the raw smell from it.This also helps in getting not so sticky upma,so its mandatory to follow this process.
  • Heat oil and ghee in a thick kadai and crackle mustard seeds.Add chana dal and urad dal and fry until they turn red and then add finely chopped green chillies,curry leaves and fry well for a couple of minutes.
  • Add chopped onions and fry until they turn pink in color.Add ginger-garlic paste to it and fry until the raw smell goes away.
  • Add chopped carrots and fry well again for a couple of minutes.Add chopped tomatoes and fry until they become mushy.
  • Mean while in another vessel bring 2 1/2 cups of water to a boil.Always use proportions of 1 oats : 2 1/2 - 3 cups of water depending on the consistency you need.
  • Once the tomatoes become mushy add chopped capsicum,turmeric powder,red chilli powder and garam masala and fry well until the masalas are well mixed and fried.
  • Add boiling water to it and let the water come to a boiling point again and add enough salt to it.
  • Add toasted oats and quickly stir and cover it with lid and cook for 3-4 mins until the water is absorbed and oats are cooked properly.
  • Meanwhile heat ghee in a small pan and add cashew nuts to it and fry until they turn light golden in color.
  • Add chopped coriander and lemon juice to it and give a nice stir.When you are removing it from stove add fried cashew nuts along with ghee over it and mix it nicely and switch off the flame.Let it rest for 3-4 mins with the lid covered.
Serve it hot with some potato wafers or boondi on top.This can be eaten on its own as it has all spices in it,if you still want you can serve it with coconut chutney.

Notes:
  • Always eat this hot and try to keep it for long,otherwise it will turn sticky.
  • Dry roasting the oats is necessary to get a not-so-sticky kharabath.
  • You can even add fresh/frozen peas,finely chopped beans,finely chopped eggplant to it.Also,you can even add grated coconut at the end as I did not have it I could not use it in the recipe.
  • Generally kharabath is loaded with lots of ghee which gives its unique flavor and makes it tastier.Adding or reducing the ghee is as per your choice and diet.

Monday, October 10, 2011

Mixed Dal Ambode | Mixed Dal Masala Vada

Festival spread is always special as it contains the wide variety of items ranging from sweets, kheer, vadas, variety rice, kosambari along with the regular menu.Though I am not a big fan of masala vada,hubby dear likes all kind of vadas and it is a rare treat to make all these yummy goodies at home.I recently made these ambode for Navaratri festival.This mixed dal vada is very good as the usage of urad dal makes the vada softer inside and the other dals gives a crispier crunch outside.One can dip them in spiced up curds and make mosaru ambode(curd masala vada) which is even very tasty.

Ambode | Mixed Dal Masala Vada Recipe:
(yields 20 vadas)

Ingredients:

1/2 cup Chana dal
1/2 cup Toor dal
1/2 cup Moong dal
1/2 cup Urad dal
1/4 cup chopped Cashew nuts
1 big Onion,finely chopped
1/4 cup chopped Coriander leaves
1 tsp chopped Curry leaves
2 tbsp chopped Mint leaves
5-6 Green chillies
1" Ginger
1/4 tsp Cooking soda
Salt to taste
Oil to deep fry
Method:
  • Soak all the lentils for 3-4 hrs.Rinse them and drain the excess water.
  • Grind green chillies with ginger and salt to a coarse paste.Transfer to a big bowl.
  • Grind the dals to a coarse paste in whipper mode.Do not grind to a smooth paste,it should be really coarse and even the dal bites here and there would add nice crunch to the vadas.
  • Add cashew nuts, chopped onion,coriander,curry leaves,mint leaves and ground chili paste to the ground dal mixture and mix well.Take care that the mixture should neither be very wet nor dry.
  • Meanwhile heat oil in a thick kadai for deep frying the vadas.
  • Add cooking soda to the vada mixture and beat well with the hand.
  • Wet your hands and take a small lemon size mixture and flatten it with hands and deep fry until golden brown in color over medium flame.
Serve them hot with some chutney/tomato sauce or as it is.

Notes:
  • Addition of cooking soda makes the vadas crisp on the outer side and soft inside.So it is essential to get good vadas.
  • If your batter is very wet add a tbsp of rice flour to it and mix well and make vadas.
  • You can flatten the vadas still thinner and bigger in size than the ones I made.But I like plump small vadas as they look cute.
  • If you are making these vadas on a festival day avoid adding onions if you want.But masala vada always tastes better if you add onions to it.
Variations:
  • You can add 1/2 cup finely chopped dill leaves or any other greens like amaranth,spinach to the vada batter and make greens vada.
  • You can even add grated carrot or beetroot or finely chopped cabbage to the vada batter for a variation.

Thursday, October 6, 2011

Fruit Trifle | Trifle Pudding....and my 250th post!!!

YIPPEE...this is my 250th post and I am really proud of reaching this milestone.
Milestone posts always need to be celebrated with a special post. While I didn't make this specifically for my post, I saved this to post for the milestone one, as it is apt for the occasion.

I had made this Trifle pudding for a family get together about three weeks back for a group of 12 people while I was in Bangalore. Though I could not take nice pics as it was already late in the evening and I was running short of time , I still managed to click a few pics.This pudding is a bit time consuming to prepare but it's very light and makes you feel like eating more even after a heavy meal.
This is a great party recipe and this pudding never fails to impress any one.So what are you thinking?plan to make this pudding for your next party and wait to receive the compliments.This dessert is quite colorful,light on stomach and would be loved by kids as well.Coincidentally my friend Priti also has posted the same Fruit Trifle recipe,do check her blog for her version.

Fruit Trifle | Trifle Pudding Recipe:
(Serves 4-6)

Ingredients:

to assemble:
6-8 plain vanilla Sponge cake slices
1 cup diced Jelly
2 cups Custard,medium thickness
1 cup mixed Fruits
1/2 cup Whipped cream
1/3 cup Sugar syrup or 1/3 cup fresh Orange juice
3-4 tbsp Tutti fruti or 10 glazed candied Cherries

for jelly:
1/2 pack Jelly crystals(preferably strawberry/raspberry flavor)
200 ml Water

for custard:
2 tbsp Vanilla custard powder
4-5 tbsp Sugar
1/2 litre Milk

for sugar syrup:
1/4 cup Sugar
1/4 cup Water

fruits needed:
2 elaichi Bananas/1 big Banana(peeled,diced small)
1/2 Apple(cored,skinned,finely diced)
1/2 Orange(skinned,seeded,chopped fine without pith)
1/2 Mosambi/Sweet lime(skinned,seeded,chopped fine without pith)
1/4 cup Pomegranate kernels
you can also use (Mangoes,Peaches,Blueberries,Strawberries,seedless Grapes) - Subjected to availability
Method:
for making custard:
  • Take 1/4 cup milk aside and mix in the custard powder and mix well.
  • Boil milk until it comes to a boil and reduce the flame and add custard powder mixed with milk and mix it vigorously and continuously.Add sugar and mix well.
  • Let it thicken until it coats the back side of the ladle.Switch off the flame and let it cool completely.Refrigerate it until its usage.
for making Jelly:
  • Always follow the instructions given on the pack for making,in general reduce the quantity of water to get perfect jelly.In our case even if the jelly is bit soft it is fine as we are layering it in between other layers and it is preferred to be soft than the firm jelly.
  • In order to make jelly boil the water and mix the jelly crystals and mix well until it melts completely and let it boil for a minute.
  • Pour this mixture over a flat plate(with the wall) to get 1/4" thickness and let it set for an hour or two.dice into fine cubes and keep it refrigerated until its usage.
preparing the mixed fruits:
  • While cutting the fruits always start with the citrus fruits like orange,mosambi so that it will help in avoiding the discoloration of the fruits like apples,banana which we add later.Otherwise you can add few drops of lemon juice which helps in discoloration of apples and bananas.
  • Cut all the fruits into even sized pieces and mix with a spoonful of sugar and mix well.Keep it refrigerated until its usage.
for making sugar syrup:
  • In a pan boil water and add sugar and let it melt completely and boil for a couple of minute.No need to boil this for more time.If you are using orange juice you avoid this step of making sugar syrup.
for assembling Trifle pudding:
  • Remove the brown edges of sponge cake and dice it into small cubes and keep them aside.
  • Arrange the glasses or the serving bowls in an order before we start the process.You can even use a big wide fancy bowl for this,but I prefer individual bowls as it is easy to serve and mess free as well.
  • First add a thin layer of colorful jelly cubes and then top it with a layer of sponge cake cubes.
  • Sprinkle sugar syrup or orange juice all over to moisten the cake pieces and gently press the cake down.
  • Add 2-3 tbsp custard all over the cake slices covering the gaps in between.
  • Add 1-2 tbsp of mixed fruits and again pour a layer of custard over it.
  • Now repeat the process of jelly layer,cake layer,custard layer,fruits layer and then again custard layer.You can repeat the process according to the size of your serving bowl/glass, generally 2-3 layers would be more than enough.
  • Top it with 1-2 whipped cream,you can even use a piping bag for this job to make it look more pretty.
  • Sprinkle some jelly cubes and tutti fruti over it or keep a candied glazed cherry over it.
  • Use a cling wrap and cover each and every individual mold.
  • Let this set in refrigerator for 5-6 hrs which helps in enhancing and mixing up of flavors.Do not keep this in freezer,just keep it refrigerated.
Serve it cold.
Notes:
  1. There are no hard rules while layering the pudding,you can use the quantities as you wish and also layer them in the order you wish.
  2. You can use the fruits according to your taste.
  3. I suggested strawberry/raspberry flavored jelly as it makes the trifle colorful.But there is no hard rule for it you can use the jelly flavor of your choice.
  4. Always set the desserts in refrigerator for few hours in order the flavors to get mixed and make the dessert tasty.
I am sending this to Rak's 'Celebrate SWEETS' event which was originally started by Nivedita.I am also sending this to Pari's 'Only-Sweets and Desserts' event which is being hosted by Gayathri.

Monday, October 3, 2011

Dabbakaya Pulihora(Chitranna) | Indian Grape fruit Rice

We all make lot of rice varieties like lemon rice,mango rice, puliyogre, coconut rice, mustard rice etc during festivals as they do not require onions in it and also are very easy to make.I recently mentioned in my post that my cousin brought so many goodies from her home town,even these big limes(dabbakaya) are also brought by her.Dabbakaya looks very similar to lemon and is generally very big in size(almost the size of mosambi) when compared to regular lemon and also dabbakaya tastes bit sweet and sour unlike lemon.We generally make pickle or this rice or gojju with it.This rice is a closer cousin to lemon rice with a slight change in taste and flavor.

Coming to the rice,it is very easy and quick to make as it does not include many items.I am sure everyone knows how to make lemon rice but I would like to share few tips in order to make tasty lemon/sweetlime rice.Nicely cooked soft and fluffy rice,more spicy and tangy rice for extra punch and also mixing the rice while it is hot are the key things one should remember to make yummy and tasty lemon rice.I follow the same way for rice varieties like lemon rice,dabbakaya pulihora and mango rice.

Ingredients:
1 cup regular Sona masuri or equivalent
1 Dabbakaya/Indian grape fruit(big lime)
5-6 Green chillies,slit
1-2 Red chillies(optional)
2-3 tbsp chopped Coriander
a sprig of Curry leaves
2-3 tbsp Cashews,broken
2-3 tbsp Groundnuts
1/4 tsp Turmeric powder
1 tbsp Chana dal
1 tsp Urad dal
1/2 tsp Mustard seeds
Salt to taste
2-3 tbsp Oil
Method:
  • Pressure cook rice(1 cup rice: 2 1/4 cups water) or how you cook your regular rice until it is soft and fluffy.The rice should be comparatively softer to eat and it should not be like how we do for pulav/biriyani.
  • Squueze the lime and separate the seeds and keep it aside.
  • Heat oil in a kadai and crackle mustard seeds and add ground nuts and fry over medium flame until they are golden brown.
  • Add cashew nuts,chana dal,urad dal,green chilies and fry until they turn golden brown and green chillies wilt.
  • Add curry leaves and mix well and add turmeric powder and switch off the flame.
  • Now take rice in a wide bowl and add the tadka to it and add enough salt and mix well until everything is mixed.
  • Add squeezed lime(dabbakaya) with out seeds and coriander to it and mix well.
Serve it immediately when it is warm/hot.You can even serve it cold.

Notes:
  1. In order to make tasty lime/lemon rice I always mix when the rice is hot and I like to eat it immediately.
  2. I added more number of chillies to the recipe,if you can not bear that much spice level feel free to reduce the number of chillies.
  3. It is always important to taste the rice and add salt,lime/lemon juice to it according to your taste buds.
  4. Always add less amount of turmeric powder and also add directly into the tadka which gives the rice a light greenish color instead of yellow color.
  5. Use regular rice like sona masuri,ponni or equivalent rice and I do not recommend using basmati rice for this.
  6. If you are making the rice ahead always use more lemon/lime and chillies than needed as the rice absorbs it and make it more tasty by noon.
 
back to top