Vegetables


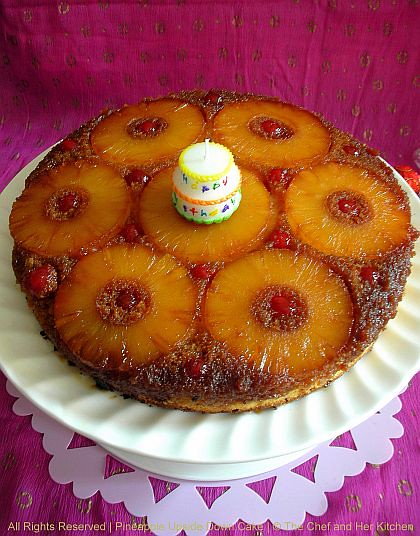
 I had made this cake 2 weeks ago for my husband's birthday but I could not post it immediately.My husband does not prefer pastries or the chocolate based cakes though I prepare them often and I feel sad if he just eats a couple of pieces when I make them.So this time I thought I should make something exclusively something to suit his taste buds to make the birthday boy happy.
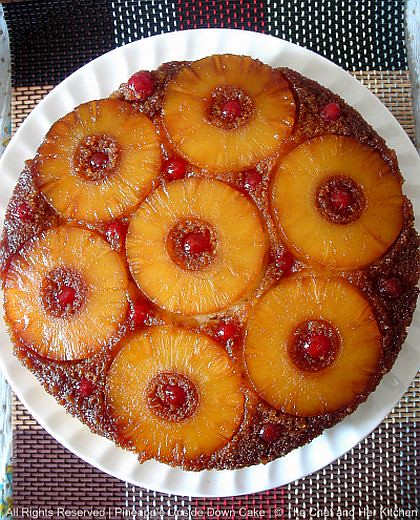
I have been thinking of making this pine apple upside down cake from such a long time and when I went for grocery shopping a week before his birthday I picked up a tinned pineapple to make this cake. I do not like pineapple and hence I never brought the fresh one but I like few preparations with it like pineapple kesari or as a pizza topping or in a curry or in a drink but I never liked to eat fresh pine apple.The real question for me was I was not sure whether he likes pine apple or not but still thought of proceeding with the cake as I thought it is just a topping and if he does not like it he can always remove it and eat the rest.
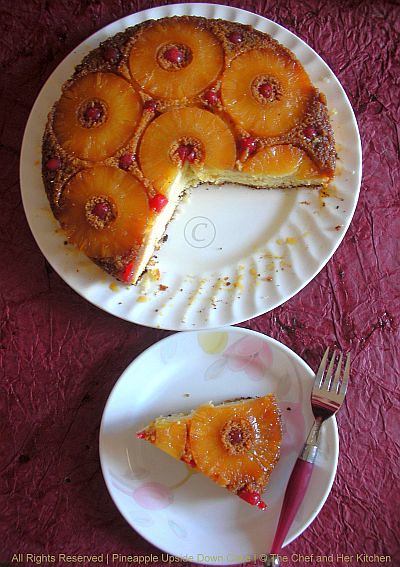
 When I googled for the recipe I landed upon N number of recipes and this post of Mrignayani has bowled me completely and gave me the comfort to proceed with the recipe.I just loved the caramel oozing out from the cake in her picture and went ahead to check the original recipe in Joy of Baking site.I just followed the recipe blindly and I must say that this is a keeper recipe and is must try for all pineapple lovers.The more interesting part of the recipe is the caramel crust which is just 'to die for' and even the cake is so soft,light and fluffy,I just loved it very much and I really mean it.My husband thoroughly enjoyed the cake and I was happy for my decision to bake this cake as he did not mind eating large portions which is not usual.
I generally take few photographs of the steps in between when a recipe is complex and needs an explanation with photo tutorial.Inspired by many fellow bloggers I gave an attempt to take step-by-step pictures and later realized I missed few steps but not bad,so excuse me for that!!I agree that it is really difficult to take the step-by-step photos handling camera in one hand while cooking or baking and I really appreciate all those who do step by step for every post.
 Ingredients:
(Recipe source:Joy of Baking)
for Cake Batter:
1 1/2 cups(195 grams) all purpose flour/maida
1/2 cup (113 grams) unsalted butter, at room temperature
1 cup (200 grams) granulated white sugar
2 large or 3 small eggs, separated
1/2 cup (120 ml) milk
2 teaspoons baking powder
1/4 teaspoon salt
1 teaspoon pure vanilla extract
1/4 teaspoon cream of tartar( I did not use,so optional)
for Caramel Pineapple topping:
4 tablespoons (1/4 cup)(55 grams) unsalted butter, cut in small pieces( I used salted one)
3/4 cup (160 grams) light brown sugar
7-8 pieces of tinned pineapple
Candied cherries (optional)
 Method:
Oven pre-heating and preparing the tin:
- Preheat oven to 350 deg F (180 deg C) and place rack in the center of the oven.
- Butter (or spray with a non stick vegetable spray) a 9 inch (23 cm) round cake pan with three inch (7.5 cm) sides.
for Caramel Pineapple Topping:
- Drain the pineapple pieces from the tin and pat dry the pineapple pieces to remove extra moisture.
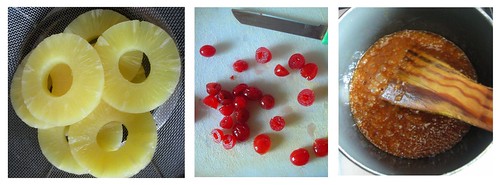
- Place the butter and brown sugar in a small saucepan and stir over medium heat until the butter has melted and the sugar has dissolved.
- Continue cooking, without stirring, for a few more minutes or until bubbles just start to appear around the outside edges of the mixture (the sugar starts to caramelize). Then remove from heat, and pour into your prepared cake pan.
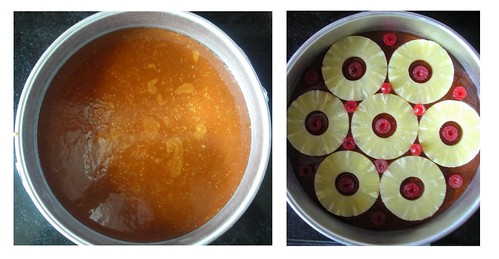
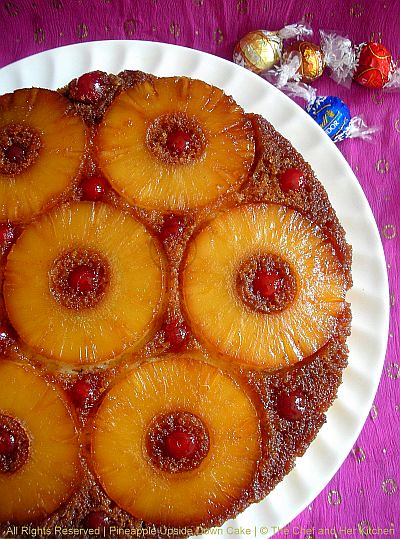
- Evenly arrange the fresh pineapple slices on top of the sugar mixture.Place the candied cherries in the gaps of pineapple or arrange according to your wish.
- In a large bowl, sift or whisk together the flour, baking powder, and salt.do it for a couple of times which helps in getting a evenly mixed flour.
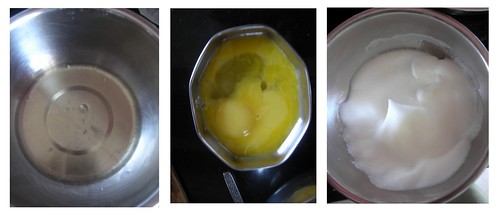 Separate the yolks from the whites and place the whites in a wide bowl.
- In a clean bowl, whisk the egg whites(with the cream of tartar if you are using) just until the whites hold a firm peak.

- In another bowl beat the butter and sugar until light and fluffy using a hand mixer.Scrape down the sides of the bowl and then beat in the vanilla extract.
- Add the egg yolks, one at a time, beating well after each addition. Scrape down the sides of the bowl. Add the flour mixture in three additions and then add milk in two additions.
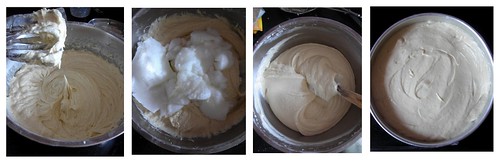
- With a large spatula gently fold the beaten egg whites into the cake batter in two additions.
- Pour the batter into the cake pan, smoothing the top with a spatula.Tap the tin twice,this helps in removing the air bubbles formation in the batter.

- Bake in preheated oven for 45 - 50 minutes, or until the top of the cake has browned and starts to pull away from the sides of the pan.A toothpick inserted into the cake (not the pineapple) should come out clean.
- Remove from oven and place on a wire rack to cool for about 2-3 minutes. Run a sharp knife around the edge of the pan and then invert the cake onto your serving plate.
Serve with softly whipped cream or Ice cream.
 Notes:
Notes: - You can even use fresh pineapple as I don't like working with fresh pineapple I preferred a canned one.
- The original recipe asked to rest the cake for 10 mins after baking and I followed it.But I felt whatever the sugar caramel which melted has got crystallized by then.So I suggest you not to rest the cake for long time once it is out of the oven.And I missed the beautiful caramel sauce flowing out of my cake.Bit I rolled the crystallized sugar into small pieces of candies and thoroughly enjoyed it.