Friday, May 31, 2013

Drumstick Tomato Curry Recipe | Mulakkada Kura - Andhra style

drumstick curry
Drumstick is a common vegetable used in Andhra for preparing various varieties like sambar, rasam, dal, curries and even pickle.It has a typical flavor which makes the dish quite tasty and I never miss buying it when I go for veggie shopping.Today, I am posting a very simple drumstick-tomato curry which serves as a good combination with rice.
mulakkada tomato kura
Check out other Drumstick varieties in my blog:
Drumstick Tomato Curry | Mulakkada Kura:
(Serves 2)

Ingredients:
2 Drumsticks,cut into 2" pieces
1 Onion,chopped
1 big Tomato,finely chopped
3-4 Garlic pods,roughly chopped
1 tbsp chopped Coriander leaves
a sprig of Curry leaves
3/4 tsp Red chili powder 
a pinch of Turmeric powder
1 Red chili
2 tsp Chana dal
1/2 tsp Mustard seeds
1/2 tsp Cumin seeds
Salt to taste
1-2 tbsp Oil

Method:
  • Heat oil in a kadai/pan and crackle mustard and cumin seeds.
  • Add chana dal and fry until they turn slight red in color.
  • Add red chili,curry leaves,garlic pods and fry for some time and then add chopped onions and fry well until they turn translucent.
  • Add the chopped drumsticks and fry well for 4-5 mins.
  • Now add chopped tomatoes and fry for another 2-3 mins until the tomatoes become mushy.
  • Add turmeric powder and some water(1/2 cup) to it and cook it covered for 5-6 mins until the drumstick pieces are cooked.You can add more water to it to make it thin and also adjust the seasonings accordingly.
  • Add salt and red chili powder and cook for 2 mins.Garnish with Coriander at the end.
Serve it hot with hot steamed Rice and papad/fryums.
drumstick tomato curry
Notes:
  1. You can increase the amount of onions and tomatoes in the recipe according to your wish.
  2. Adjust the amount of red chili powder in the recipe.
drumstick curry

Wednesday, May 29, 2013

Carrot Beetroot Halwa | Gajar aur Beetroot Halwa

I am celebrating the 500th post on my 4+ years old site - The Chef and Her Kitchen through 
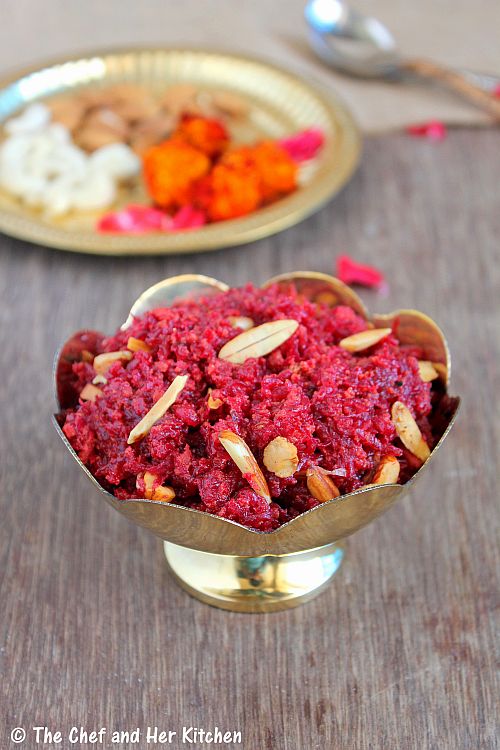
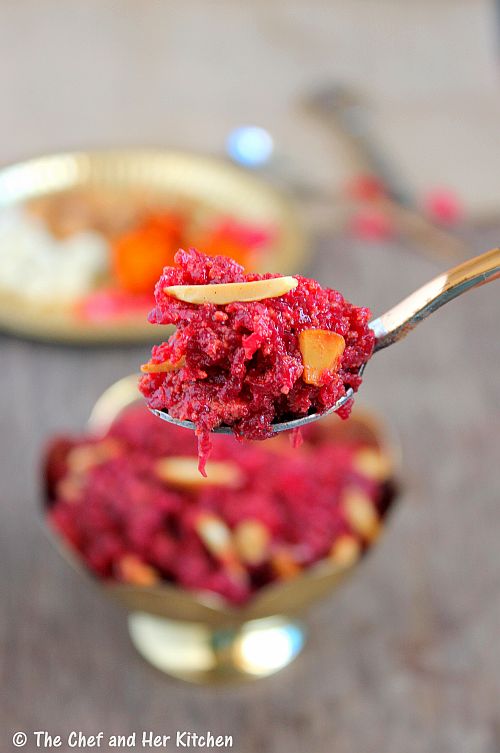
a sweet recipe - Beets & Carrot Halwa.
Halwa is a popular Indian dessert which gets featured in any Indian wedding or occasion.There are various varieties of halwas and the most popular among them is Carrot Halwa aka Gajar ka Halwa.Though I do not prepare halwa varieties often but during winters, I do not miss preparing Carrot halwa with the red Delhi carrots which are available only in that particular season. The extra sweetness of the red carrots adds a nice taste and makes the halwa more delicious.This winter season, I paired the red carrots with fresh beetroot and prepared this delicious Beets & Carrot Halwa. Well yes - its been a while since the winter season - its been over 4 months since I prepared it - as  I was preserving this post for the occasion. 
Halwa is usually prepared using Khoya/Mawa but I use Condensed milk to prepare it, as it is difficult to fetch mawa sometimes.The addition of condensed milk does not alter the traditional taste of halwa and also makes the preparation process a bit easy.I prefer to use my small Hawkins pressure cooker to prepare halwa instead of kadai as the process is quite quick.One can follow the same process for preparing various halwa varieties like Carrot halwa, Beetroot Halwa and Lauki(bottle gourd) halwa.Check out my Lauki  ka Halwa recipe which I prepared in a similar way.
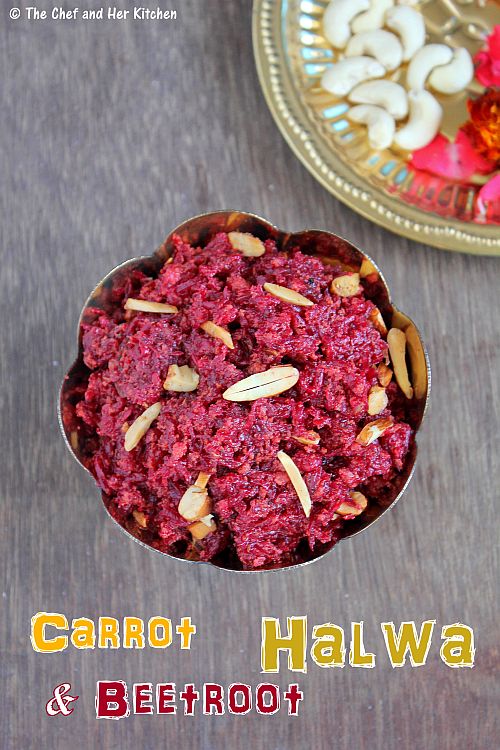
Beets - Carrot Halwa | Gajar aur Beetroot ka Halwa Recipe:
(Serves 5-6 generously)

Ingredients:
2 medium Beetroots, peeled and grated
4 large Red or Orange Carrots, peeled and grated
2 cups Full cream Milk
1/2 tin Condensed milk(200ml approx)
1/4 tsp Cardamom Powder
4 tbsp Sugar(add it accordingly)
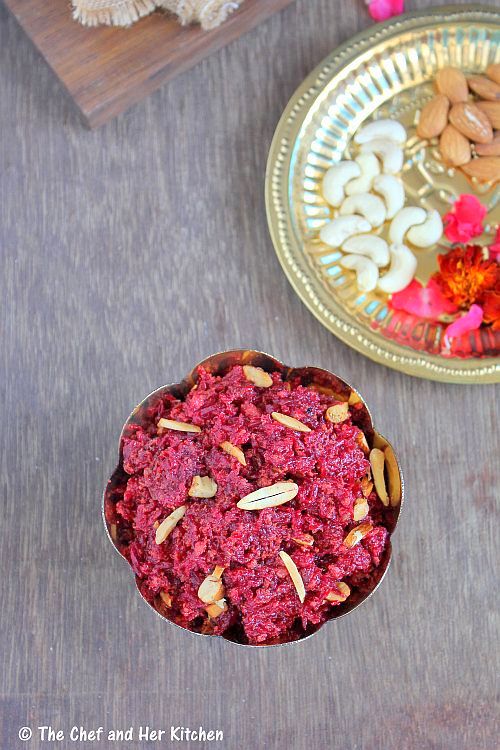
2 tbsp chopped Cashew nuts
2 tbsp flaked Almonds
2 tbsp flaked Pistachios
2 tbsp Raisins
4 tbsp Ghee

Method: 
  • Heat 2 tbsp ghee in a small pressure cooker and add grated carrots and beetroot to the remaining ghee and fry for 3-4 mins and add milk to it and close the lid and bring it to full pressure on high heat and remove cooker immediately from heat.
  • Release the pressure immediately and open it(or you can cook the grated carrots and beetroots in milk on a stove top which is bit time consuming).
  • Place the cooker on high heat,add sugar and condensed milk and cook until the liquid dries up(approx for 15-20 mins) stirring occasionally.
  • Add 2 tbsp ghee and cardamom powder and cook until the ghee separates from the mixture(this takes approx 10 mins),stirring constantly.
  • Heat ghee in a small pan and fry cashews and raisins and add this to the halwa,add flaked almonds and pistachios and mix everything.
Serve the halwa hot/cold garnished with flaked almonds and pistachios.You can even serve it warm with vanilla ice cream.
Notes:
  1. You can make just beetroot or carrot halwa using the same recipe.You can even prepare bottle gourd(lauki) halwa following the same process.
  2. You can replace condensed milk with 1/3 cup mawa(khoya) and also increase the sugar quantity to 1/2 cup approximately.
  3. I use pressure cooker as it is easy and faster to prepare,you can do the whole process in a thick kadai.You need to be patient as it takes more time to prepare halwa.
  4. I used less ghee in preparing this halwa,you can add little more if you want it really rich.
  5. I used Red carrots(Delhi variety) to prepare this halwa,you can use either red or orange variety of carrots to prepare the same.
This spoonful of halwa is for you all for your constant support which helped me to reach this far milsetone.I must thank all my readers,blogger friends and family for your support.
 

Monday, May 27, 2013

Five Taste Uthappam | Uthappam Toppings ideas

five taste uthappam
'Uthappam' or 'Oothappam' or 'Utappa' is a thick dosa and is usually prepared with various toppings of vegetables like tomatoes,onions,carrots etc.If I go to any joint for breakfast,my typical order constitutes Masala Dosa or Set dosa unless something else impresses me in their menu. I don't usually order Uthappam when I go out as I prefer eating it at home-don't know why!!
capsicum uthappam
carrot uthappam
Onion Uthappam is the most famous among all other Uthappam varieties and is also my personal favorite.I usually love to add generous amounts of finely chopped onions,green chillies and coriander and sprinkle lots of Milagai podi over it and roast with a double dose of ghee-it tastes really delicious. Today I am posting various toppings options for Uthappam which might be colorful and a perfect way to feed those fussy kids.
The batter for uthappam is bit different from the regular batter and it makes a soft and fluffy uthappam.You can be creative with the toppings and use the same batter for any kind of uthappam.
Check out another interesting version of Uthappam - Masala Uthappam, a version from Khao gallis of Mumbai.
uthappam toppings

Five Taste Uthappam Recipe: 

Ingredients:

for Uthappam Batter:
2 cups Raw rice(sona masuri or similar)
2 cups Idli Rice or Par boiled rice
1 cup whole white Urad dal
1/4 cup Toor dal
1/4 cup Chana dal
1 tsp Fenugreek seeds
a pinch of cooking soda
Salt to taste 
Oil/Ghee, to roast utappams

for toppings:
1 small Tomato,seeded and chopped fine
1 Onion, finely chopped or Shallots,sliced
1 small Carrot,grated
1 green Chili,finely chopped
1/4 cup finely chopped mixed bell peppers
2-3 tbsp chopped fresh Coriander
2 tbsp Idli Milagai podi,to sprinkle
onion uthappam
 tomato uthappam
Method:

to make dosa batter:
  • Wash and soak raw rice,idli rice(or par boiled rice), urad dal, toor dal, chana dal, fenugreek seeds together in water for  4-5 hrs.
  • Grind all the ingredients in the wet grinder to a fine batter by adding water at regular intervals.The batter should be like regular dosa batter consistency.
  • Add required amount of salt at the end of grinding and mix well.
  • Allow the batter to ferment for 12-14 hrs.
to make Uthappam:
  • The dosa batter should be at room temperature.Mix in a pinch of cooking soda and mix well.
  • Pour a small ladle of batter(do not spread) of 2-3" inch size on a hot tawa,you can prepare 2-3 at a time based on your tawa size
  • You can sprinkle various toppings like grated carrots on the first one,chopped tomatoes on the second,finely chopped onions(or shallots) + finely chopped green chillies on the third one, chopped coriander leaves + Idli Podi on the fourth one, chopped bell peppers on the fifth one.Pour a tsp of oil/ghee generously over the mixture and also pour the oil from the sides and cover with a lid and cook it on medium flame for a minute or two and remove the lid..
  • Increase the flame to high and cook until you can see the golden brown crust formation.
  • Now turn the dosa to the other side and fry for a minute.
Serve it hot right out from the pan with coconut chutney and Sambar.If you want you can sprinkle milagai podi or kaarapodi over the hot uthappams before serving.Check out other side dishes for Idli/dosa here.
podi uthappam

five taste uthappam
The options for Uthappam toppings are endless.I am sharing you many more options here:
  1. a mix of chopped onions + grated carrots + chopped coriander + chopped green chillies
  2. Potato Masala .check the link for a detailed post.
  3. slices of tomatoes instead of chopped tomatoes
  4. grated Cheese + chopped coriander + chopped green chillies - do not turn this utappam,roast it only on one side.
  5. finely chopped onions + generous sprinkle of Idli Milagai podi
  6. finely chopped onion + chopped tomatoes + chopped green chili + grated cheese - it is called Pizza Utappam.Do not turn this utappam,roast it only on one side.
  7. thinly sliced Mushrooms sauteed in oil and seasoned with salt and pepper.
five taste uthappam

Saturday, May 25, 2013

Sambar Powder Recipe - Karnataka style

I have already posted a version of Sambar powder which is my MIL's version and is typical Andhra style and today I am posting my mom's version.My mom prepares the sambar powder in a huge quantity and she gets it powdered in a mill and this easily lasts for an year and she even gives me from her supply.This sambar powder is very flavorful and we use the same for sambar as well as few rasam varieties like Bele Saaru , Holige Saaru,Tomato Rasam etc.This version of Sambar powder is quite different from my earlier recipe Andhra style Sambar powder and this is a typical Karnataka style preparation.You need to follow the exact measurements and hence I suggest you to buy the ingredients fresh with the exact measurements.It is laborious process but its worth the effort and makes it convenient for you for a long time.

Sambar Powder Recipe:
shelf life : 1 year

Ingredients:
1 kg Coriander seeds
1/2 kg Byadige Red chillies(for color)
1/2 kg Guntur Red chillies(spicier variety)
150 gms Cumin seeds
150 gms Peppercorns
100 gms Fenugreek seeds
50 gms Mustard seeds
50 gms Turmeric sticks
1 packet(50 gms) Asafoetida(good quality rock variety,LG or similar)
1 cup Curry leaves
1 tsp Oil,to roast

Method:
  • In a kadai/pan dry roast each variety - cumin seeds,pepper corns,fenugreek seeds,mustard seeds separately until they pop up and get roasted and keep them separately.
  • Dry curry leaves nicely and dry roast until they are crisp and no moisture is seen.
  • Dry the turmeric sticks in sun nicely and keep them ready.
  • Heat 1/2 tsp oil in the pan and add coriander seeds and fry them until they turn slight brown in color and remove them and keep aside.
  • Heat 1/2 tsp oil in the same pan and add both the varieties of red chillies and fry them until they turn red and remove them and keep aside.
  • Break the asafoetida into small pieces and keep them aside.
  • Let all the ingredients come to room temperature.
  • Mix all the ingredients and get them ground in a flour mill or grind the ingredients in a mixer in small batches to a fine powder.
  • Sieve the powder if necessary.Spread it on a wide deep bottomed vessel and dry it in shade for a day.
  • Store the sambar powder in an air tight container or in small pouches in refrigerator.
Use it in the recipe as required.

Notes:
  1. Because of the humidity in Mumbai I usually keep the big pack of Sambar powder in a ziplock bag in fridge and take out small portion in to an air tight container and use it on daily basis.This way it stays fresh and also not get spoilt.
  2. Use the measurements correctly to get aromatic Sambar powder.
  3. The addition of Byadige chillies gives the nice red color to the sambar,so do not miss using them.
  4. You can grind 1/3 cup of grated coconut with a large tomato and 2 tbsp of sambar powder and add to any vegetable sambar,it tastes delicious and gives the typical Karnataka style sambar.
  5. You can use this sambar powder in various vegetable curries/stir fries and also to make spicy chapatis like theplas,onion chapati etc.
  6. If you do not get turmeric sticks use same quantity of turmeric powder in the recipe.
  7. You can easily make half quantity by reducing the ingredients to half.
  8. Use good quality rock form of strong Asafoetida for an aromatic sambar powder.
Check out few Sambar varieties in my blog:
  1. Gummadikaya(Red Pumpkin) Sambar
  2. Mullangi(Radish) Sambar-with freshly made masala

Thursday, May 23, 2013

Lal Bhaji (Lal Math) Saag | Red Amaranth Stir fry

I got introduced to Lal Bhaji or Lal Math which is red colored Amaranth leaves only after coming to Mumbai and is available here through out the year.I use lot of greens in my cooking and apart from Palak and methi I use green amaranth and red amaranth a lot in my cooking.While palak and methi are very versatile greens and can be used in various varieties,I am left out only few options with amaranth leaves.Most of the times I end up preparing either Stir fry or pair it with moong dal(Amaranth-moong dal stir fry) or in a dal or curry with the amaranth leaves.Today I am posting a very simple and healthy stir fry using Red Amaranth leaves but completely packed with garlic flavor and I just love to eat it with Rice or Bhakris.

Lal Bhaji Saag | Red Amaranth leaves Stir fry:
(Serves 2-3)

Ingredients:
1 big bunch Red Amaranth leaves/Lal Bhaji/Lal Math
1 big Onion,roughly chopped
4-5 Green chillies,finely chopped
5-6 Garlic pods
2 tbsp Oil
Salt to taste

Method:
  • Clean the amaranth leaves and wash them properly and soak it in salted water for 8-10 mins.Chop the leaves finely along with tender stalks.
  • Crush the garlic pods slightly and add this garlic pods to the chopped amaranth leaves and mix it well for 1-2 mins by pressing the garlic pods with your fingers/palm to infuse the flavor of garlic in the greens.This process adds a nice flavor to the stir fry,so do not miss doing this process.
    Heat oil in a kadai and add chopped onions and green chillies and fry for few mins until onions turn pink.
  • Now add the amaranth leaves mixed with garlic and fry for 10-12 mins until the amaranth is cooked.Take care that you would not over cook the greens,they taste best when they are cooked right.
Serve it hot with Roti/Rice/Jowar Bhakri/Bajra Bhakri.
Notes:
  1. You can use green amaranth leaves and follow the same process.
  2. I usually do not add any seasonings in the oil as I like the garlic flavor to dominate in the recipe.You can reduce the garlic if you are not a big fan of it.
  3. I like to keep this recipe simple as it tastes best as it is and I love to eat this with Jowar or Bajra Bhakris.
  4. Use only tender stems of the greens for this recipe.Chop them roughly.

Wednesday, May 22, 2013

Avarekalu Pulao | Hyacinth Beans Pulav | Avarekalu Recipes

Pulao features at least once in a week at my place. My mom used to make this for breakfast and pack the same dish for lunch.Now many of you might be wondering - pulao for breakfast??. My kannadiga friends would however not find it unusual given that in Karnataka Bhat/Bath - a rice variety like Vangi bath, Batani bath, Bisi Bele Bath, Chitranna(Lemon rice), Tomato bath, Veg Pulao, Capsicum bath, Puliyogre etc are usually prepared for breakfast. These varieties are easily available for breakfast and lunch in Darshinis and other hotels in Bangalore.My mom used to make various bath varieties as it is a single pot meal which is quiet convenient to prepare for those busy morning hours and since we used to leave quite early in the day during our school and college days we also used to get the same, packed for our lunch.
At my MIL's place, the concept of eating rice variety for breakfast is something new and hence TH was never fond of it.After my marriage I rarely prepared these bath varieties for breakfast except on the festival days.Now all these kind of bath varieties and pulaos mostly appear on our weekend lunch as I do not like to slog in the kitchen on weekends and hence look for these kind of simple one pot meals which I can finish preparing in flat half an hour.
Today I am posting a simple Avarekalu Pulao which is again a delicacy from Bangalore.Though it is not a very traditional dish,it has been becoming popular these days in many wedding and function menus.If you are a avarekalu lover you should try this simple yet delicious pulao as avarekalu adds a nice flavor to it.

Also check out other Avarekalu recipes in my blog here.

Avarekalu Pulav Recipe:
(Serves 2)

Ingredients:
1 cup Basmati Rice or Jeeraga Samba or regular Rice
1 3/4 cup water
1 cup tender Avarekalu(Hyacinth beans)
8-10 Cashew nuts,split into halves
1 big Onion,sliced
1 Bay leaf
1" Cinnamon
2 Cloves
2 Marathi Moggu
1 green Cardamom
Salt to taste
1 1/2 tbsp Ghee
1 1/2 tbsp Oil

to grind:
3/4" Ginger
4-5 Garlic pods
3-4 Green chillies
1/3 cup grated Fresh Coconut
1/4 cup Coriander leaves
1/2" Cinnamon
2 Marathi Moggu 
1-2 Cloves

Method:
  • Wash and soak basmati rice(or other rice what you are using) for 10 mins.
  • Grind all the ingredients under the section 'to grind' to a fine paste by adding little water.
  • Heat oil and ghee in a pressure cooker and add Biriyani leaf, cinnamon, cardamom, marathi moggu and cloves and fry them for a minute.
  • Add sliced onions and fry until they turn translucent and then add the tender avarekalu and fry them nicely for 2 mins.
  • Add ground masala and fry the mixture until the raw smell disappears.
  • Add washed basmati rice and fry the rice for 2 minutes.Stir it gently.
  • Add the water (1 3/4 cups) and also salt and let it come to a boil.If you are using sona masuri or equivalent increase the water quantity to 2 cups.
  • Pressure cook for 1 whistle and reduce the flame and cook for 8-10 mins.
  • Heat ghee or oil in a small kadai and add cashew nuts and fry them and garnish the pulao with the fried cashew nuts.
Serve the pulao hot with Onion-tomato raita or Boondi raita.

Notes:
  1. If you cannot find Marathi Moggu you can ignore using it but it lends a nice flavor to the pulao.
  2. Use fresh and tender Avarekalu for the pulao.If you do not get hold of fresh ones,you can use frozen ones as well.
  3. If using Basamati rice, for 1 cup rice you can use 1 3/4 -2 cups of water and if you are using any other rice use 2 - 2 1/4 cups of water for 1 cup of rice.

Check out various Bath and Rice varieties which are ideal for lunch box in my blog here:
 

Monday, May 20, 2013

Kanchipuram Idli | Kanchi Idli Recipe | Idli Varieties

kanchi idli
Its been a long time since I posted any variety of idli in my blog.When I prepare Idli batter, it usually lasts for 3-4 days and we usually have plain idli with Sambar or Chutney or prepare this Kanchi Idli,Stuffed Idli and if the batter turns sour, I usually make other varieties like Spicy Onion Idli, Dibba Rotti etc.
kanchi idli
Kanchi Idli (it is also called as Kanjeevaram Idli or Kanchipuram Idli) is another version of Idli which is loaded with peppercorns and other spices like Ginger powder(or ginger),cumin seeds and curry leaves which makes the Idli taste unique and delicious. It originated from the town 'Kanchipuram' in Tamilnadu and hence the name. It is also served as the prashad in Varadaraja perumal temple in Kanchi. Definitely do give it a try in case you have not made it earlier.
kanchipuram idli
Kanchipuram Idli Recipe:
(makes around 7-8 big round 6" idlis)

Ingredients:
2 cups Raw Rice/Idli Rice (or Idli Rava)
1 cup white whole Urad dal
2 tbsp Chana dal or chopped Cashew nuts
1/2 cup fresh thick Curd
a sprig of Curry leaves,roughly chopped
1 tsp dry Ginger powder or 1 tsp chopped fresh Ginger
2 tsp whole Black Pepper corns
2 tsp Cumin seeds
2 tbsp melted hot Ghee
2 tbsp Oil
1/4 tsp Cooking Soda(optional)
Salt to taste

Method:
  • Soak rice and urad dal separately for 3-4 hrs.If you are using Idli rava soak it for just 1 hr before grinding.
  • Wash the urad dal and grind to a fine batter in the wet grinder/mixie and remove it and keep it aside.
  • Now grind the idli rice to a slight coarse batter,the consistency of batter should be like slight rawa textured batter.If you are using idli rawa,squeeze the idli rava and add it to the ground urad dal and grind for 5 minutes.Keep the batter thick and do not add much water while grinding.
  • Add this to ground urad dal batter and mix well and add enough salt and let it ferment for 12-14 hrs.
  • Soak chana dal for 2 hrs and drain them and keep them ready.
  • Add beaten curds,cumin seeds,pepper corns,dry ginger powder(or chopped fresh ginger),torn curry leaves and chana dal(or cashew nuts) to the batter and mix well.
  • Add hot ghee,oil and cooking soda to the batter and mix well.
  • Grease a flat deep container or idli plates (I use thatte idli stand) with ghee or oil and pour batter up to 3/4th of its depth and steam it for 15-20 mins.You can even pour the batter into small cups or tumblers and steam them.This idli takes bit longer to steam compared to regular idlis.If you are using cooker to steam idlis,do not forget to remove the whistle.
  • Leave the plates in the steamer/cooker for 5 mins before you unmold the idli.Run a sharp knife around the edges and try to unmold the idli carefully and cut it it into wedges.
Serve the idli hot with Coconut Chutney and Milagai Podi.
kanchi idli
 Notes:
  1. You can even use Raw rice(regular rice) instead of idli rice or 1 cup of each - 1 cup Idli rice and 1 cup Raw rice in the recipe.
  2. Regular Idli batter(prepared with Idli rava) can also be used to make Kanchi Idlis.
  3. You can add all the ingredients like cumin seeds,pepper corns,ginger powder,curry leaves and soaked chana dal(or cashewnuts) to the batter before fermenting and add the curds,oil and hot ghee on the following day(after fermentation) just before making idlis.
kanjeevaram idli
kanjeevaram idli

Friday, May 17, 2013

Chikoo Milkshake | Sapota Milkshake

Chikoo milkshake and Mango Milkshake are my most favorite among all varieties of milkshakes and would love to have it  anytime especially during summers.I prefer to make milkshake with chikoo rather than eating the whole fruit.Now off to this simple and refreshing milkshake recipe.
Chikoo Milkshake Recipe:
(Serves 2)

Ingredients:
2 big ripen Chikoo/Sapota
3-4 tbsp Sugar
2 cups cold Milk 
2 scoops of Vanilla ice cream (optional)
Method:
  • Remove the skin and cut the chikoo into pieces.
  • In a mixer/blender add chikoo pieces, sugar and 1/2 cup of milk and blend into a smooth puree.Check the sweetness and if needed add extra sugar.
  • Add remaining 1 1/2 cups of milk and vanilla ice cream and run again to the desired consistency.Add more milk if you need a thin milkshake and also adjust the sugar accordingly.
Serve the chilled Chikoo milk shake immediately.
 
Notes:
  1. Add more sugar if required while blending the mixture.
  2. You can substitute chikoo with mango or banana or apple. 
  3. Milk also is to be adjusted according to your desired thickness.
  4. Addition of ice cream is entirely optional,it adds a nice creamy touch to milkshake.

Wednesday, May 15, 2013

Red(or Purple) Cabbage Stir fry with Peanuts | Red Cabbage Recipes

red cabbage stir fry
When I am lazy to cook anything I usually prepare some quick Stir fry and Rasam for lunch and I would say it is my most comforting food.Usually it does not take more than half an hour to cook this meal with rice,stir-fry and rasam and hence it is apt for a quick meal.I like this particular combination of cabbage with peanuts,the addition of peanuts not only adds taste but also the crunch to the stir fry.You can serve this as a salad or a side dish for rotis and rice,it goes very well.
red cabbage stir fry

Red(Purple) Cabbage Stir fry with Peanuts:
(Serves 2-3)

Ingredients:
1 small Red or Purple cabbage,finely shredded
1/2 cup roasted Groundnuts,skinned and halved
4-5 Red chillies,broken
a sprig of Curry leaves
1 tsp Cumin seeds
1/2 tsp Mustard seeds
Salt to taste
1 tbsp Oil

Method: 
  • Heat oil in a kadai and crackle mustard seeds and cumin seeds.
  • Add broken red chillies and curry leaves and saute again for a minute until they turn slightly crisp.
  • Add shredded cabbage and fry on medium-high flame for 2-3 minutes and cover it and reduce the flame and cook for another 3-4 mins.Now the cabbage would start slightly change the color and is 3/4th cooked,it should be crunchy and not become soggy.
  • Slightly crush half the peanuts in a mortar and pestle or do it using a rolling pin.
  • Add salt and crushed peanuts and halved peanuts and stir fry on high flame for 2 minutes.
Serve it hot immediately with Roti/Rice.You can have this as a salad as well,it tastes nice too.
red cabbage salad
Notes:
  1. Always add peanuts at the end otherwise they will loose their crunch and it does not taste that good.
  2. In case you are preparing this stir fry ahead of time do not add peanuts in it,add the peanuts jsut before serving and give a quick stir on high flame.
  3. You can replace red chillies with green chillies in the recipe.
  4. Regular cabbage can be used instead of red cabbage and follow the same recipe.
  5. Grated carrots can also be added along with carrots in the recipe.
red cabbage salad

Monday, May 13, 2013

BHURJI PAV RECIPE | PANEER BHURJI PAO

bhurji pav
Mumbai - the city that never sleeps...!!
This city is filled with lot of energy and you can see large crowds even at odd times in the night.Many food joints and street hawkers open until late nights. While we are not one of those who love to venture late nights, there are a few times when we go for a party or a late night movie. Many hawkers open their Anda Bhurji stalls and make the sizzling Anda bhurji in their heavy bottomed hot tawas and is usually served with pav. I have not tasted this anytime, as I do not eat eggs (use them in cakes though). I usually prepare Egg Bhurji (Anda Bhurji) for TH sometimes and try to make something else for me. 
bhurji pav
Paneer Bhurji is a good alternative for those like me who do not eat eggs. We both love it very much and so several of my weekend breakfast or dinner would feature this simple Paneer bhurji paired with butter laden roasted pav.I would say that it is a simple yet delicious food which you can prepare as breakfast/lunch/dinner.
paneer bhurji

Paneer Bhurji Pav Recipe:
(Serves 2)

Ingredients:
1 cup crumbled/grated fresh Paneer(Cottage Cheese)
1 medium Onion,finely chopped
2 Green chillies,finely chopped
1/2" Ginger,finely chopped
1 Tomato,finely chopped
1 small Capsicum,finely chopped
1/2 tsp Red chilli powder
1/4 tsp Garam masala
1 tsp Pav Bhaji masala
1/4 tsp Turmeric powder
1 tbsp Lemon juice
2 tbsp Coriander,chopped
Salt to taste
1 tbsp Oil
2 tbsp Butter

Method:
  • Heat oil in a kadai/pan and add finely chopped onions and green chillies and fry until the onions turn pink.
  • Add ginger-garlic paste and fry well.
  • Now add finely chopped capsicum and fry for a minute and then add chopped tomatoes and saute until it becomes slightly mushy.
  • Now add garam masala,pav bhaji masala,red chilli powder and turmeric powder and fry for a minute.
  • Add crumbled paneer and salt and give a good mix and saute for a couple of minutes.The mixture should be moist and not dry,add a tbsp of water if required and cook for a minute.
  • Add the butter at the end and mix it properly.
  • Switch off the flame and add lemon juice,chopped coriander and chopped ginger and mix it.
Serve it hot with roasted butter ladened pav with some sliced onions and lemon wedges.
bhurji pav
Notes:
  1. It can be placed in a chapati and make it into a roll and serve for kids.
  2. This can be used as a filling for parathas,Samosa,Bread rolls.
  3. You can add colored bell peppers along with capsicum in the recipe.
  4. Instead of Pav bhaji masala you can even add Kitchen king masala in the recipe.
  5. Replace Paneer with 2-3 eggs in the recipe to make the famous 'Anda Bhurji'.Just break the eggs and add them instead of paneer and let them sit for a minute and then run your spatula to scramble them and follow the same process.You can avoid lemon juice for Anda bhurji.
paneer bhurji

 
back to top