Monday, May 26, 2014

Soya Chunks Biryani Recipe | Soya Chunks Recipes

soya chunks biryani
I love Pulaos and Biryanis for the fact that they are one pot meal and can be prepared quickly,while few Biryani recipes are bit complicated and time consuming. I reserve the Dum Biryanis for occasions and always adopt a simple one pot pressure cooker method for daily basis. These kind of one pot dishes are ideal for lunch box or for a week end lunch.
nutrela biryani
 I usually add soya chunks even to my vegetable pulaos but in moderate amounts. Soya chunks is also known as 'Nutrela' or 'Meal Maker'.Soya chunks has meaty texture and is a very good source of proteins for vegetarians, hence I include it in many of the gravies and pulaos on daily basis. As Soya chunks are bland in taste you need to spice it up a bit but they observe the flavours beautifully and make the dish delicious. We get soya chunks in two sizes and I prefer to use the mini soya chunks over the bigger ones. I follow more or less a similar recipe for most of my one pot biryanis and love the flavourful outcome all the time. Pair it with Onion-Tomato raita and papad and enjoy the delicious meal with your family.
meal maker biryani
soya chunks biryani

Soya Chunks Biryani Recipe:
Serves 2
Prep time: 10 mins | Cooking time: 20 mins | Total time: 30 mins
Cuisine: Indian | Category: Pulao/Biryani - Main Course

Ingredients:
1 heaped cup Basmati rice
3/4 cup mini Soya Chunks
1/3 cup fresh/frozen Green peas
2 cups Coconut Milk(medium consistency,see notes)
1 large Onion,finely sliced
1 tsp Biryani Masala or 1/4 tsp Garam masala
1/2 tsp Red chili powder
1/4 tsp Turmeric powder
few mint leaves
1 Bayleaf
1/2" Cinnamon
2 Cloves
1 Cardamom, slightly crushed
1 tsp Shahjeera(black Cumin seeds)
Salt to taste
2 tbsp Oil
1 tbsp Ghee

to grind:
1 Tomato,chopped
2 Green chillies
1/4 cup Mint leaves
1/8 cup Coriander leaves
4-5 Garlic pods
3/4" Ginger,chopped
1/2" Cinnamon
2 Cloves
1 tsp Fennel seeds(saunf)

Method:
  • Grind all the ingredients mentioned under 'to grind' to a smooth paste and keep it aside. 
  • Wash and soak basmati rice in water for 10 mins.
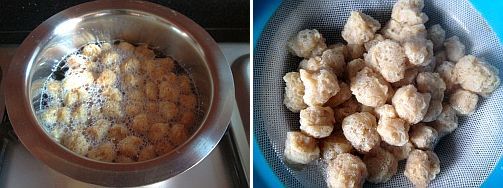
  • Boil 2-3 cups of water in a vessel and add soya chunks and boil for 2-3 minutes or immerse in hot water for 7-8 mins.Drain them and drop them again in cold water and squeeze them and repeat the cold bath once again and squeeze them and keep aside.This process ensures to remove the raw smell from soya chunks. 
  • Heat oil and ghee in a cooker and add bayleaf followed by shahjeera, cloves, cardamom and cinnamon and fry for half a minute. 
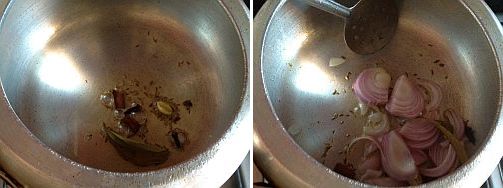
  • Add sliced onions and fry well until they turn pink color.
  • Add green peas and boiled and squeezed soya chunks and fry well for a minute. 
  • Now add ground masala and fry well for 2-3 minutes until the raw smell disappears.
  • Now add turmeric powder, red chili powder or Garam masala(or biryani masala) and fry for a minute again.
  • Add soaked and drained basmati rice and fry for a minute until the moisture in the rice dries.Do not roast for long as the rice would break.
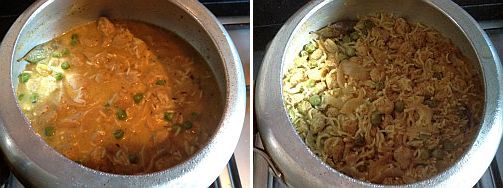
  • Add coconut milk to it, mint leaves and salt and bring it to a boil and cover it and pressure cook for 1 whistle and simmer it for 7-8 mins.Switch it off and let the pressure drops on its own.Fluff up the rice with a fork.
Serve it hot with Tomato-Onion raita and papad.
soya chunks biryani
Notes:
  • If you use tinned Coconut milk which is of thick consistency you can dilute 1 cup of coconut milk with 1 cup of water to get 2 cups of thin coconut milk.You can even mix coconut milk powder in hot water to get the desired consistency as mentioned on the pack.
  • You can use water instead of coconut milk in the recipe. In that case I recommend you to add 2 tbsp beaten curd before adding water and fry slightly.
  • Along with soya chunks,you can add vegetables like carrots, beans, potatoes, cauliflower, capsicum and reduce the quantity of soya chunks in the recipe.
soya chunks biryani

Wednesday, May 21, 2014

Arbi Roast | Chamadumpa Vepudu

arbi roast
According to me, Arbi(Taro root) is one of the most tastiest vegetables and I prepare it almost every weekend as TH is also very fond of it. I make mostly dry preparations like arbi fry,arbi roast to pair with rice or as marinated dahi arbi roast or arbi ajwaini which pairs nicely with rotis.Arbi fry tastes best when it is deep fried and as I do not use much oil in my cooking I prefer to do it in my oven which not only saves my time but also consumes very less oil. I use my oven often in my cooking and it helps in preparing most of the vegetable fries - potatoes, ladies finger, raw banana, yam with very less oil.
chamadumpa fry
Check out other fry recipes in my blog.
chamadumpa vepudu

Arbi(Taro root) Roast | Chamadumpa Vepudu:
Serves 2
Prep time: 10 mins | Cooking time: 30 mins | Total time: 1hr(with cooling time)
Cuisine: South Indian | Category: Stir fry|Curry

Ingredients:
250 gms Arbi(Taro root)
1 tbsp Rice flour
1 tsp Red chili powder
1/4 tsp Turmeric powder
1/2 tsp Amchur powder(optional)
Salt to taste
1 tbsp Oil

to temper:
1 tsp Urad dal
1/2 tsp Mustard seeds
2 Red chillies,broken 
a sprig of Curry leaves
1 tbsp Oil

Method:
  • Soak arbi in water for some time and rub it nicely to remove extra dirt and wash it  properly in few changes of water.Pressure cook arbi with enough water for 1 whistle.Let them cool completely.Peel the skin and chop them into big chunks.
  • In a bowl add chopped taro root(arbi) and sprinkle rice flour, red chili powder, turmeric powder, amchur powder, salt and oil to it and gently mix so that the spice mix coats all the pieces nicely.You can add more rice flour if you need and also adjust the seasonings according to your wish.
  • Now follow any of these 3 methods which I mentioned below.I followed the oven method which is healthy and less calorie version and also yields very crispy fry.
method1:
  • Line the baking tray with silver foil and arrange these slices in a single layer and sprinkle some oil over it and bake in oven at 160 deg for 20-25 mins.Keep an eye after 20 mins so that they will not get burnt.If the edges are crispy and changes its color means its done.Do not over bake them,they will become tough.
method2:
  • Deep fry them in oil until golden brown and crisp.
method3:
  • In a wide non-stick kadai heat 2 tbsp oil and arrange the taro root pieces in a single layer and let them fry for 12-15 mins until crisp.Give a stir in between so that they don't get burnt.
  • Heat the kadai and add 1 tbsp oil and heat it.
  • Add mustard seeds and let them crackle and then add urad dal,red chillies and curry leaves to it.
  • Add fried taro root chunks (prepared by following any of the three methods mentioned above) and fry them on medium-high flame for 2-3 mins.
Serve them hot with rice or as a side dish for sambar/rasam with rice.
chamadumpa vepudu

Notes:
  1. These kind of roasts/fry will loose their crispiness after a while,so its better to serve immediately.
  2. In case you want to serve later you can roast them again in the same pan for 4-5 mins on medium flame to get the crispiness back at the time of serving.
  3. You can follow the same process for potatoes,baby potatoes and Raw Bananas.
  4. You can replace rice flour with besan(chickpea flour).
  5. You can add sambar powder along with red chili powder in the recipe.
  6. Do not cook for long as the taro root will get mushy.

Monday, May 12, 2014

Pacchi Pulusu | Raw Tamarind Rasam | Easy Rasam Varieties

'Pacchi Pulusu' in Telugu literally translates to 'Raw Stew'. We even call it as 'Pacchi Chaaru' or 'Pacchaaru'. It is a raw tamarind stew where the tangy taste of tamarind is balanced with spicy one  from green chillies and sweetish tinge from jaggery. Finely chopped raw onions are added to it for extra crunch.This is the the usual method of preparing pacchi pulusu,but at my MIL's place they add roasted urad dal powder to it and it is called 'Minapa pindi Pachi Pulusu ' (Urad dal powder tamarind stew).The addition of urad dal powder not only adds thickness but also helps balances the taste of Pacchi Pulusu. It is though optional to add the tempering to the rasam.This is an ideal preparation if you are craving for something tangy to tickle your taste buds.You can check out another version of pacchi pulusu called 'Aratikaya(Raw Banana) Pacchi Pulusu' in my blog.


Pacchi Pulusu | Pacchi Chaaru | Raw Tamarind Rasam Recipe:

(serves 2)

Ingredients:
1 big lemon sized Tamarind
2-3 tbsp grated Jaggery
2 tbsp roasted Urad dal powder*(optional,see notes)
2-3 Green chillies
1 Onion,finely chopped
Salt to taste

to temper(optional):
1 tsp Oil/Ghee
1/2 tsp Mustard seeds
a sprig of Curry leaves

Method:
  • Soak tamarind in water for 10-15 mins and extract the pulp and dilute the tamarind pulp with approx 1- 1 1/4 cups of water.
  • Add grated jaggery,urad dal powder(if using) and salt to it and mix and make sure that no lumps are formed.
  • Traditionally green chillies are squeezed directly with hand in the above mixture.This process might create some burning sensation in your palms,hence I usually use my mortar and pestle to crush the slit chillies a bit and add to the rasam.You do not need to grind the chillies to a paste,just crush it roughly and add.
  • Now mix everything well and taste the rasam at this point.Adjust the consistency of rasam and also the sweet,spicyness,tangyness and salt in it.The taste depends on individual taste buds and hence adjust it according to your taste buds.
  • Add finely chopped onion to it and mix well.The more the onions the better the taste is.
  • This step of tempering is optional but I do it sometimes.Heat oil/ghee in a small tempering pan and crackle mustard seeds and add curry leaves and fry them and add them to the rasam.
  • Let it stand for half an hour for the flavors blend well.If you wish you can serve immediately.
Serve it with hot rice and papad/fryums.This rasam would be at room temperature as we do not heat it.

*making urad dal flour:
  • Dry roast whole urad with skin(or white urad dal) over medium flame until you get nice aroma and well roasted ,it takes around 4-5 mins and let it cool and then powder them into a smooth powder.
  • This can be refrigerated 3-4 months and can be used to prepare Andhra famous sweet called  'Sunnunda' and this 'Pacchi pulusu'.
Notes:
  1. Usually in regular 'Pacchi Pulusu' we do  not add roasted urad dal powder.If I have the roasted urad dal powder in hand I usually add it otherwise it is optional.It adds the thickness as well as the taste to Pachhi Pulusu.
  2. I have mentioned in the method about how to crush green chillies.So do not attempt doing it using your hands unless you are used to it.
  3. This recipe depends on your taste buds and there are no actual measurements to make this rasam.You need the adjust the consistency,spicyness,tangyness,sweetness and salt according to your wish.

Monday, May 5, 2014

Vegetable Idli Recipe | Idli Varieties | Breakfast Recipes

vegetable idli
I always look for interesting Breakfast options as that is my favorite meal of the day.I cannot stick to the same dish every time as I get bored of it.I like to eat Idli but I do not prefer to eat it in the same form in a row for breakfast.I always try to prepare various options with it and make it more interesting.If you are someone like me, try this Vegetable Idli for a change instead of regular idli.It is a great way to sneak vegetables for your kids.
vegetable idli

Also check out other interesting Idli varieties:
vegetable idli

Vegetable Idli Recipe:
yields: 12 idlis
Prep time: 10 mins | Cooking time: 20 mins | Total time: 30 mins + cooling time
Cuisine: South Indian | Category : Breakfast

Ingredients:
3 cups Idli batter
12-15 Cashew nuts,split into two halves
1/4 tsp cooking soda
1 tbsp Ghee
for vegetable mixture:
1 medium Carrot,finely chopped
1/4 cup Cabbage,finely chopped
10-12 French Beans,finely chopped
1 small Capsicum,finely chopped
1/4 cup fresh/frozen Green Peas
2 tbsp grated fresh Coconut
1 medium Onion,finely chopped
2-3 tbsp chopped Coriander
a sprig of Curry leaves,chopped
2 tsp Green chilli paste
1/2 tsp mustard seeds
1 tbsp Oil
Salt to taste

Method:
to prepare Vegetable mixture:
  • Heat ghee in a kadai and add halved cashew nuts and fry them until light golden in color.Remove and keep them aside.
  • Heat oil in a kadai and crackle mustard seeds and add finely chopped onions,curry leaves and saute until it is slight pink in color.Add green chilli paste to it and fry well.
  • Add chopped carrots,beans and green peas and fry well for 4-5 mins until they are slightly cooked.
  • Add chopped cabbage and capsicum and fry for another 2-3 mins.You don't need to make the vegatables really soft,if they are slightly crunchy its fine as we steam the batter they will get cooked nicely.
  • Add enough salt and mix well.
  • Switch off the flame and let the mixture cool a bit.
  • Add coriander,grated coconut to it and mix well. 
to prepare Vegetable Idli:
  • Add fried vegetable mixture to the batter and mix well.
    Add cooking soda to a ladle and mix it with a tsp of water and add this to the batter and mix it well,the batter becomes bit light.
    Grease the idli plates with oil and place roasted cashew nuts and pour a ladle of idli batter until each impression is filled 3/4th.
    Steam it in idli steamer or pressure cooker(with out whistle) for 10-12 mins.Let it rest for another 5 mins.
    With a idli spoon cleanly remove the idlis.Dip the idli spoon in water in between which helps to remove the idlis easily from the plate.

 vegetable idli
Notes:
  • You can use the same batter to make vegetable dosa.Make the dosas bit thick like uthappam and roast until crisp on one side.
  • Adding cooking soda is a must otherwise the idlis come out hard.So in order to get soft and fluffy idlis we should add cooking soda to the batter.
  • You can use idli batter either prepared with Idli rice or Idli rava to prepare these idlis.But I prefer to use the batter made up of Idli rice.
vegetable idli

 
back to top