Monday, February 27, 2012

Zebra Cake with Zebra Fondant Icing...and my Third Blog Anniversary!!!

My Blog turns 'THREE' this month.
I started this blog to record my recipes online, as a hobby; which later turned to a passion and I never thought that I would reach this far.I must admit that the culinary journey has been quite interesting, exciting and a wonderful one which gave me an opportunity to learn and know more about various cuisines.
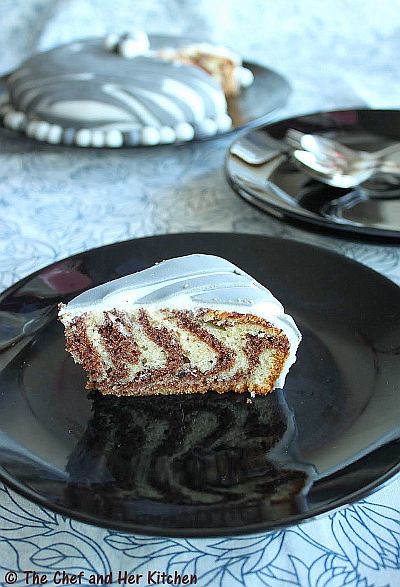
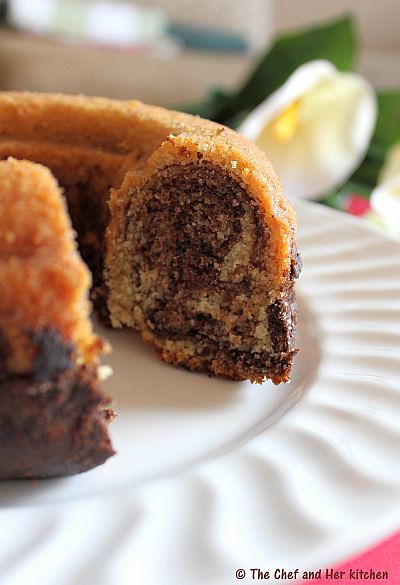
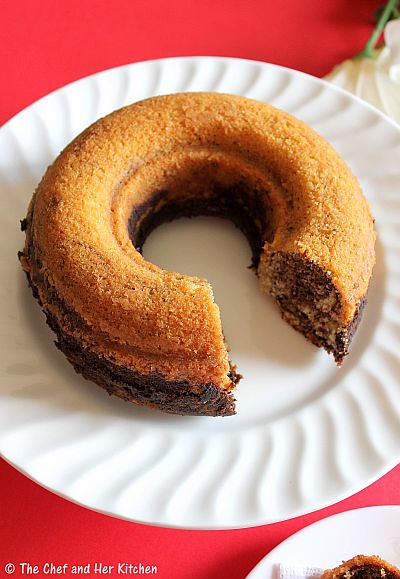
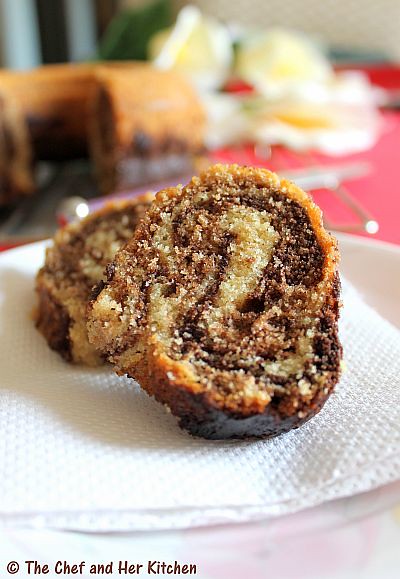
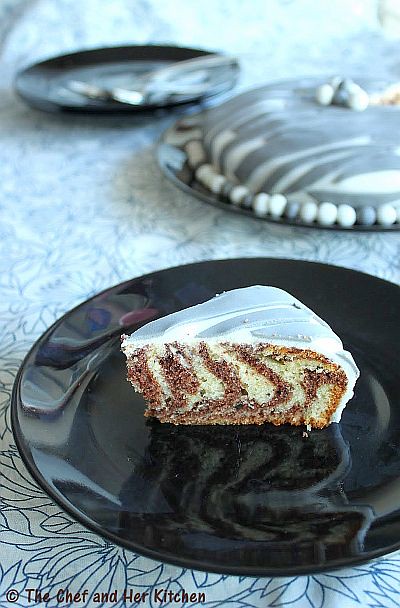
I would like to give a visual treat to my blog and all my readers and friends with a sweet post to celebrate the occasion.I made Farida's famous Zebra cake which is quite popular in blogosphere and also tried my hands on fondant for the first time.This is my first fondant experiment which turned quite nice and gave me enough confidence to work with fondant in future.Though I have adapted a simple zebra striped pattern to go with my zebra cake, playing with various colors of fondant and rolling in to various shapes is definitely a fun filled activity which I thoroughly enjoyed.One does not need to attend any cake decorating class to start with fondant,Trust me..!! when I could work with fondant I am sure even you can.I have mentioned few pointers for easy guidelines, in case you are working with fondant for the first time.Though I used a black color it did not turn out black and gave a shade of grey,I think I should added few more drops of black color.I referred Wilton's site for some tips. My S-I-L helped me while decorating it.I would also like to thank my little niece 'K' for letting me use her valuable Minnie mouse for the photographs.
Zebra Cake Recipe:
(makes one 9-inch round cake)
Recipe Source: Farida's AZcookbook

Ingredients:
2cups(300g) All-purpose flour
1cup(250g) granulated Sugar
1cup(250ml) Milk,at room temperature
1cup(250ml) Oil
4large Eggs, at room temperature
2tbsp dark Cocoa powder
1tsp Vanilla essence
1tbsp Baking powder
Method:
  • Preheat the oven to 350F (180C) for 12-15 mins.
  • Grease a 9" round tin with oil and dust it with flour evenly and remove the excess flour or line the pan with parchment paper.
  • Sieve flour with baking powder a couple of times until it is mixed well.
  • In a large mixing bowl,combine eggs(both egg whites and yellows) and sugar. Using an electric whisk or wire whisk beat the mixture until it is creamy and light in color.
  • Add milk,vanilla essence and oil to the egg mixture and continue beating until it is mixed well.
  • Now gradually add the flour mixture to the wet ingredients and beat until the batter is smooth and the dry ingredients are thoroughly incorporated. Try not to over beat the batter as this will remove the air pockets formed in the batter.
  • Divide the mixture into 2 equal portions. Keep one portion plain and add cocoa powder into the other portion and beat well until it is well mixed.Make sure you sieve the cocoa powder before otherwise you will end up having the lumps in the cocoa batter.
  • Now comes the most interesting part of assembling the cake to get that beautiful zebra pattern.
  • Scoop 3 heaped tbsp or 1 ladle of plain white batter into the middle of the baking pan.Then scoop 3 tbsp or 1 ladle(same sized) of cocoa batter and pour it in the center on top of the plain batter.You need not to wait until the previous batter spreads and also do not try to spread the batter or tilt the pan to distribute the mixture.The batter will spread by itself and fill the pan.
  • Continue alternating the batters until you finish them.
  • Bake in the oven for about 40 minutes until the cake is bake and pass the tooth pick test.If you insert a toothpick in the center of the cake it should come out clean.
  • Remove the tin from oven and let it cool for 5 mins.Run the knife slowly around the edges of the cake and invert the cake on to the cooling rack and turn the cake back and let it cool completely.
You can serve the cake as it is or you can dust it with icing sugar or you can can cover it with your favorite icings like butter cream,fresh cream or with fondant.
For eggless version follow my Eggless marble cake recipe and follow the procedure as of zebra cake.You need to divide the batter into two halves and mix in the cocoa powder in one half and follow the spreading process as of zebra cake.

Notes:
  1. You can serve this as a tea time cake with out fondant or any other icing.
  2. Just dust the cake with icing sugar or cocoa powder or serve as it is.
  3. I felt the cake was bit less sweeter,it all depends on the quality of cocoa powder.If it is dark bitter one feel free to add 2-3 tbsp more sugar to the batter.
Decorating with Fondant:
Tips : Wilton's website

Ingredients:
1 pack of ready made Fondant mix(we need just a portion of it for the recipe)
black edible food color drops to create stripes
3/4 cup butter cream icing(ready made or freshly made)

Method:
  • Take a big orange sized fondant dough and knead the fondant dough until it is smooth and shiny for roughly around 4-5 mins.
  • Take a lemon sized fondant dough and add few drops of black color to it and mix well and knead to a smooth dough.
  • Spread a tbsp batter of butter cream in the center of the serving plate and fix the cake over it.
  • Now slowly cover the cake with a thin coat of butter cream icing all over the cake.
  • Roll the kneaded white fondant dough into a big round of 1/4 inch thickness(remember it should be big enough to cover the cake completely).
  • Slowly lift the rolled fondant and cover the cake and press it slightly so that it will hold on the cake.Using the pizza cutter or knife cut around the edges (where the cake ends near the plate) and remove the extra fondant.
  • Roll the black colored fondant into a thin round of 3-4 mm thickness and cut into random stripes of different length and size and width using the pizza cutter.
  • Stick the cut stripes applying water on one side of the strip on the cake(white fondant) creating the zebra pattern.
  • Cover the bottom portion of the cake with small pebble sized balls made out of fondant.

Thursday, February 23, 2012

Steamed Corn-Rawa Dumplings | Upma Kozhukattai

I bought a pack of corn rava long back thinking of experimenting various varieties with it and it was almost ignored for a couple of months.It caught my attention when it was nearing its expiry date and thought of making something simple with it.I initially thought of making upma with it,but I was not sure whether I would like the taste of corn in upma and so took a easy route of combining regular rava and corn rava to subside the dominating flavor of corn.
Then the idea of making steamed dumplings (and the Tamilians call it Kozhukattai) with it seemed more interesting for me and proceeded with rice rava instead of regular rava and followed the same process for kozhukattai with my addition of corn rava to it. Though I made upma kozhukattai before(to be precise just once) during my initial days of blogging,hubby was not fond of eating it and hence never attempted to prepare it again.I gave myself an excuse to use the corn rava and prepared it only for me and was pretty much happy with the result.Even I am not a fan of such steamed kind of rava dumplings but it tasted good when paired with the chutney.
Corn-Rawa Dumplings | Upma Kozhukattai Recipe:
(serves 2)

Ingredients:
1 cup Rice rava
1/3 cup Corn rava
1/4 cup fresh/frozen Peas
1/4 cup grated fresh Coconut
4-5 Green chillies,finely chopped
a sprig of Curry leaves,finely chopped
Salt to taste

for Tadka:
1 tbsp Chana dal
1 tsp Urad dal
1/2 tsp Cumin seeds
1/2 tsp Mustard seeds
1 tbsp Oil
Method:
  • Slightly roast rice rava and corn rava until a nice aroma comes out of it and keep it aside.
  • Heat oil in a pan and crackle mustard seeds and cumin seeds.
  • Add chana dal and urad dal and fry them well until red.
  • Add finely chopped green chillies and curry leaves and fry well.
  • Add green peas and fry for a couple of minutes.
  • Add 2 1/2 cups of water to it and let it come to a boil.
  • Add grated fresh coconut and salt to it and also add corn and rice rava mixture and mix well until no lumps are formed.
  • Cover it and cook on medium flame for 4-5 minutes until the mixture is cooked well.
  • Remove the covered plate and let the mixture come to a room temperature.
  • Apply oil to your right palm and start making oblong balls(as shown in photos) and place them on a greased idli plate(steam plate).
  • Steam the oblong balls for 10-12 mins in a steamer or in cooker(without whistle).
Serve them hot with coconut chutney or any other chutney or milagai podi.

Variations:
  1. Addition of green peas is optional or you can add other finely chopped vegetables like carrots,beans and fresh corn.
  2. You can replace corn rava with toor dal rava.To make toor dal rava,just grind toor dal to a rava consistency.Follow the same procedure.
  3. You can even replace green chillies with bits of red chillies and ground pepper.
  4. If you want to make regular kozhukattai,just avoid adding corn rava to it.

Monday, February 20, 2012

Meeti Kaddu ki Sabzi | Sweet Pumpkin Curry

I rarely get pumpkin at home as hubby dear is not very fond of it and the only thing he prefers is sambar with kaddu. I hence try to make various varieties with pumpkin, only when I have to cook for myself. This one I tried from Vidhu Mittal's book 'Pure and Simple'.The recipe was quite easy to make and has simple flavors.The addition of jaggery brings out the natural sweetness of pumpkin and makes it more tastier.If you like pumpkin you can try out this curry for a variation with rotis.
Meeti Kaddu ki Sabzi | Sweet Pumpkin Curry Recipe:
(serves 2)
Recipe Source: Pure and Simple

Ingredients:
250 gms Sweet Pumpkin
2 tsp finely chopped Ginger
1 tsp finely chopped green Chillies
1 tbsp chopped Coriander leaves
1/4 tsp Methi seeds
1/4 tsp Turmeric powder
1/2 tsp Red chili powder
1/2 tsp Amchur powder
1 tbsp grated Jaggery
a pinch of Hing
Salt to taste
2 tbsp Oil

Method:
  • Wash the pumpkin well and remove the skin of pumpkin and cut pumpkin into thin pieces.
  • Slice the peels into very thin.I used just 2 tbsp of peels in the recipe as I was skeptical about its taste in the curry.
  • Heat oil in a kadai and add hing and methi seeds and let them brown.
  • Add finely chopped ginger and green chillies and fry well.
  • Add turmeric powder and red chili powder and fry well.
  • Now add the sliced peels and also the chopped pumpkin and fry for 2 mins.
  • Add 1/2 cup of water to it and cover it and cook well for 4-5 minutes until pumpkin is cooked soft.
  • Add grated jaggery and cook well again for 2 mins.The gravy would have thickened by now.
  • Add chopped coriander at the end.

Serve it hot with roti/naan/rice.

Monday, February 13, 2012

Cranberry Puliyogre | Cranberry Rice Recipe

I know that I am quite irregular in blogging these days due to my travel.I will take a couple of more days to come back to regular blogging and visit your blogs.I really missed all your posts and I have lots to catch up as my dashboard is over flowing with those yummy posts.I sincerely thank everyone for visiting my blog regularly and kept it active even in my absence.
I love dried sweetened cranberries and always stock a pack in my pantry.But the fresh cranberries are slightly sour and bitter to eat them plain but they can be adapted in many south Indian recipes and today's recipe is one such example.
Puliyogre is one of my favorite rice items for its unique taste.When I got hold of a fresh pack of cranberries recently I could not stop myself from experimenting some thing new with it. While I was browsing for the recipes I ended up here and basically adapted the idea from there and followed the regular puliyogre recipe.The puliyogre with cranberries turned out quite delicious and almost tasted like the regular puliyogre with a slight hint of taste from cranberries and the only difference is the bright red color because of cranberries.If you are accessible to fresh cranberries I suggest you to go ahead and try this recipe and I am sure you would not get disappointed with the outcome.
Cranberry Puliyogre Recipe:
(Serves 2)
minimally adapted from : Versatile Vegetarian Kitchen

Ingredients:
1 cup Sona Masuri or Basmati Rice(uncooked)
Salt to taste

for Cranberry Gojju:
1 1/2 cups fresh Cranberries
6-8 Red chillies
1/4 cup grated dry Coconut
1 tsp Methi seeds
1/2 tsp Mustard seeds
1 tsp grated Jaggery
Salt to taste
1-2 tbsp Oil

for Tadka:
1/4 cup Groundnuts(roasted and skinned)
2 tbsp Chana dal
1 tsp Urad dal
1/2 tsp Mustard seeds
2-3 Red chillies,broken
a sprig of Curry leaves
a pinch of Hing
2 tbsp Sesame Oil(or regular Oil)

Method:
  • Clean,wash and cook the rice with the ratio of 1:2(1 cup rice:2 cups water) and once it is cooked spread it on a wide plate leaving it to cool.
  • Dry roast methi seeds and red chillies until they are roasted and slightly brown and remove them into the mixer.
  • Dry roast mustard seeds until they pop up and drop them too in the same mixer.
  • Dry roast the grated coconut slightly for a minute and put it in the same mixer.
  • Grind everything together into a fine powder and keep it aside.
  • Clean and wash the cranberries and cut them into halves.
  • Heat 1-2 tbsp Oil and add cranberry halves and fry them for a minute.They will start popping in some time and also will get soft in another 4-5 mins.Slightly press with the back of the spoon to let it form like a mushy paste(Gojju).
  • Add grated jaggery,salt and the ground masala powder to it and let it cook for some time until the oil leaves the edges and a thick pulpy paste(gojju) is formed.Let it cool.
  • Heat 2 tbsp Oil in a big kadai and crackle the mustard seeds and add groundnuts and fry until they turn slightly brown.
  • Add chana dal and urad dal and fry for half a minute until they turn brown.
  • Add red chillies,curry leaves and hing and fry for half a minute and switch off the stove.
  • Add the cranberry gojju to the tadka and mix well.Remove 1/4 cup of gojju and keep it aside.
  • Add the cooled rice into the rest of gojju and add enough salt and mix well until everything is well incorporated like how we do for puliyogre.
  • Check for the salt and sourness of the rice and adjust it by adding enough salt and the remaining gojju and mix it thoroughly.
Serve it warm or at room temperature.Let it sit for a couple of hours for a nice tasty puliyogre and also it is ideal for lunch boxes.


Thursday, February 2, 2012

Eggless Marble Cake

We always prefer simple tea cakes over celebration cakes at home.I usually prepare marble cake following my sponge cake recipe and adding the cocoa powder to half the batter.When I saw this recipe in Divya's space I made a mental note that I should try her recipe soon.I had made this for a small get together at my place and it was perfect for the tea time snack and everybody loved it.The cake is very soft,moist and also got a nice crumb which is perfect for an eggless recipe.Today is my parent's marriage Anniversary and I would like to wish them with this eggless cake recipe.Hope they like it.
Eggless Marble Cake Recipe:
(yields one 7" cake)
Recipe Source : Easy Cooking

Ingredients:
1 1/4 cups Maida/All purpose flour
3 tbsp Milk powder(I substituted with 3 tbsp condensed milk)
1/2 cup Butter
3/4 cup Powdered sugar
3/4 cup Milk
2 tbsp Cocoa powder
2 tsp Baking powder
1/2 tsp Baking soda
1 tsp Vanilla essence
2 tbsp Hot water
Method:
  • Preheat oven to 170 deg Centigrade.Grease a regular 7' round/square or ring tin.
  • Sift together flour with milk powder,baking powder and baking soda a couple of times until everything is well incorporated.keep it aside.If you are using condensed milk,do not add milk powder at this stage.
  • Pour hot water on cocoa powder and mix well to form a paste and let it come to the room temperature.
  • Cream the butter and sugar using a hand blender until light and fluffy .
  • Add half the flour mix and half the quantity of milk to the butter mixture and beat well.
  • Add the remaining milk and condensed milk(if using instead of milk powder) and beat well and finally add the flour and beat to a smooth batter.
  • Take one third of the batter into another bowl and add the cocoa paste to it and mix well.
  • Add vanilla essence to the remaining white batter.
  • Pour all of the white batter into the prepared greased tin.Now top it with the cocoa flavored batter in patches.
  • Swirl the batter using a clean table knife or spoon.Do not mix it long otherwise you will end up not getting that beautiful marble effect.
  • Bake for 40 minutes or until a toothpick inserted comes out clean.Cool in the pan for 10 minutes.
  • Run the knife around the cake and then un mould the cake on to a cooling rack.
  • Cool the completely over night or at least for 4-5 hrs.As the cake is extremely moist it will break up while cutting it,so handle it with care.
Cut into thick slices and serve it warm or at room temperature.
Notes:
  1. The original recipe used orange zest in the cocoa batter which gives a nice orange hint to the cake.I skipped it as I did not have it at the moment.
  2. I used condensed milk instead of milk powder as I usually do not stock it.The texture was not affected and it was very soft and fluffy.
 
back to top