Wednesday, December 27, 2017

Achari Baingan Recipe | Spicy Brinjal with Pickle spices

achari baingan
Achari Baingan recipe with step by step photos.Brinjal is one of my favorite vegetables and I love to eat it mostly in the form of stuffed varieties.I have already posted many stuffed Brinjal curries like Stuffed Brinjals with fresh Coconut,Stuffed Brinjal with Onion and Bagara Baingan.Today I am posting a quick and easy Achari baingan recipe where brinjal is cooked in the pickle spices and mustard oil which imparts a nice achari flavor to the curry.I have tried various versions like the gravy kind, with and without onion and I liked this version the best.It is very simple and quick which does not include any grinding or chopping apart from the brinjals.
achari baingan
I highly recommend to use Indian baby brinjals or Indian long brinjals for this recipe but not chinese eggplants or aurbergines(bharta wala brinjal.Also try not to skip any of the spices or mustard oil in the recipe as that gives the typical achari flavor to the curry,I have even added carom seeds but it is entirely optional.You can even coarsely grind the spices and add to the oil instead of the whole spices.
achari baingan
Check out other brinjal recipes in my blog:
achari baingan
Here is how to make achari baingan recipe with step by step photos.
Achari Baingan Recipe:
Serves 2 | Recipe source:here
Prep time: 10 mins | Cooking time: 20 mins | Total time: 30 mins
Cuisine: North Indian | Category: Side dish

Ingredients:
6-8 small round Brinjals or 2 long Brinjals
a sprig of Curry leaves
2 tbsp Coriander leaves,chopped
1.5 tsp grated Ginger
2 tsp Coriander powder
1 tsp Amchur powder
1 tsp Red chili powder
1/2 tsp Garam masala
1/4 tsp Turmeric powder
a pinch of Asafoetida
1/4 tsp Sugar
Salt,to taste

to temper:
2-3 tbsp Mustard oil or any other vegetable oil
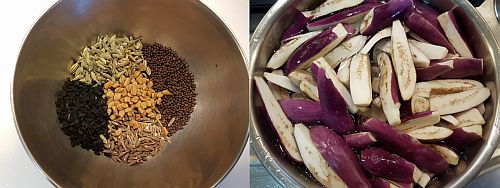
1/2 tsp Mustard seeds
1/2 tsp Cumin seeds
1/2 tsp Fennel seeds
1/4 tsp Fenugreek seeds
1/2 tsp Nigella seeds(Kalonji)
1/2 tsp Carom seeds(Ajwain),optional

Method:
  • Wash and trim the brinjals into 8 long slices and put them in water to avoid discoloring.
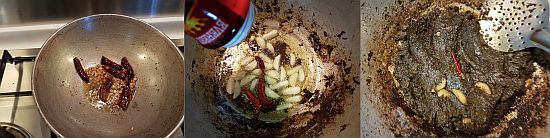
  • Heat mustard oil in a thick bottomed pan until it is smoking hot and switch off  the flame and leave it aside for a while.Again heat the oil and crackle mustard seeds,cumin seeds,fennel seeds,fenugreek seeds, nigella seeds and carom seeds.
  • Add asafoetida,curry leaves and grated ginger and fry for half a minute.
  • Reduce the flame and add turmeric powder,coriander powder and red chili powder and quickly saute and add drained brinjal pieces and mix it nicely until all the pieces are coated well with the spices.
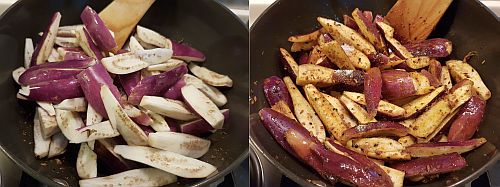
  • Fry the brinjal pieces for 2-3 mins and cover it and cook for 8-10 mins until done.You can sprinkle some water on the brinjals if you feel that the masalas are burning at the bottom.
  • Add salt,garam masala, sugar and amchur powder and mix well and cook it without lid for another 3-4 mins.
Garnish with chopped coriander leaves and serve it hot with rotis/parathas/naans/kulchas.

Notes:
  1. Mustard oil is highly recommended for this recipe as it adds a nice flavor,but if you do not like it you can either use sesame oil or any other regular oil.
  2. Indian baby brinjals or Indian long brinjals work best for this recipe.Do not use either chinese brinjals or aubergines(bharta wala baingan) for the recipe.
  3. You can even coarsely grind all the spices(mentioned under to temper) and add along with the other powdered spices(like coriander powder),but I prefer this way.
  4. I did few changes like the addition of carom seeds which was not there in the original recipe.

Wednesday, December 20, 2017

Danish Apple Cake Recipe | Easy Tea Cakes

danish apple cake
Danish apple cake recipe with step by step photos.Tea cakes or Brownies are the most preferred ones at home rather than the cream based cakes.I have made this Danish apple cake several times and served to guests and I have even baked them in beautiful disposable loaf pans and it was loved by everyone.I have followed the recipe from one of my old books-Nita mehta cakes and bakes and must say that this recipe is a keeper and is tried and tested by me many times.The addition of walnuts and cinnamon powder complements the soft and juicy bite apple and must say that this was totally delicious.Try this quick and easy apple cake this Christmas.
danish apple cake
danish apple cake
Check out other Tea time bakes in my blog:
danish apple cake
danish apple cake
Here is how to make danish apple recipe with step by step photos:
Danish Apple Cake Recipe:
yields:8" square cake | Source: Nita Mehta
Prep time: 10 mins | Baking time: 35-40 mins | Total time: 50 mins
Cuisine: International | Category: Baking-Cakes

Ingredients:
3/4 cup(75 gms) All purpose flour
3/4 cup(75 gms) powdered Sugar
1 cup Red Apple,cored and chopped along with peel(from one big apple)
1/4 cup Walnuts
75 ml Oil
2 large Eggs
3/4 tsp Cinnamon powder
1/2 tsp Baking powder
a pinch of Baking Soda
a pinch of Salt
1 tsp Vanilla essence

for topping:
1/2 Red Apple,cut into slices along with the peel
1 tbsp Brown sugar
1/2 tsp Cinnamon powder
1 tsp melted Butter

Method:
  • Grease an 8"square tin with butter/oil and dust it with flour or you can line a parchment paper in the tin.
  • Sift flour with baking powder,baking soda,salt and cinnamon powder.
  • Separate egg whites and egg yolks.Beat egg whites with a pinch of salt and vanilla essence till stiff.Add sugar in batches and beat well after each addition.
  • Put egg yolk one at a time.Beat well.
  • Add oil and beat for half a minute.
  • Add flour gradually and fold gently with a large wooden spoon.
  • Fold 1 cup apples and chopped walnuts(dust the walnuts with flour before adding) into the batter.
  • Pour the batter into the prepared tin and evenly arrange the remaining apple slices on the batter.
  • Mix a 1 tbsp of brown sugar with 1/2 tsp cinnamon powder and 1 tsp melted powder in a bowl and sprinkle this mixture on the arranged apples in the tin.
  • Bake in pre-heated oven at 170 deg C/300 deg F for 35-40 mins.Insert a skewer in the center to check the doneness of the cake.If it comes out clean,remove from oven.
  • Let it cool and invert on a rack and cut into pieces and serve.
You can serve a warm/cold custard sprinkled with the cinnamon powder along with the cake.

Notes:
  1. You can bake this in two small loaf tins or 1 big loaf tin too.
  2. Walnuts add a nice bite in the cake,so do not miss it.
  3. The cup I used in the recipe is 1 cup = 200ml.
danish apple cake
Technorati Tags: ,,,,,,

Wednesday, December 13, 2017

Eggless Wholewheat Chocolate Cake Recipe

eggless wholewheat chocolate cake
Eggless wholewheat chocolate cake recipe with step by step photos.Chocolate cake is a favorite to most of us and I would never no to a piece of chocolate cake as it is always tempting.But we restrict ourselves to eat less as it is usually made out of flour(maida) and butter,though sometimes I go overboard and eat more and feel guilty later.Also when I prepare any bake for my son I like to do it with wheat flour rather than the regular white flour.This recipe of wholewheat chocolate cake comes to rescue under such circumstances.I have tried this cake a couple of times and it came out well.The only change I usually do in this recipe is to use cold milk instead of cold water as the cake tastes bit rich with the usage of milk rather than the water in the recipe.The cake is also very moist because of the usage of COLD water in the recipe.I have mentioned few variations in the notes in case if you want to try the recipe.
eggless wholewheat chocolate cake
Check out other eggless cakes recipes in my blog here:
eggless wholewheat chocolate cake
Here is how to make eggless wholewheat chocolate cake recipe with step by step photos:

Eggless Wholewheat Chocolate Cake:

Yields: 1 loaf or 7" round tin | Source: Vegrecipesofindia
Prep time: 10 mins | Cooking time: 35 mins | Total time: 45 mins
Cuisine: World | Category: Desserts/Snack

Ingredients:
dry ingredients:
1 cup(120 gms) Whole wheat flour(1 cup=250ml)
3 tbsp Cocoa powder
1/2 tsp Baking Soda
a pinch of Salt

for wet ingredients:
3/4 cup(150 gms) Sugar
1 cup(250 ml) Cold Water
1/4 cup Oil
1 tbsp Lemon juice/Vinegar
1/2 tsp Vanilla essence

Method:

  • Grease a loaf tin or 7" round tin with oil and line with parchment paper.
  • Preheat the oven at 180 deg C/350 deg F for 10 mins.
  • Sieve wholewheat flour with cocoa powder,baking soda and salt a couple of times and keep it ready.
  • In a bowl take sugar and add cold water and mix it until the sugar melts.Add oil and lemon juice and mix it nicely until you get uniform mixture.
  • Add vanilla essence and mix it again.
  • Now add the sieved flour-cocoa mixture to the wet ingredients and mix it nicely until you get a homogeneous mixture with out any lumps.The batter will be slightly on the thinner side.
  • Pour it in the prepared pan and tap it to remove the air bubbles and bake it in the preheated oven at 180deg C for 35-40 mins until the cake is done.To check the doneness of the cake you need to inset a toothpick in the center ,if it comes clean which indicates that it is done.
  • Remove the tin and let it cool for 8-10mins on the counter and gently loosen the edges with a knife and gently invert on the wire rack and let it cool completely.
Cut into slices and serve as a snack or decorate with chocolate ganache or cocoa frosting and serve as a dessert.

Notes:
  1. To make ganache: heat 1 cup cream over medium flame until it is hot(you do not need it bubbling, just hot enough to melt the chocolate) and pour over 2 cups chocolate chips and whisk it nicely until you get an uniform smooth ganache mixture and let it become slightly warm.Pour this ganache over the cake and decorate it with sprinkles or cocoa powder for a simple celebration cake.
  2. Use good quality cocoa powder and good quality chocolate for a richer taste.
  3. You can even frost the cake with cocoa frosting or chocolate icing.
  4. I have used 1 cup cold milk instead of 1 cup cold water and still it worked well and liked the taste of cake made with milk than the water.You can even use half and half of cold milk and cold water.Make sure you use cold water/milk not the room temperature water/milk.
  5. You can make the cake with regular flour or half and half too.
  6. You can replace oil with the melted butter(at room temperature)in the recipe but it needs to be beaten nicely as it is difficult to incorporate butter to the cold water.
eggless wholewheat chocolate cake

Wednesday, December 6, 2017

Kala Masoor Pulao | Whole Masoor Pulav Recipe

kala masoor pulao
Kala masoor pulao recipe with step by step photos.Pulao varieties appear in my menu mostly over the weekends as I would like to spend less time in the kitchen and these pulao varieties are quite easy to prepare.Apart from the various vegetable pulav I like to prepare this kala masoor pulav as this recipe uses both vegetables and lentils in the same recipe and yet it is not mushy like khichdi.I prefer the version without vegetables if I have to prepare it for guests as the lentils add nutty texture to the pulao.This pulav is prepared like any other pulao just that the addition of lentils add a texture and nice taste to the pulao.You can pair it with a simple onion raita or boondi raita or any spicy vegetable gravy and papad,it tastes delicious.
kala masoor pulao
Check out other pulao recipes in my blog:
kala masoor pulao

Here is how to make kala masoor pulao recipe with step by step photos:
Kala Masoor Pulao Recipe:
Serves 2 | Author: Prathibha
Prep time: 10 mins | Cooking time: 30 mins | Total time: 40 mins
Cuisine: Indian | Category: Main course

Ingredients:
1 cup Basmati Rice
1/2 cup Whole Red lentils(Black Masoor)
1/4 cup Carrot,chopped
1/4 cup Peas
1/3 cup thick curd,beaten
1 large Onion,chopped
2-3 Green chilies,slit
1/3 tsp Garam masala or Biryani Pulav masala
2-3 Bay leaves
1" Cinnamon stick
3-4 Cloves
2-3 Green Cardamom
1/2 tsp Shahjeera
2 tbsp Oil/Ghee
Salt,to taste

Method:
  • Soak whole red lentils in water for 2-3 hrs and wash the lentils and keep aside.Wash the basmati rice and soak it for 10 mins.
  • In a pressure cooker heat ghee and crackle shahijeera and add bay leaves,cloves,cinnamon stick and cardamom and fry for half a minute.
  • Add chopped onions,slit green chilies and ginger-garlic paste and fry until the onions wilt.
  • Now add chopped carrot and peas and fry for a minute and then add soaked and drained whole red lentils and fry for a minute and add garam masala and salt and mix nicely.
  • Add soaked and drained rice and mix it gently and add beaten curd and mix it nicely and cook until the water content from the curd evaporates.
  • Add 2.5 cups of water and let it come to a boil and close the pressure cooker and cook it for one whistle and simmer it for 7-8 mins.
  • Once the pressure is dropped leave it untouched for 5-10 mins and then gently fluff up the rice with a fork.
Serve it hot with Onion raitha or Boondi raita or Vegetable raita or any vegetable gravy.

Notes:
  1. The addition of vegetables is entirely optional and I like it more without the addition of vegetables as the lentils add a nutty texture to the pulav.
  2. You can increase the spice level according to your wish and if you want it more masaledar add more 
  3. garam masala in the recipe.
  4. I recommend you to do this pulav in the cooker as the lentils get cooked properly.However you can cook in a thick kadai but make sure you add little extra water so that the lentils get cooked and cook it over low flame.
kala masoor pulao

Wednesday, November 22, 2017

Appam Recipe without Yeast | Kerala Appam Recipe

appam without yeast
Appam Recipe without yeast with step by step photos.Appam with vegetable stew is a classic combo for breakfast from the state of Kerala.My mom has been making this Appam(without yeast) from our childhood but she had always paired it with Onion chutney.Her recipe is bit different from the traditional appam recipe which includes yeast, she makes a kanji(porridge) out of the rice batter and mix it with more ground rice batter and is fermented for long,they yield soft at the center and crispy and lacy at the ends kind of appams. But we used to call this dosa as Aapan dosa instead of appam and I am not sure why it was called so.Typical Kerala style appam has coconut and yeast in the recipe but if you do not like to use yeast in the appam recipe you can follow this recipe which yields similar results.
appam without yeast
Appams can be served with coconut milk and sugar or sweetened coconut milk or flavorful vegetable stew or a simple coconut chutney.Appams are usually fluffy and can absorb the flavors very nicely and hence I always love to eat them with vegetable stew.
Appam Recipe without yeast:

Yields 12-15 appams | Author: Prathibha
Prep time: 30 mins | Cooking time: 15 mins | Total time: 45 mins + fermentation time
Cuisine: Kerala | Category: Breakfast

Ingredients:
3 cups Raw Rice,soaked in water for 5-6 hrs
1 cup Raw Rice, soaked in water for 5-6 hrs
1/2 cup thin yogurt
1 tbsp Sugar
Salt,to taste
1/8 tsp Cooking soda,optional

Method:
  • Soak 3 cups of rice and 1 cup of rice separately for 5-6 hrs.
  • Wash and grind 1 cup of rice with enough water to get a coarse rawa consistency like batter.Grind the remaining 3 cups of rice with enough water to a smooth batter and keep it aside.
  • In a big pot add 4 cups of water,salt and sugar and let it come to a boil and then add the coarsely ground batter to it and keep stirring continuously till it thickens and become a kanji(porridge) and let it cool completely.
  • Once the cooked batter is completely cooled mix in the yogurt and ground rice batter(made out of 3 cups rice) and mix it nicely with out any lumps and let it ferment for 15-16 hours.
  • The batter should be little loose than the regular dosa batter,so adjust the consistency accordingly. Add cooking soda(if using ,see notes) to a tbsp of water and mix it in the batter nicely.
  • Heat the non stick appam chetti/kadai and pour a big ladle of batter in the center and swirl it in a circular motion so that it forms an aapam which is thin around the corner and thick in the center.
  • Pour the oil around the edges and close it with a lid and let it cook until the edges turn crispy and is soft and fluffy in the center.Loosen the corners gently with the help of spatula and slide the appam into a plate and repeat to make more appams.
Serve it with sweetened coconut milk or Vegetable Stew or any spicy curry.

Notes:
  1. The addition of soda is optional,if the batter is fermented nicely you do not need to add soda to appam.Try making one appam without soda and if it is not fluffy you can add soda to the batter and make which definitely gives soft and fluffy appams.
  2. My mom never added grated fresh coconut while grinding for appam dosa,but you can add 1/3-1/2 cup of grated coconut while grinding the rice(3 cups rice) batter.
  3. The most important step in the recipe is making the kanji and mixing in the batter and hence follow the instructions carefully.
  4. You can make the dosa like regular dosas or thick dosa like poha dosa with the same batter.

Monday, November 13, 2017

Vegetable Stew Recipe | Kerala Veg Stew for Appam

vegetable stew
Kerala style Vegetable stew recipe with step by step photos. Appam with Vegetable stew is a famous Kerala breakfast combo variety which is loved by all.Appams are different from the regular dosa as these are lacy thin at the corners and fluffy in the center and are made in a Appam Chatti(kadai) instead of the tawa and hence the appams turn in the shape of kadai.Appam is served with a white coconut milk based curry with vegetables in it.The stew has mild spice levels and also has slight sweetness from the coconut milk but it is very flavorful and tastes delicious with the fluffy appams.The appams are so porous that they absorb the flavor from the stew beautifully and makes it taste more delicious.
Stew is made up of various vegetables and is cooked in a coconut milk with minimal spices but the process to prepare the stew is quite important otherwise you will not get the stew in white color. Freshly pressed coconut milk is the best choice for the stew but if you are lazy like me you can even use tinned coconut milk.I have used coconut oil in the recipe for the authentic kerala taste but if you do not like you can even use the regular oil in the recipe. Try this delicious kerala delicacy-stew with appam if you have not tried it before.
kerala veg stew
Check out other breakfast combos here in my blog:
Here is how to make kerala style vegetable stew with step by step photos:
Vegetable Stew Recipe:
Serves 2 | Author: Prathibha
Prep time: 15 mins | Cooking time: 30 mins | Total time: 45 mins
Cuisine: Kerala | Category: Side dish

Ingredients:
1 small Carrot,peeled and cut into 1" long thin sticks
1 small Potato,peeled and cut into 1" long thin sticks
10-12 french Beans,trimmed and cut into 1" pieces
1/4 cup Green peas
1 small Onion,thinly sliced
2-3 Garlic cloves, cut into long strips
1/2" Ginger,peeled and cut into thin strips
2-3 Green chilies,slit
1 pack(200ml) Coconut milk or 1 Coconut,grated
8-10 Curry leaves
Salt,to taste

to temper:
1.5 tbsp Coconut oil
4-5 Cloves
1" Cinnamon
4 green Cardamoms
8-10 Black peppercorns

Method:
  • If you are using freshly grated coconut to extract coconut milk add 1/2 cup warm water to the grated coconut and grind it nicely and strain it to get the thick coconut milk and add 3/4-1 cup warm water to the coconut residue and grind again to get a thin consistency coconut milk.If you are using ready coconut milk empty the contents of the carton to a bowl and add a cup of water to the empty carton and shake it nicely to get thin coconut milk.
  • In a kadai/pan heat coconut oil and add cloves,cinnamon,peppercorns and green cardamoms and fry for 10-15 seconds.I forgot to add the peppercorns in the tempering and hence did separately and added later to the curry.
  • Add cut ginger,garlic and slit green chilies and fry until the green chilies slightly wilt.Add 5-6 curry leaves and fry for few seconds.
  • Add thinly sliced onions and fry until they become translucent,do not let them turn brown.
  • Now add all the vegetables(you can add them raw or steamed) and add salt and thin coconut milk and cook until the vegetables are done.
  • Now reduce the flame(or remove the pan from the flame) and add thick coconut milk and 3-4 curry leaves and boil it on low-medium flame.
  • Adjust the consistency of gravy and seasoning by adding enough water and salt.The consistency should neither be thin or thick.
Serve it with Appam/Dosa.

Notes:
  1. You can even add cauliflower along with the other vegetables.
  2. Do not brown the onions,spices and vegetables otherwise it will change the color of the stew.
  3. Freshly pressed coconut milk tastes best for the recipe but one can use ready one if pressed for time.
  4. Coconut oil adds a nice flavor to the stew but if you do not like it you can use regular oil and make it.

Monday, November 6, 2017

Gongura Pickle Recipe | Andhra Niluva Gongura Pacchadi

gongura pickle
Gongura pickle recipe with step by step photos.Gongura pickle does not need any introduction as it is one of the most popular pickles from the state of Andhra and any Andhra meal is incomplete without gongura pickle being served in it.Gongura pickle is sour and spicy and is made out of red sorrel leaves,it can be stored for a couple of months if made carefully. I also have posted a version of Gongura Pacchadi with Green Chilies and Gongura Pacchadi recipe using Red chllies which have less shelf life and should be consumed in a day or two.Gongura pickle is usually mixed with hot steamed rice,ghee and is eaten with raw onions on the side, the onions elevate the taste of the gongura pickle and hence do not miss to serve it with onions.
gongura pickle
I do not miss to get these wonderful greens when ever I go to little India and in fact it has become a norm to keep a bottle of Gongura pickle or Pulihora Gongura pickle handy in my refrigerator these days.It is much better to eat the homemade pickles rather than the preservative loaded ready made pickles.I also prepare another version of gongura pickle - Pulihora Gongura pickle which is prepared in a different way with the addition of tamarind and few other spices and even this Pulihora Gongura pickle can be stored for a couple of months.Both the pickles taste absolutely delicious in its own way, try these pickles at home and enjoy the delicious home made andhra famous gongura pickle.
Apart from the pickles we make various other pacchadi,dal,curry and rice varieties with these greens and these greens give a peculiar taste and sourness to the recipe which makes it even more tastier.Check out all Gongura recipes in my blog here:
niluva gongura pacchadi
Here is how to make gongura pickle recipe with step by step photos.
Gongura Pickle | Niluva Gongura Pacchadi Recipe:
Shelf life:1 month | Author: Prathibha
Prep time: 15 mins | Cooking time: 30 mins | Total time: 45 mins
Cuisine: Andhra | Category: Pickles/Accompaniments

Ingredients:
1 big bunch or 8-10 cups tightly packed Gongura(Red sorrel) leaves
1 tbsp Mustard seeds
1.5 tsp Fenugreek seeds
6-8 Red chilies
Salt to taste
1.5 tbsp Sesame oil

to temper:
4 tbsp Sesame oil
1 tsp Mustard seeds
5-6 Red chilies,whole or broken
15-16 Garlic cloves,peeled roughly
1/4 tsp Asafoetida

Method:
  • Dry roast mustard seeds,fenugreek seeds and red chilies until they are nicely roasted.Cool them and grind them along with salt to a fine powder.
  • Remove the gongura leaves from the stems and wash them thoroughly and drain the water thoroughly. Spread a big kitchen towel and spread the leaves on the towel and let them dry in shade for 3-4 hours.They do not need to get wilt just that the water has to be completely absorbed by the towel.
  • In another pan heat oil and add gongura leaves(dried for a while) and saute them until they become soft and pulpy.Do not add water to the leaves at any point of time.Continue frying for 7-8 mins until the water evaporates from the leaves mixture.
  • Cool the gongura leaves and grind it to a paste along with the ground spice powder.
  • In the same/another pan heat 4 tbsp of sesame oil and crackle mustard seeds and then add garlic cloves and red chilies and fry them until they turn slight brown in color and add asafoetida and then add the ground gongura mixture and fry it nicely for 8-10 mins until the mixture starts leaving the oil along the edges.Sometimes the oil gets seeped inside the pickle but it will start leaving after a couple of hours when stored in the bottle,so do not worry.
  • Cool it thoroughly and store it in an air tight glass bottle in the refrigerator.It stays good for a month or two in refrigerator when handled carefully.
Serve it with hot steamed rice with ghee and raw onions on the side.

Notes:
  1. You can add 1.5 tbsp of Coriander seeds while roasting the mustard and fenugreek seeds.The addition of coriander seeds is optional.I add sometimes and skip it sometimes and however the taste does not alter much.
  2. If you are using tella gongurs(not the typical red gongura leaves) you need to add a small gooseberry sized tamarind while frying the gongura leaves for the sourness.
  3. The amount of red chilies can be altered according to your spice level.
  4. Do not skip garlic in the recipe as it adds a nice taste and also always serve the gongura pickle with raw onions on the side.
  5. Sesame oil is recommended for the recipe, if you do not have you can use regular oil.
  6. Always use a clean and dry spoon when you take out the pickle and close the lid tightly and store it in refrigerator for increased shelf life.
  7. You can take the required portion of the pickle and mix in the chopped onions and serve it with hot steamed rice and ghee.
gongura pickle


back to top