Wednesday, July 31, 2013

Mangalore Buns Recipe | Banana Buns | Sweet Banana Pooris

mangalore buns
I didn't knew about these Mangalore Buns until a decade back. I vaguely remember that I heard this name from one of my aunts when they were discussing about recipes but my mom never gave a thought to prepare it and we ignored it. When we had gone for a family trip to a few places in Karnataka, I finally got a chance to taste these Mangalore Buns for the first time. Do you remember my Bonda Juice recipe which I posted long back(almost few years back), even that recipe is inspired from my Mangalore trip.mangalore buns
Though Mangalore cuisine is predominantly non-vegetarian, it has various breakfast and snack options which tastes really good and I am kind of addicted to them. Few of my personal favorites from Mangalore are Goli Baje, Buns, Neer Dosa, Churmuri, Kadubu, Bonda Juice to name a few.                 
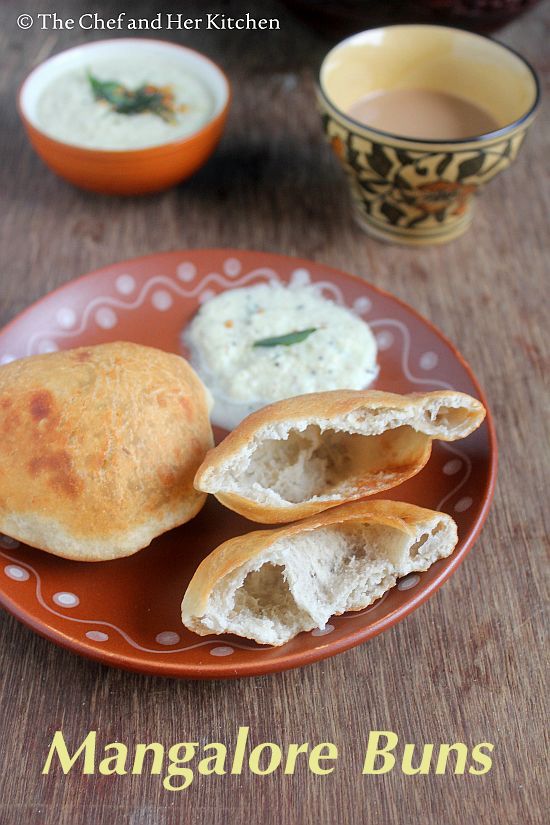
The word 'Buns' associated with Mangalore Buns is quite misleading if you are hearing it for the first time, do not get confused with the regular baked buns. These buns are deep fried and made of mashed banana mixture and flour which is kneaded to a dough and fermented for a few hours. The fermentation process helps in getting these banana buns(pooris) a different bun like texture unlike the regular pooris. These are prepared mildly sweet and it tastes best with a very spicy Coconut chutney, they both complement really well.
banana buns
Even TH loved these Mangalore Buns when he tasted for the first time and approved it as a regular breakfast item at our place.He does not like the deep brown color of it and hence I do not let them deep brown in color and remove them while they are light brown and cooked well.You can serve them for breakfast or a snack with a cup of tea or coffee.I hope I have tempted you enough to try this recipe, what are you waiting for?? try these delicious Mangalore Buns for a snack or breakfast in this rainy season and enjoy!!
mangalore buns
Mangalore Buns Recipe:
 
Yields: 8-9 Buns
Prep time:10 mins | Cooking time:20 mins | Total time:30 mins + 5 hrs fermentation
Cuisine: Karnataka - India | Category: Snack/Breakfast

Ingredients:
1 1/2 All purpose four(Maida)
1 medium sized ripen Banana
3-4 tbsp slightly sour Curd
2-3 tbsp Sugar
1/2 tsp Cumin seeds(optional)
a fat pinch of Cooking Soda
2 tsp Oil
Salt to taste
extra flour, for dusting
Oil,to deep fry

Method:
  • Peel and cut banana into pieces and grind it along with sugar.You can mash the banana nicely if you want. I prefer to grind it.The pulp should yield 1/2 cup approximately.(Make sure your sugar is fine variety like castor sugar,otherwise if it is granular grind it in mixer to a powder).
  • Keep aside 1/4 cup flour and take the remaining flour(maida) in a bowl and add salt and cooking soda to it and mix well.
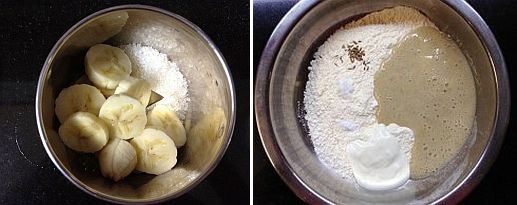
  • Add curd, cumin seeds and gradually add banana puree and mix.Do not add all the pureed banana mixture at once,add slowly the required portion and mix.The mixture would be slightly sticky by the time you mix all the banana mixture in the dough.Do not add water while mixing,the moisture from the banana puree and curd is enough to bind the dough.Now add the remaining 1/4 cup flour which is kept aside and mix well.If the dough is sticky add 2-3 tbsp of extra flour and mix to get a fairly thick dough.Remember that the dough would loosen up a bit after the fermentation process.
  • Now add the oil and gently knead the dough for 2-3 mins.
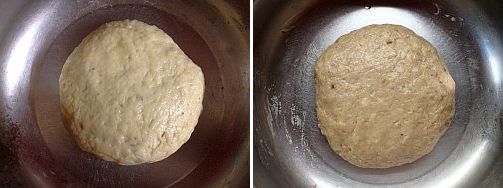
  • Cover and leave it aside for 4-5 hrs. As I usually prepare this for breakfast I leave it overnight in the fridge and remove it in the morning and keep for 1-2 hrs outside.
  • Heat oil in a deep curved pan and let it become hot.If you put a small pinch of dough it should raise to the top immediately,which indicated the oil is hot and ready for deep frying.
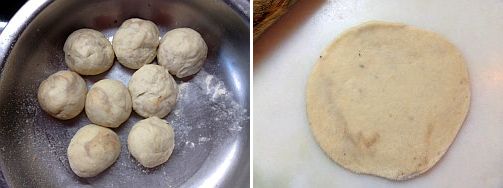
  • Slightly knead the dough and divide the dough into 8-9 big lemon sized portions.
  • Roll each portion by dusting it with flour into a 3-4" diameter thick disc,it should be thicker than the regular poori. Remove the extra dusting of flour by gently patting on the discs.
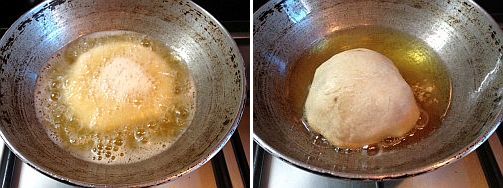
  • Gently slide the rolled discs(pooris) into the hot oil and after few seconds try to press the middle portion of the disc gently with a slotted spoon,which helps to fluff up the bun(poori) nicely.
  • Turn to the other side and fry until brown.These buns usually turn to dark brown in color very quickly,you can remove them when they are puffed up and light brown in color like I did or you can continue frying until they turn dark brown.
  • Remove them with a slotted spoon on to a kitchen napkin.Follow the same process with the remaining buns,I usually fry only one at a time.
Serve them hot with spicy Coconut chutney and a cup of tea/coffee. You can even serve it with Sambar but for me Coconut chutney and Buns are best preferred combo.
banana buns

Notes:
  • Ideally Mangalore buns are prepared with plain flour(maida).If you like, you can even prepare the same with wheat flour or a mix of maida and wheat flour in the ratio of 2:1(maida:wheat flour) and prepare the dough.
  • Use ripened bananas for this,you can use long variety or even smaller variety like Yelakki banana.
  • You can even use freshly ground pepper powder to spice up the buns.I usually do not add it.
  • If you like you can even add a pinch of cardamom powder while making dough.Cardamom complements the banana nicely,but I prefer buns very simple.
  • Always prepare the coconut chutney extra spicy as the mild sweetness of banana buns tastes great with the spicier version of coconut chutney.
  • It is ideal to leave it aside for 4-5 hrs for fermentation of dough which makes the buns get a nice texture.Alternatively you can refrigerate the dough overnight and take it out 1-2 hrs before in the morning you prepare them.
  • Do not add water to the batter,the moisture from banana mixture and curd is enough to bind the dough.
  • One can alter the amount of sugar according to your taste buds,but it tastes best when it is midly sweet.
  • Mangalore Buns can be stored for up to a day or two. I usually finish it off by evening if I have left over buns, they taste even better by evening and makes a nice combination with a cup of tea or coffee.
mangalore buns

Monday, July 29, 2013

Eggless Vanilla Sponge Cake Recipe | Eggless Tutti Frutti Cake

I have never developed a liking for cakes that have cream frosting or any Icing applied on it and my preference is for the plain cake - vanilla or chocolate.I still remember those days when we used to have plain Vanilla Sponge Cake at Butter Sponge in Bangalore city; believe me that cake used to be absolutely soft and fluffy.
I do make cakes with Icing but only for specific occasions but in general I prefer to bake simple plain cakes on a regular basis as an accompaniment with evening tea/coffee or just as an anytime snack.I also use this plain Vanilla Sponge Cake for Cake Pops and also as a base for Fruit Trifle | Trifle Pudding.
A few years back when I saw this recipe in Madhuri's blog,which she tried from Nita Mehta's book,I knew that I would be baking that cake as I was in search of good Sponge Cake at that time.I am glad that I prepared that cake as my search for a good Eggless Vanilla Sponge Cake finally ended. I wonder why it took so long for me to post this beautiful cake recipe in my blog.The recipe is quite simple with no butter or any other fancy substitutes-it is a simple and straight forward recipe.You should try this recipe and am sure you would agree that it is the best Eggless Vanilla Sponge Cake recipe.
If you are in search for a good Eggless Cake recipes I would strongly recommend you to try these tried and tested Eggless Cake recipes from my blog which were appreciated by many.

Basic Eggless Vanilla Sponge Cake | Eggless Tutti Frutti Cake Recipe:
Makes one 8" round cake or 4"x7" loaf tin
Original recipe source: Nita Mehta
Prep time: 10 mins | Baking time: 30-40 mins | Total time: 1 hr
Cuisine: Indian|International | Category: Cakes - Baking

Ingredients:
1 1/2 cups All purpose flour(Maida)
3/4 cup Sugar
1 cup Curd,beaten
1/3 cup Tutti frutti(optional)
1/2 cup Oil
1 1/4 tsp Baking powder
1/2 tsp Baking Soda
a pinch of Salt
2" Vanilla Pod or 2 tsp Vanilla essence
1 tsp milk,to brush the cake
2 tsp flour,to coat the tin and tutti frutti

Method:
  • Grease an 8" round pan or the 4"x7" loaf tin with oil.Add a tsp of flour and shake it well so that it coats all the sides and bottom of the tin.Alternatively you can line it with baking paper,make sure you cut it into right size before lining it in the pan.
  • Preheat the oven at 200 deg C(400 deg F) for 10-12 mins.
  • Sieve all purpose flour a couple of time to ensure that there are no lumps in it.
  • Grind sugar to a fine powder in mixer.You can avoid this step if your sugar is fine,as the sugar crystals what we get here are very big I usually grind it before using in the cake.
  • In a bowl beat curd until smooth.Add sugar powder to it and beat again for 2-3 mins.
  • Add baking powder and baking soda to the curd mixture and mix well and leave it aside for 2-3 mins.The curd mixture will become frothy and increase in volume,you can see some bubbles forming in it.
  • Scrape the vanilla bean if you are using and keep it ready.
  • Now add the scraped vanilla pod or vanilla essence and oil to the curd mixture and mix it nicely and gently and make sure that the air in the mixture is not lost.
  • Add the flour in two batches and gently fold the flour into the mixture until you get smooth dropping consistency.Do not stir vigorously as it will loose air in the mixture,hence do it gentle.
  • In a small bowl take tutti frutti and add 1 tsp of flour and mix well.the addition of flour to tutti frutti ensures that it will not settle in the bottom of the tin.
  • Add the tutti frutti to the cake batter and fold it nicely.
  • Pour this batter into the prepared tin and keep it ready.
  • Reduce the oven temperature to 180 deg C(350 deg F) and place the tin in the preheated oven and bake it at 180 deg C for 35-40 mins.The baking time varies from oven to oven,hence keep an eye over it after 30 mins.
  • You can insert a toothpick in the center of the cake to check whether it is done or not.If the toothpick comes out clean with few cake crumbs then your cake is ready.If the toothpick has some batter stuck to it keep the tin back in the oven and bake for some more time.
  • Brush the top of the cake with milk and put it back in the oven and bake for 2 mins.This gives a shiny look on top of the cake.However this step is optional.But I recommend you to do that.
  • Remove the tin from the oven and let it sit for 5 mins.
  • Run a sharp knife around the edges of the cake and gently turn it upside down onto a wire rack and let it cool completely,approx 2 hrs.
  • Once it is completely cooled,slice the cake into thick slices using a serrated knife.
Serve it with tea/coffee or eat as it is as a snack.

Notes:
  1. The original recipe calls for 1 cup of sugar,however I followed her recipe and reduced it to 3/4 cup which is right enough quantity of sugar for a tea cake.If you really have a sweet tooth you can add 1-2 tbsp of sugar extra in the cake.
  2. You can bake the cake plain with out tutti frutti as the original recipe and can decorate with the icing of your choice.
  3. You can keep it out for 2 days and can be stored for 4 days in refrigerator.Just pop it in microwave for 10-15 seconds if you refrigerate the cake.
  4. Do not alter the measurements of the cake,these measurements perfectly yields soft and fluffy cake.I have used a cup size which holds 1 cup = 200 gms of sugar or 125 gms of flour for this recipe.
  5. I like to use vanilla pod in my baking as it adds great flavor to the cake.If you do not get them use good quality vanilla essence.
  6. I have used Saffola oil to prepare this cake. You can use any neutral vegetable oil (canola oil etc) to prepare this.
  7. This cake makes a perfect base for dessert recipes like Fruit Trifle.

Saturday, July 27, 2013

Watermelon Juice | Easy Drinks Recipes

water melon juice
I usually prefer eating whole fruit rather then preparing juices and that's the reason I don't have many juice posts in my space. Moreover juices are simple to prepare so posting recipes of fresh juices may not be required but according to me, a juice can be prepared with several variations and hence am posting one such recipe today. Look out for the finer points in the notes section.
watermelon juice
I usually prefer milkshakes to juices but a few fruit varieties are not suitable to prepare milkshakes and tastes best in the form of juice. Watermelon belongs to this category and as it has high water content one can eat it as it is or turn it into juice. I have been planning to post water melon juice from a long time as the colour of watermelon juice is captivating and appetizing!! But to my bad luck, the day I had planned to take pics, the weather was very gloomy and made me struggle to capture this gorgeous juice. I am not very happy with the clicks and did not meet any expectations from what I had actually thought in my mind, anyways would like to capture more juices in future to bring those bright colourful juice recipes in my blog.
watermelon juice

If you are interested check out other interesting beverages like Mango Lemonade , Bonda Juice(Tender Coconut Cooler), Butterfruit(Avocado) Milkshake and Oats-Fruits Smoothie.
For a complete range of beverages check here.

Watermelon Juice Recipe:
Yields 2-3 glasses
Prep time:10 mins | Grinding time:2 mins | Total time:12 mins
Cuisine: Indian/International | Category: Beverages
 
Ingredients:
3 cups Watermelon, diced and seeded
2-3 tbsp Sugar, to taste
1/2- 3/4 cup chilled Water roughly
Ice cubes, to serve(optional)
 
Method:
  • Cut the watermelon and remove the seeds. I do not prefer ice hence I avoid it and refrigerate watermelon pieces for some time.
  • Blend the watermelon pieces with sugar and water to a smooth juice. Do not add water at one shot, add it in intervals  and also according to you required consistency. Now taste it and add more sugar if needed. Strain the juice.
Serve it by adding ice cubes.
 
water melon juice
 
Notes:
  1. This is a very basic water melon juice recipe with out any flavours. If you like you can add 1-2 tsp lemon juice or 1 tsp chopped ginger while grinding it for extra punch.
  2. You can even freeze watermelon cubes and blend it with sugar like a smoothie.
  3. Various fruits like pomegranate, oranges, mosambi(sweet lime) and grapes can be combined with water melon.
  4. Sugar can be replaced with honey in the recipe.
  5. You can also prepare with out sugar by adding mint leaves, chaat masala, kala namak and roasted cumin powder for a more chatpata juice.
watermelon juice

Friday, July 26, 2013

Roasted Red Bell Pepper Pasta Recipe | Pasta Recipes

roasted red bell pepper pasta
Pastas are perfect for weekend lunch or dinner and I usually make it for dinner as I find it easy to cook.As TH prefers mostly Pesto sauces with pasta or a simple one rather than the tomato or the white sauce, I usually end up preparing either Basil Pesto Pasta or Spinach Pesto Pasta or simple Aglio Olio or Sundried Tomato Pesto Pasta or this Red Bell Pepper Sauce Pasta.
roasted red bell pepper pasta
I love Bell peppers and especially the red colored bell peppers. I can eat them raw as well.I use the bell peppers often in my cooking in recipes like chutneys, dips, sauce, salad, stuffed bell peppers, rice varieties, curry, stir fry etc. Red bell peppers is very versatile and can be adapted even in Indian cooking.
roasted red bell pepper pasta

Red Bell peppers has a mild sweet taste when roasted and it complements the pasta really well.I add a roasted tomato to balance the sweetness of pepper with the slight sourness from tomatoes.This Red Bell pepper sauce is really creamy and nutty with the addition of walnuts.I do not prefer to add cheese to my pastas and the addition of walnuts itself makes the pasta sauce creamy and delicious.
roasted red bell pepper pasta
If you are interested check out other pasta varieties like Basil Pesto Pasta, Spinach Pesto Pasta, Sundried Tomato Pesto Pasta , Pasta Salad and Macaroni in white sauce in my blog.

Roasted Red Bell Pepper Pasta Recipe:
Serves 2
Prep time:25 mins | Cooking time:20 mins | Total time:45 mins
Cuisine:Italian - International | Category: Pasta - Main Course

Ingredients:
2 cups Penne Pasta(or any other shape like fusili,sphagetti)
1 Onion,finely chopped
3-4 Garlic pods,finely chopped
1 tsp Mixed Herbs or Oregano
2 tbsp chopped Coriander or Parsley
1/2 tsp Red chili flakes
2 tbsp Olive Oil
2 tbsp Parmesan Cheese,to garnish
Salt to taste
for roasted Bell Pepper Sauce:
1 large Red Bell pepper
1 small Tomato
10-12 Walnuts
2-3 tbsp Parmesan cheese(optional)
2-3 Garlic pods
2-3 tbsp Extra Virgin Olive Oil(EVOO)
1/2 tsp Black Pepper powder
Salt to taste
Method:
to prepare Roasted Red Bell Pepper Sauce :
  • Wash and wipe the red bell pepper and tomato and apply oil all over it and roast them on open flame until they are charred completely by turning it to all sides.Alternatively you can roast it in preheated oven at 180 degrees for 40-45 mins.Drop the hot charred bell pepper and tomato into a vessel and cover it with a lid,this will ease the process of peeling the skin of charred pepper and tomato.Peel the skin off and chop them roughly.
  • Grind roasted,peeled and chopped bell pepper,tomato with walnuts,parmesan cheese,extra virgin olive oil,garlic pods,black pepper powder and salt to a smooth puree.
to cook pasta:
Cook according to the instruction of your package or follow this procedure:
  • Bring water to boil in a big pot (filled to its half) and add salt,1 tsp olive oil and pasta and cook over medium flame for 10-12 mins until al dente(cooked and tender to teeth).You can cook it further for 2-3 mins more to get soft pasta,but definitely do not make it soggy.
  • Drain and reserve 1/2 cup of water for later usage.you can even give a cold bath to the pasta by running it under fresh tap water which helps in keeping the pasta separate.
to prepare roasted bell pepper pasta:
  • Heat olive oil in a wide bottomed pan and fry sliced garlic until slight brown and then add chopped onions and fry until they are pink and soft.
  • Add the bell pepper pasta sauce and mix well.Add 4-5 tbsp of reserved pasta liquid if required add more to get a medium sauce consistency.
  • Add cooked pasta and mix well until all the pasta is covered with the sauce and is warm.Now add red chili flakes,Italian herbs,chopped parsely,salt(remember we added salt in sauce as well,so add accordingly)and mix well.Season with more pepper if you want.
  • Dish it out to the serving platter and sprinkle some Parmesan cheese over it.Garnish with parsley.
Serve it hot or warm with Lime Soda or drink of your choice.
red bell pepper pasta

Notes:
  • You can even add bechamel sauce or cream to the bell pepper sauce in the above recipe to give a nice creamy texture to the pasta.
  • You can add more Parmesan cheese while preparing sauce in the above recipe to make pasta more cheesy.
  • You can replace penne pasta with any of the pasta like spiral, fusili, spaghetti, macaroni , farfelle or any other pasta of your choice.
  • You can add colored bell peppers, blanched broccoli, thinly sliced mushrooms, zucchini to the pasta
  • For a Vegan version avoid parmesan cheese while making pesto,it tastes even delicious without cheese in it.
  • Walnuts can be replaced with cashew nuts or almonds in the recipe.
red bell pepper pasta

Wednesday, July 24, 2013

Paneer Butter Masala Recipe - Restaurant style

paneer butter masala
Paneer Butter Masala is my most favorite gravy and we always order this whenever we visit any North Indian restaurant. Well I know that I have mentioned this for several North Indian veggies but if I am asked to choose only one then it would be Paneer Butter Masala.I love it a lot and usually  order kulchas with it. Kulcha or Butter Naan and paneer butter masala is a hit combo, in my view.
paneer butter masala
Butter Chicken is the most popular gravy in and outside India and while it's a treat for non vegetarians, this  Paneer Butter Masala is prepared on similar lines and is definitely the king of dishes for the vegetarians.I am sure most of us love paneer based recipes  and we are no exception.DH is a big fan of paneer and hence it is mandatory to prepare at least one paneer recipe in any form.Paneer is also a good source of proteins for vegetarians.
paneer butter masala
In my earlier post on Paneer Makhani, I have highlighted a few differences between Paneer Makhani and Paneer Butter Masala.While the ingredients that are used in both the gravies are almost similar,the cooking procedure and the quantity of ingredients varies and this is what makes them taste different. This is an ideal recipe for parties, so dont miss preparing this restaurant style paneer butter masala at home.This recipe has a bit of fat and may not be ideal for calorie conscious one's but one can reduce the fatty content by replacing cream with milk and also the butter quantity. One would have to compromise on the taste though.
paneer butter masala
In case you are interested check out  Paneer recipes both dry sabzi and gravy varieties in my blog - Kadai Paneer, Palak Paneer, Paneer Jalfrezi , Paneer Bhurji, Matar Paneer, simple Paneer Sabzi, Paneer Makhani and Grilled Corn-Palak Paneer.

If you like sweets try this easy Paneer Modak Peda recipe. Its simple and yumm!!
paneer butter masala

Paneer Butter Masala Recipe - Restaurant style:
Serves 3-4
Preparation time:10 mins | Cooking time:30 mins | Total time:40 mins
Cuisine:Punjabi-India | Category:Side dish - Main Course

Ingredients:
200 gms Homemade Paneer (Cottage cheese) (or store bought)
2 medium Onions
3 large Tomatoes
6-8 Cashew nuts
1/3 cup Milk or 1/4 cup Cream
1 tsp Coriander powder
1 tsp Red chili powder
1/2 tsp roasted Cumin powder
1/4 tsp Home made Garam masala(or 1/2 tsp store bought)
a tiny pinch of Turmeric powder
2 tsp Kasuri Methi
1/4-1/2 tsp Sugar
1 small Green chilli,thinly slit
1 tbsp Coriander leaves,to garnish
Salt to taste
2 tbsp Oil
2 tbsp Butter

Method:
  • Cut paneer into triangle pieces of 1/2" depth.Immerse them in warm water until its usage.
  • Soak cashew nuts in warm milk for some time.Grind it to a smooth paste along with the milk.If you want to use cream,grind the cashew nuts with a couple of table spoons of milk.
  • Make a cross on tomatoes and blanch them in hot water for 3-4 mins.Remove them and let them slightly cool.Peel the skin and remove the eyes of tomato and chop into pieces and grind it to a smooth puree.
  • Grind chopped onions with ginger garlic paste to a slightly coarse or smooth paste.
  • Heat oil and 1 tbsp butter and add slit green chilli,onion-ginger garlic paste mixture and fry well until it turns slight brown and the raw smell goes away.
  • Add pureed tomato and fry constantly for 6-8 mins over medium heat until the mixture becomes really thick and oil separates.This step is important to get a deep red color to the gravy and also it enhances the taste of it.So fry the tomato mixture until it leaves the pan and take care that you would not burn the masala in any stage.
  • Add roasted cumin powder,sugar,coriander powder,red chili powder and turmeric powder fry well again for 2-3 mins.
  • Add 1 cup of water and boil it for 6-8 mins till the oil separates and the gravy dries up to a thick masala gravy.
  • Remove the kadai from flame and add the ground cashewnut- milk mixture(if you are using cream,add it now).Add kasuri methi,salt and garam masala and give a stir.
  • Return the kadai back on to the burner and keep mixing on low flame and let it come to a boil for 2 mins.
  • Add butter and paneer slices (dipped in warm water) and cook for 2-3 mins stirring continuously.
Serve hot with flat breads like Naan/Roti/Kulcha or Jeera rice/Bagara Rice.

paneer butter masala
Notes:
  1. You can add a tiny pinch of  red food color to the gravy along with the masalas.I don't like to use food colors and hence I did not add it.
  2. The addition of sugar and milk(cream) helps in neutralizing the sourness from tomatoes.So do not miss it.
  3. You can toss few onion rings and capsicum rings in butter and add along with paneer slices at the end.
  4. You can even toss paneer slices in butter for few minutes,do not fry for long otherwise they will become tough.As I like to use soft malai paneer I do not like to toss them as I feel they will loose their texture.
  5. For a vegan version,replace paneer with tofu.Avoid cream,milk and butter.Increase the quantity of cashew nuts in the recipe and follow the same process.
paneer butter masala

Monday, July 22, 2013

Baby Corn Pulao | Babycorn Recipes

Babycorn Pulav
This recipe was sitting in my drafts from almost eight months and I finally decided to post it now. This is a very simple pulao which is prepared with baby corns. The recipe is very similar to my Vegetable pulao recipe just with the difference being that  I added coconut milk here instead of water.
Babycorn Pulav
I have mentioned many times earlier about my love for baby corns and this pulao is definitely one of my favorite recipes with baby corns.The slight crunch and sweetness of  baby corns adds a nice taste and texture to the pulao.
Pulavs and Rice Varieties are ideal for lunch boxes as they are very easy to eat.You can just pair it with raita and papad and a wholesome meal is ready.I even prefer to make pulavs over the weekends as they are not only easy to make but also serve as a simple and delicious meal.
Babycorn pulao
 If you are a fan of Baby corns like me,so check out other baby corn recipes in my blog:
Babycorn pulao

Baby Corn Pulav Recipe:
Serves 2
Prep time:20 mins | Cooking time:40 mins | Total time: 1 hr
Cuisine:Indian | Category: Pulao Varieties - Main Course

Ingredients:
1 cup Basmati Rice
2 cups Coconut Milk
10-12 Babycorns,cut into pieces in an angle
8-10 Cashew nuts
1 Bay leaf
1" Cinnamon stick
3-4 Cloves
2 tbsp Oil
1 tbsp Ghee
Salt to taste 

to grind:
3/4 cup Mint leaves
1/2 cup Coriander leaves
4-5 Garlic pods
1/2" Ginger
2-3 tbsp grated fresh Coconut
2-3 Red chillies
3-4 Green chillies
1/4 tsp Garam masala

Method:
  • Wash and soak basmati rice for 10 mins.
  • Grind all the ingredients under the section 'to grind' to a fine paste by adding little water.
  • Heat oil and ghee in a pressure cooker or a thick kadai and add Biriyani leaf,cinnamon and cloves and fry them for a minute.
  • Add cut babycorn pieces and fry them nicely for 2 mins.
  • Add ground masala and fry the mixture until the raw smell disappears.
  • Add washed basmati rice and fry the rice for 2 minutes.
  • Add coconut milk,salt and let it come to a boil.
  • Pressure cook for 1 whistle and reduce the flame and cook for 8-10 mins.If you are using thick kadai,cover it and cook until the rice is done.
  • Heat ghee or oil in a small kadai and add cashew nuts and fry them and garnish the pulao with the fried cashew nuts.
Serve the pulao hot with Onion-tomato raita or Boondi raita.

Babycorn pulao
Notes:
  1. Baby corns can be replaced with fresh corn kernels or the corn cob cut into 1" round pieces or soya chunks in the recipe.
  2. You do not need to use thick coconut milk in the recipe.If the coconut milk is very thick you can dilute with little water to get 2 cups of coconut milk of medium thickness.
Babycorn pulao
I usually do not plan in advance when I click pics. I usually select the the props just before taking the pics based on whatever I feel would go with the food. This post was one of those where I enjoyed clicking more than cooking.Thought I would share one more pic before I say bye..
Babycorn pulao

 
back to top