Monday, July 24, 2017

Stuffed Mushrooms Recipe | Vegetarian Stuffed Mushrooms

stuffed mushrooms
Stuffed Mushrooms with a vegetarian filling recipe with step by step photos. Mushrooms are very versatile and can be used in various ways to create delicious starters, snacks,pulav, biryani,gravies,stir-fry,curry etc. Among all the mushrooms recipes this stuffed mushroom recipe is my most favorite, it is not only easy to prepare but also tastes delicious.If the preparation work of mushrooms is done, it takes hardly any time to cook them and stuff them and bake.It is an ideal recipe for starters in the parties, one can prepare the filling ahead and stuff the mushrooms and keep them ready and bake in the oven at the last minute.These stuffed mushrooms taste best when served hot and consumed immediately, otherwise they become soggy.
stuffed mushrooms
Stuffed Vegetables make any meal interesting and I always love stuffed colored bell peppers, stuffed jalapeno poppers, Indian style stuffed peppers,Stuffed Brinjals ,stuffed mushrooms which can jazz up any meal.
You can check few stuffed vegetables recipes in my blog - 
stuffed mushrooms
You can check other mushroom recipes in my blog- Mushroom BiryaniMatar Mushroom MasalaMushroom Chettinadu,Palak Mushroom.
stuffed mushrooms
Here is how to make stuffed mushrooms recipe with step by step photos.
Stuffed Mushrooms Recipe with Veg filling:
Serves 3-4 | Author: Prathibha
Prep time: 15 mins | Cooking time: 10 mins | Total time: 25 mins + 20 mins baking time
Cuisine: International | Category: Starters/Sancks

Ingredients:
15-20 white button Mushrooms
1/4 cup grated Mozarella/Cheddar/Processed cheese
1/4 cup Bread crumbs
1 small Onion,finely chopped
2-3 Garlic cloves,finely chopped
2-3 tbsp chopped Coriander leaves
2 tsp Mixed herbs
3/4 tsp Pepper powder
2-3 tbsp Olive oil
Salt, to taste

Method:
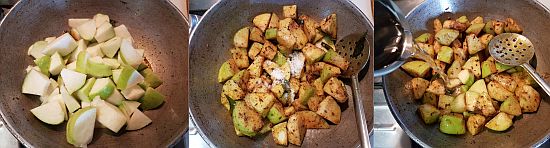
  • Gently rub and wash the mushrooms.I usually rub them with rice flour gently and wash them under running water.Carefully remove the stalks and trim off the tip portion of the stalk and cut the stalk into fine pieces and keep aside.
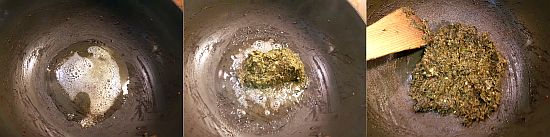
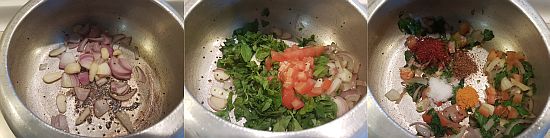
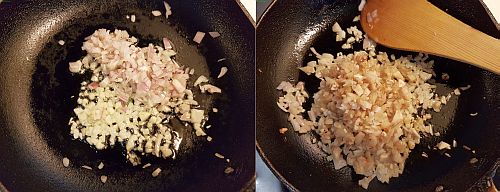
  • Heat 1 tbsp Olive oil in a pan and add finely chopped garlic and fry until it turns slight brown in color and then add finely chopped onion and fry until the onion turns light brown in color.
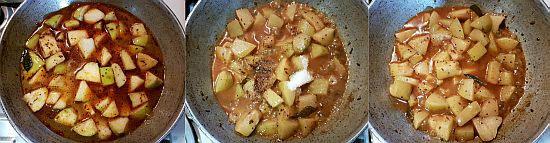
  • Add the chopped mushroom stalks and saute them, they initially release water and let them cook more until the water is absorbed completely.
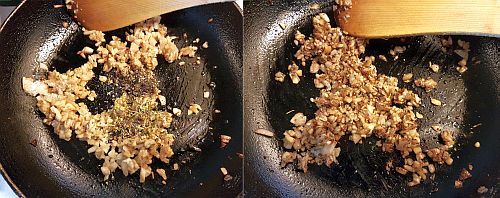
  • Add the mixed herbs, pepper powder, salt and cook for another 2 mins.
  • Let the mixture cool a bit.
  • Meanwhile preheat the oven at 180 deg C/375  deg F for 10 mins.
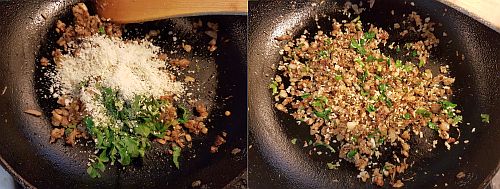
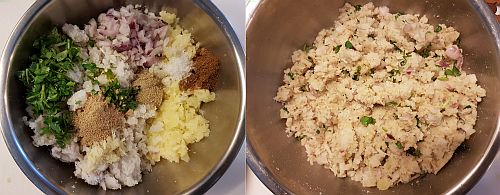
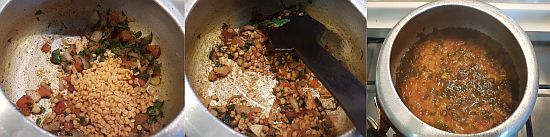
  • Now add the bread crumbs and chopped coriander leaves to the cooked mushroom stalk mixture and mix it well.
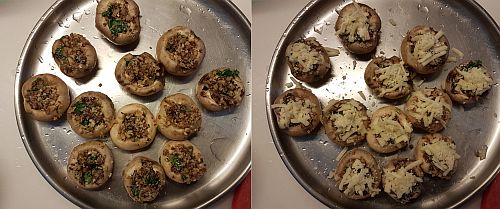
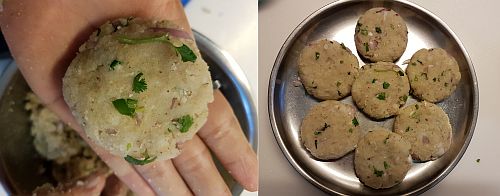
  • Stuff the mushrooms with 2-3 tsp filling and sprinkle some grated cheese(of your choice) and little bit of bread crumbs and keep them ready.
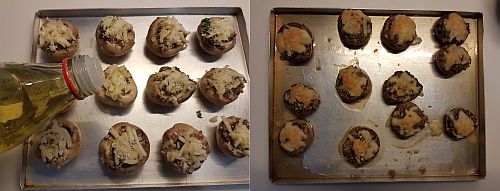
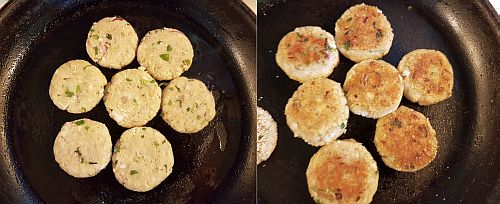
  • Arrange the stuffed mushrooms on a greased tray and dot them with olive oil and bake them in the oven at 170 deg C for 20-25 mins until they are done, they release water and starts to slightly drying up.When start drying up you can remove them from the oven.
Serve them immediately by adding freshly chopped coriander leaves.

Notes:
  1. They taste best when served immediately and consumed hot, else they turn soggy and will not taste good.
  2. Once the mushroom started releasing water in the oven means it is done but I usually keep it for little longer until it starts slightly drying up otherwise I find them bit raw.So it is your wish,you can remove them when you see the water starts forming under the mushrooms while baking.
  3. The bread crumbs add a nice crispy texture on top so do not skip in the filling as well as add a little while topping them with cheese.
  4. For a vegan version avoid cheese on top.
stuffed mushrooms

Monday, July 17, 2017

Eggless Chocolate Chip Cookies | Eggless Cookies Recipes

eggless chocolate chip cookies
Eggless chocolate chip cookies recipe with step by step photos.Chocolate chip cookies along with a glass of chilled milk is a classic combo and I just them.I love to dunk the chocolate chip cookies in the cold milk and eat them.There are various versions of chocolate chip cookie recipes, some like their cookies soft and some like chewy and some like crisp and this recipe of mine yields a crisp yet soft to bite chocolate chip cookies and it is eggless too.I will post another recipe of chocolate chip cookies with eggs sometime soon which is a soft cookie version.
eggless chocolate chip cookies
As I mentioned before these days I am baking cookies like crazy and sometimes I am baking 2-3 batches at one go so that I don't need to bother about the kiddo's snack box or those mid night hunger pangs for me.I have used dark brown sugar in the recipe and hence my cookies look bit darker in color but if you use regular brown sugar you will get golden brown cookies.I bet once you get the hang of the home made cookies I am sure you will never turn to buy the store bought cookies any more.
eggless choco chip cookies
Check out other cookies recipes in my blog:
eggless chocolate chip cookies
Here is how to make eggless chocolate chip cookies recipe with step by step photos.
Eggless Chocolate Chip Cookies Recipe:
Yields:16-18 cookies | Author: Prathibha
Prep time: 20 mins | Baking time: 15 mins | Total time: 35 mins
Cuisine: International | Category: Snacks

Ingredients:
3/4 cup All purpose flour
2 tsp Corn flour
a pinch of Salt
1/4 cup Butter
1/4 cup Brown sugar
2 tbsp Caster Sugar
1/2 cup Chocolate chips
1/4 tsp Baking soda
1-2 tsp Milk,if needed
1/2 tsp Vanilla essence

Method:
  • Sieve flour with corn flour,salt and baking soda a couple of times and keep aside.
  • Cream the butter with caster sugar and brown sugar until creamy and pale and then add vanilla essence and beat again.
  • Add the sieved flour mixture and chocolate chips to the creamed butter mixture and mix until the mixture resembles the crumbs.Now add a couple of teaspoons of milk and mix until it forms a dough, do not over mix it.
  • Preheat the oven at 180 deg C for 10 mins.
  • Place a parchment paper on the cookie tray and keep it ready.
  • Make small balls out of the dough by hand or scoop out using a small ice cream scooper and place them on the prepared cookie tray at a distance giving them enough space to raise while baking.
  • I do not like if the cookies spread more and hence I usually refrigerate the cookie tray for 5-7 mins in the refrigerator, however this step is optional.But if you feel the dough is slightly wet it is advised to keep the dough for a while in the refrigerator,this avoids the cookies get spread more while baking.
  • Bake it in the oven at 170 deg C for 12-15 mins, keep an eye on the cookies after 10 mins.The moment you see the brown patches at the edges and at the bottom of the cookies, it is time to bring them out of the oven.
  • The cookies might be slightly soft to touch on top but when they are cooled they will be perfect.Cool the cookies on the sheet for a while and then remove them carefully and place on the wire rack to cool further.Once they are cooled completely store them in an air tight container.
Serve them with a glass of  chilled milk or as a snack.

Notes:
  1. You can avoid brown sugar and make it with only white caster sugar but I highly recommend the use of brown sugar in the recipe.
  2. Instead of chocolate chips you can add chopped chocolate chunks in the recipe.
  3. You can also add few m&m's along with chocolate chips if you are making them for the kids.
eggless chocolate chip cookies

Thursday, July 13, 2017

Kothimeera Pacchadi | Coriander Chutney for Idli,Dosa

kothimeera pacchadi
Kothimeera pacchadi recipe with step by step photos.Idli and Dosa appears quite frequently for breakfast in any south Indian home. It is always challenging to think of a different side dish for Idli and Dosa apart from the usual fare like Coconut Chutney and sambar. Though I make various chutnies like Tomato ChutneyTomato-Onion ChutneyCarrot ChutneyCapsicum ChutneyPeanut Chutney, Fried gram chutney but the moment I hear about any new chutney recipe I would like to try it immediately as we south Indians are never tired of the various chutney varieties.
kothimeera pacchadi
During my last visit to my mil's place I had noticed a couple of vaious chutney variety jars sitting in the fridge and everyday she used to serve with different combinations of chutnies and powders with Idli and Dosa.These chutnies do not have large shelf life like couple of months but they are good to store for a couple of weeks or until a month. Niluva tomato pacchadi and this Kothimeera pacchadi were few among those pacchadi varieties which she keeps preparing often.Though I do not prepare Idli and dosa on daily basis but we love to indulge them over weekends atleast twice or thrice a month.Hence I never needed to make storable chutnies at my place but when my inlaws visited us last month Idli and Dosa featured quite often for our breakfast.Hence I had prepared few chutney varieties like niluva tomato pacchadi, mamidi allam pacchadi, allam pacchadi and this kothimeera pacchadi and these chutnies stayed quite well for a month. Though we prepare the regular chutnies, it is always nice to have an array of chutnies and powders to be served along with Idli and Dosa,it definitely jazz up your breakfast a bit.
kothimeera pacchai for idli,dosa
Check out other chutney and powder varieties for Idli and Dosa:
coriander chutney for idli,dosa
Here is how to prepare Kothimira pacchadi recipe with step by step photos.
Kothimeera Pacchadi | Coriander Chutney Recipe for Idli,Dosa:

Serves 3-4 | Author: Prathibha
Prep time: 5 mins | Cooking time: 20 mins | Total time: 25 mins
Cuisine: Andhra | Category: Accompaniments,Side dish for Idli/Dosa

Ingredients:
1 big bunch Coriander leaves(roughly 3-4 cups)
8-10 Green chilies
1 big lemon sized Tamarind
1/2 tsp Turmeric powder
1 tsp Cumin seeds
Salt,to taste
1 tbsp Oil

to temper:
1/2 tsp Mustard seeds
2 tsp Oil

Method:
  • Wash and drain the water from the coriander leaves and green chilies and chop them roughly.
  • Heat oil in a kadai and crackle cumin seeds and then add green chilies and fry until they wilt a bit.
  • Add chopped coriander leaves,turmeric powder,tamarind and salt and fry until they become wilted and become a lump,this might take 12-15 mins.Cool it.
  • Grind the coriander leaves mixture to a coarse paste in the mixer.If needed add a couple of tablespoons of water while grinding it.
  • Heat oil in the same pan and crackle mustard seeds and then add ground paste and fry for another 3-4 mins until there is no moisture left in the chutney.Let it cool.
  • Store it in an airtight glass container in the refrigerator.It stays nicely up to 3-4 weeks.
Take out required portion as required into the cup and add little water and dilute it and serve it as a side dish with Idli/Dosa/Uthappam.

Notes:
  1. If you want to prepare the coriander chutney for rice, you can add a tbsp of urad dal and chana dal each before frying the green chilies and coriander leaves and proceed the same way.This chutney cannot be stored more than 2-3 days.
  2. This chutney is extremely spicy and tastes best when served with other mild chutnies like coconut chutney, tamarind chutney.
  3. You can reduce the number of green chilies in the recipe if you cannot bear much spice in the recipe.
  4. If you want you can add bit of jaggery or sugar in the recipe to cut down the spice.
kothimeera pacchai for idli,dosa
Technorati Tags:

Monday, July 10, 2017

Poha Tikki Recipe | Poha Cutlet | Poha Aloo Tikki

poha alu tikki
Poha tikki recipe with step by step photos.Tikkis or Cutlets are always a good option for the evening snacks or can be served as appetizers in the party.Tikkis are versatile and one can prepare various tikkis like aloo tikki, vegetable tikki, stuffed veg tikki, stuffed aloo tikki, aloo and greens tikki, kala chana kebab,veg shammi kebab,Soya chunks tikki,poha tikki, rava tikki etc.I have transformed sometimes the leftover pongal, upma, rice into tikkis as evening snacks as usually no one wants to eat the leftovers at my place.
poha tikki
I usually do not make poha tikkis often at my place and I would prefer the other versions anytime. I had even made this tikki because of a small mishap in my kitchen. When I asked my helper to clean the thin variety poha for a recipe she had washed it accidentally and all I was left was a thick mass of soft and soggy poha.I was left with no option other than transforming it into tikkis  and everyone had it with out any complaints.
poha tikki
Check out other tikki varieties in my blog- 
poha alu tikki
Here is how to make poha aloo tikki recipe with step by step photos.

Poha Tikki Recipe:
Yields 10-12 tikkis | Author: Prathibha
Prep time: 20 mins | Cooking time: 25 mins | Total time: 45 mins
Cuisine: Indian | Category: Snacks

Ingredients:
1 cup Poha/Flattened rcie flakes(Atukulu)
1 medium sized Potato,boiled peeled and mashed
1 small Onion,finely chopped
1/4 cup chopped Coriander leaves
3-4 Green chili,finely chopped or ground into paste
1.5 tsp grated Ginger 
1 tsp Chaat masala
1 tsp Amchur powder
1/2 tsp Garam masala
Salt,to taste

Method:
  • Wash poha in water and remove the water and let it soak for a while for 15-20 mins.If it is thick poha soak in little water,if it is thin poha you can drain water completely and let it soak.
  • Slightly mash the poha with your hands,it is optional.
  • In a large bowl add soaked and mashed poha,boiled peeled and mashed potato, finely chopped onion,green chili and coriander leaves,grated ginger, chaat masala, garam masala,cumin powder, amchur powder and salt and mix everything nicely until it is mixed nicely.
  • Take a big lemon sized portion of the poha mixture and make it into a ball and flatten it to form a tikki.
  • You can roll them in bread crumbs by dipping in thin maida-water mixture or else leave them as they are.I left them like that only and refrigerate them for half an hour.
  • Heat a flat pan and add 1-2 tbsp oil and spread with a spatula and place the tikkis and fry them over low-medium flame until they are done by flipping it in between to roast on the other side.
Serve them hot with green chutney and meetha chutney or tomato sauce.Sprinkle some chaat masala on the tikkis while serving.

Notes:
  1. You can even grind the poha to a powder and sprinkle little water to it and follow the same process.
  2. You can add grated vegetables like grated carrots,boiled green peas or blanched green beans  or chopped raw bell peppers or capsicum to the mixture before making tikkis.
  3. You can dip the tikkis in the sooji or oats or bread crumbs on both sides for a crunchy layer on the top.
  4. You can make it in the shape of oval or heart shaped cutlets or you can make like egg shaped rolls and deep fry in oil.
poha alu tikki

Thursday, July 6, 2017

Menthi kura Pappu | Andhra style Methi Dal

menthi kura pappu
Menthi Kura Pappu recipe with step by step photos.Dal is a must in every meal across all the states in India just that the preparation process different from state to state.The south Indian version dal is made very thick and it consists of a tempering of mustard seeds and tamarind pulp is added in the dal which gives a distinct taste compared to the versions from the other states. I have already posted a typical Andhra version of Methi dal before and today I am posting a simple pressure cooker everyday dal version where the dal is cooked along with the spices and greens directly in the cooker.The preparation process is so verstaile that one can prepare various varieties of dals using the same process and it is a breeze to make using this version.
In Andhra, Menthi kura pappu is mixed with hot steamed rice and a dollop of ghee and it tastes so heavenly and the addition of a simple fry and fryums make the meal even more tastier.You can check out other Andhra style dal varieties here - Beerakaya PappuGongura PappuMamidikaya PappuMamidikayi-Vankaya PappuPesara KattuPalakura PappuTomato Pappu.
menthi kura pappu
Here is how to prepare the Andhra style Methi Dal recipe with step by step photos:
Menthikura Pappu | Methi Dal Recipe:

Serves 3-4 | Author: Prathibha
Prep time: 10 mins | Cooking time: 20 mins | Total time: 30 mins
Cuisine: Andhra | Category: Sidedish

Ingredients:
1/2 cup Toor dal
1 1/2 cups Fenugreek leaves/Methi ,loosely packed
1 Onion, roughly chopped
1 Tomato, roughly chopped
1-2 Green chilies,slit into pieces
5-6 Garlic pods
1 tsp Coriander powder
1/2 tsp Cumin powder
1 tsp Red chili powder
1/2 tsp Turmeric powder
1 small amla sized Tamarind
1/2 tsp Mustard seeds
1/4 tsp Asafoetida
Salt to taste
1 tbsp Oil

Method:
  • Wash and soak the toor dal for 15-20 mins.
  • Remove the fenugreek leaves from the stems and wash them and chop them roughly.
  • Soak tamarind in 1/4 cup of water and extract the juice and keep it ready.
  • Heat oil in a cooker and crackle mustard seeds and then add sliced onions,green chilies and garlic cloves and fry them well until the onions turn translucent.
  • Add chopped methi leaves and tomatoes and fry for 2-3 mins.
  • Now add turmeric powder, coriander powder, cumin powder, red chili powder and salt and fry for another couple of minutes.
  • Add washed and drained toor dal and fry for a minute and add 1.5 cups of water and let it come to a boil.
  • Close the lid and pressure cook it for 3 whistles and simmer the flame and cook it for another 7-8 minutes.
  • Once the pressure drops take a dal masher(pappu gutti) and mash the dal nicely to get the uniform dal mixture and add the extracted tamarind juice and keep it again on high flame for another 3-4 mins until the dal is thick and uniform in consistency.
Serve it hot with hot steamed rice,ghee and papad or rotis/phulkas.

Notes:
  1. This is a simpler version of dal but one can prepare the dal following a traditional way by cooking the dal with methi leaves and then do the rest of the process as mentioned above and add cooked and mashed dal( with leaves) to the fried onion tomato mixture and cook as above.
  2. You can prepare various dals like Bottlegourd dal, tomato dal,Amaranth greens dal(thotakura pappu), Brinjal dal by following the same procedure.
  3. The dal tastes better when it is made thick and cooked properly, hence adjust the water accordingly.
andhra style methi dal
Technorati Tags:

Monday, July 3, 2017

Peru Nu Shaak | Guava ki Sabzi | Guava Curry | Amrood ki Sabzi

guava ki sabzi
Guava ki Sabzi recipe with step by step photos. I had mentioned before that my stay in Mumbai has widened my knowledge and introduced me to various new cuisines. I had tasted this Peru Nu Shaak for the first time at one of my most famous restaurants known as Swati Snacks in Mumbai. Their menu is quite wide and very unique and more traditional Gujarati cuisine and their Panki is one of my favorites till date but everything on their menu is quite good. I liked this Guava ki sabzi very much when I had tasted there for the first time and it had become routine to order this Guava sabzi in that restaurant apart from Panki and few other varieties.
guava curry
I had even tried to recreate it at home by exploring more about it in internet but somehow I forgot the recipe.Recently I got a craving for this sabzi but I vaguely remembered the ingredients that went in to make this curry.Most of the recipes available online use curd as the base but the version I am talking about is different and is very simple in flavors but quite distinct in taste.While surfing I landed upon this recipe which was similar to the one I wanted and had adpated the recipe and prepared it in my way and I had already prepared it a couple of times already.I want to record the recipe in my blog so that I would not forget it again and I will also post another variation with the curd sometime soon.
amrood ki sabzi
If you are a guava lover you must try this delicious curry.A little quantity of sugar is added to enhance the taste of the curry, the sweetness of the guava is cut down by the spices and gives a very balanced taste of sweet and spicyness in the gravy.
guava curry
Here is how to make Peru nu shaak recipe with step by step photos:

Guava ki Sabzi | Amrood ki Sabzi Recipe:

Serves 2 | Author: Prathibha
Prep time: 5 mins | Cooking time: 20 mins | Total time: 25 mins
Cuisine: Gujarati | Category: Side dish

Ingredients:
1 big semi ripen Guava
1 tsp Sugar
1/2 tsp Turmeric powder
1 tsp Coriander powder
1 tsp Red chili powder
1/2 tsp Garam masala
a sprig of Curry leaves
1/2 tsp Mustard seeds
1/2 tsp Cumin seeds
1/4 tsp Asafoetida
Salt,to taste
1.5 tbsp Oil

Method:
  • Wash and cut the guava and remove the seeds and cut into cubes and keep them aside.
  • Heat oil in kadai/pan and crackle mustard seeds and cumin seeds and add curry leaves and asafoetida and fry until the curry leaves wilt.
  • Reduce the flame or remove the pan off the flame and add the spices - turmeric powder, coriander powder and red chili powder and mix the spices nicely taking care that they are not burnt and return the pan on to the flame.
  • Now add the chopped guava pieces and coat the guava pieces nicely with the spices and then add salt and fry for 2-3 minutes and add 3/4 -1 cup of water to it depending on the consistency you want and cover it and let it cook until the guava pieces are cooked but not mushy.It will take roughly 8-10 mins.
  • Add garam masala and sugar to it and mix and cook for another 2 mins.Switch off the flame.
Serve it hot with rotis/phulkas/bhakris.

Notes:
  1. The addition of sugar is optional if you do not like but it enhances the taste of the curry and hence I strongly recommend not to skip it.
  2. The curry thickens as it sits and hence add the water accordingly.Do not make it very thin, it should be slightly thick-ish and pourable kind.
  3. Use semi ripen guavas for the best taste, do not use very ripe ones.
 
back to top