Friday, April 19, 2013

Red Coconut Chutney | Side dish for Idli/Dosa

 coconut chutney
What to prepare as a Side dish for Idli/Dosa is always a confusion and since I get bored eating the same side dish again, I usually change the flavor and color of the chutney which makes it taste different every time.I have posted a version of Coconut chutney earlier, which is the usual way I prepare.I make various variations of this such as Red Coconut chutney and Green coconut chutney The addition of raw onion and garlic adds a nice flavor to the chutney and the addition of red chillies and byadige red chillies adds a bright red color to the chutney.
red coconut chutney

You can check out other chutney varieties for Idli/Dosa here:
Red Coconut Chutney Recipe:
(serves 2-3)

Ingredients:
1/2 cup grated fresh Coconut
1 small Onion,chopped
2-3 dry Red Chillies
2-3 Byadige Red Chillies
2 small Garlic pods
2 tbsp Chana dal
1 1/2 tsp Tamarind pulp
Salt to taste

to temper:
2 tsp Ghee/Oil
1/2 tsp Mustard seeds
1 tsp Urad dal
a sprig of Curry leaves
a pinch of Asafoetida

Method:
  • Heat 1 tsp Oil and add chana dal and fry until they turn red in color and add red chillies and byadige red chillies until they are crisp and keep them aside.
  • Grind grated fresh coconut with onion, garlic pods, roasted chana dal and dry red chillies, tamarind pulp and salt to a paste.
  • Heat ghee/oil in a small tempering pan and crackle mustard seeds and add urad dal and fry until it turns red in color.Add curry leaves and asafoetida and fry it.
  • Add the tempering to the chutney and mix well.
Serve it with Idli/Dosa/Paniyaram.
coconut chutney
Notes:
  1. Instead of chana dal you can add 3-4 tbsp fried gram(roasted gram) in the recipe.
  2. Adjust the red chillies according to your spice level.The addition of byadige red chillies gives a nice red color to the chutney,so do not miss adding them.
red coconut chutney

You can check the regular Coconut Chutney recipe here.

Wednesday, April 17, 2013

Cauliflower Stir fry | Aromatic Gobi Curry Recipe

Cauliflower is one of those veggies which features regularly in my kitchen and Ajwani Aloo Gobi with mustard flavor is one of my most favorite preparations with it. It serves as a nice combination with rotis. I usually prepare this Cauliflower curry or this simple aromatic Gobi stir fry which tastes well even with rice.
This recipe is quite simple to make and is very aromatic because of the addition of coriander and garlic while pounding the coconut masala.You can adapt this recipe to various vegetables like Potatoes, Ladies finger, Tindora, Clusterbeans, French beans, Long beans, Brinjal and Cabbage and follow the same process but adjust the cooking time accordingly. While a few vegetables like potatoes needs to be cooked first others such as cluster beans, french beans, long beans are to be steamed , the rest of the veggies listed above should be sauteed in oil until they are done.Now let's see how this simple and versatile recipe is prepared.
cauliflower stir fry

Cauliflower Stir Fry | Aromatic Gobi Curry Recipe:
(Serves 2)

Ingredients:
1 small Cauliflower,cut into small florets
1 Onion,finely chopped
juice of 1/2 Lemon
a sprig of Curry leaves
1/4 tsp Turmeric powder
1 tbsp Chana dal
1 tsp Urad dal
1/2 tsp Mustard seeds
2 tbsp Oil

to grind:
1/4 cup grated fresh Coconut
3-4 Green chillies
3-4 Garlic cloves
2-3 tbsp chopped Coriander leaves
Salt to taste

Method:
  • Clean and check the cauliflower florets and add them to the boiling water with salt and turmeric powder and switch off the flame and leave them aside for 2-3 mins.Drain and keep them aside.
  • Heat oil in a kadai/pan and crackle mustard seeds and add chana dal and urad dal and fry until they become golden in color.
  • Add curry leaves and finely chopped onion and fry well until they turn pink in color.
  • Now add drained cauliflower florets and fry for 2 mins.
  • Add 2-3 tbsp of water and cover it and cook it on low flame for 7-8 mins until the cauliflower is cooked.Take care that it should not become mushy,it should be cooked and firm to touch.
  • Meanwhile grind grated coconut with green chillies,garlic cloves,coriander leaves and salt to a coarse paste.Do not add water while grinding it.
  • Add the ground masala to the cooked cauliflower and fry it for some time and cover it and cook for 2 mins.
Serve it hot with Roti/Rice/Chapati.
Notes:
  1. You can skip onion and garlic in the recipe if you are preparing on festivals.
  2. Soaking the cauliflower florets in salted water will remove if there are any insects in cauliflower.I always do this even after checking the florets to make sure for myself.

Also check out other cauliflower recipes in my blog:

Sunday, April 14, 2013

Lemon Pickle | Nimboo ka Achar Recipe

I have posted many mango pickle recipes last year in my blog which were sourced from my MIL. The lemon pickle recipe which I am posting today is also sourced from her during her recent visit.Apart from the lemon pickle she brought various other pickles and powders. We also prepared a few varieties of pickles together and you might have already seen a few of them on my blog. I intend to post a few more shortly.
Lemon pickle pairs really well with Curd rice.If you get fresh lemons you must try this lemon pickle as it is not only delicious to eat but also keeps your body cool in the summers.
Lemon Pickle Recipe:
shelf life: up to 1 year

Ingredients:
30-35 big sized Lemons
1 cup Salt
1 cup Red chili powder
2 tbsp Turmeric powder
1 tsp Fenugreek powder
1 cup Sesame oil
1 tbsp Mustard seeds
1/4 tsp Asafoetida

Method:
  • Wash and wipe the lemons with a clean cloth.Cut them into 8 pieces lengthwise or quarter them into 8 pieces.
  • Mix the lemons with 3/4 cup of Salt and turmeric powder until they are mixed nicely.
  • Put this mixed lemons in a clean and sterilized glass bottle and close it with lid and leave it aside for 10 days.You can mix it once in a while in 3 days.By this time the lemons would leave water.
  • After 10 days add red chili powder,fenugreek powder and 1/4 cup salt to the lemon mixture.You should not remove any water which oozes from the lemons.
  • Heat sesame oil and crackle mustard seeds and asafoetida and cool the oil completely.
  • Add the oil(which is cooled down) to the lemon pickle and mix well.
  • Leave it for 10-15 days to get marinated.
Serve it with Curd rice or you can even serve it with any Upma variety,it tastes nice.
Notes:
  1. After 10 days when lemon is mixed with salt and turmeric powder,check the salt and increase the salt amount accordingly from 1/4 cup if needed.
  2. Few squeeze the lemons slightly and remove the seeds and mix the lemons with lemon juice and follow the same procedure.You can follow this method too if you want.Do not squeeze the lemons hardly as it will make the pickle bitter.
  3. You can also store just the marinated lemons with salt and turmeric powder through out the year.When needed you can take out some portion and add red chili powder according and temper it with sesame oil,mustard seeds and asafoetida.You can even avoid the tempering with oil and add just the red chili powder to it.
Check out the recipes for various Andhra style Mango Pickles and North Indian Achar here.

Friday, April 12, 2013

Minapa Vadiyalu | Urad dal Fryums | Sun-dried Fryums


During Summer season, preparation of  "Pickles" and "Fryums" is a major activity in many house holds in the South. My mom used to make large batches of various varieties of fryums in the summers and we used to store them for the rest of the year.Apart from these fryums, my mom used to prepare few special varieties of papads, which she stopped making now. The fryums, which my mom used to prepare were rice and sago based. Today, I am posting a different variety of fryums that is prepared using urad dal.I was introduced to these fryums by my husband who is a big fan of these Minapa Vadiyalu which his mom sources for him every year.
These fryums can be prepared using whole white urad or black urad. We prefer black urad as it is not only tasty but it is also very healthy. If you use the whiter variety they will be in white color but as we used the black urad you can see the black skin of urad in the fryums.These fryums are extremely easy to make,all you need is good sunlight. If you are living in a tropical climate, you must try making them.
 
Minapa Vadiyalu | Urad dal Fryums Recipe:
(stores upto an year)

Ingredients:
1/2 kg whole  black Urad or whole white Urad
1 tbsp Cumin seeds
10-12 Green chillies (optional)
Salt to taste

Method:
  • Soak whole urad for 6-7 hours or overnight.If you are using white urad you can soak it for just 3-4 hrs,the whole black urad takes longer to get soaked.
  • Drain the urad and grind it with cumin seeds,green chillies and  salt to a thick smooth paste like the medu wada batter in the wet grinder.Add enough water to grind it,do not add more water which makes the fryums soak lot of oil when fried,So make the dough to a thick smooth paste.
  • In a open space under sun,spread a clean plastic sheet and place heavy weights in the four corners so that the sheet does not fly.
  • Take a spoonful of batter and drop them like how we do for fryums leaving some space in between.
  • Dry them under sun for 2-3 days until they are completely dried.
  • Store them in an air tight container.They stay good for an year.
Deep fry them in oil until brown when required and serve as an accompaniment with South Indian meal.
Notes:
  1. You can use whole white urad or a mix of white urad with the skin of  whole black urad to make these fryums.As the whole urad with skin is good I prefer using it.
  2. Green chillies and cumin seeds can be avoided completely in the recipe.It adds flavor and spicyness to the fryums.

Wednesday, April 10, 2013

Semiya Payasam | Vermicelli Kheer Recipe| Ugadi Recipes

semiya kheer
I would like to wish all my readers and friends ' HAPPY UGADI '. Ugadi is on the 11th of April. 
Today, I am posting a simple Vermicelli kheer recipe to celebrate the festival.The process of preparation of this kheer is no different from any other kheer. This kheer is usually prepared during festivals. If you havent planned anything yet with regards to what to make during Ugadi , then you should check out my Ugadi menu planner here.This should help you to plan a simple menu for the festival.
semiya payasam
Check out other Kheer recipes in my blog here.
vermicelli kheer

Semiya Payasam | Vermicelli Kheer Recipe:
(serves 3-4)

Ingredients:
1 cup Vermicelli
3/4 cup Sugar
3/4 liter full cream Milk
10-12 Cashew nuts
2 tbsp Raisins
a pinch of Cardamom powder
2 tbsp Ghee

Method:
  • Boil milk and simmer it for 12-15 mins until it reduced to 3/4th of the quantity.
  • Meanwhile heat ghee in a kadai and fry cashew nuts and fry them until golden in color and remove them and keep aside.
  • In the same kadai add raisins and fry them until they fluff up and remove and keep them aside too.
  • Now add vermicelli to the remaining ghee and fry for 1-2 mins.
  • Add boiling milk and reduce the flame and cook till the vermicelli becomes soft.
  • Add sugar and mix gently till it dissolves and let it continue cooking over low flame.Always cook over low flame otherwise the milk might curdle.
  • Add ghee roasted cashew nuts and raisins and cardamom powder to the kheer and mix and switch off the flame.
Serve it hot/warm/cold or at room temperature.
vermicelli payasam
Notes:
  1. You can add a pinch of saffron to the kheer while it is boiling.Rub it in a tbsp of milk before adding to milk for better color and flavor.
  2. I sometimes add condensed milk to the kheer ,so I usually reduce the quantity of sugar in the recipe.This makes the kheer more tastier,creamier and rich.

semiya kheer

Monday, April 8, 2013

Rava Pulihora | Nimmakaya Rava Pulihora | Pulihora Pindi

rava pulihora
The word 'Pulihora' makes my mouth water. I like Chintapandu Pulihora (Puliyogre) or Lemon Rice(Nimmakaya Pulihora) for its tangy taste.I prepare some variety of Pulihora during festivals and also when I run out of time for a simple lunch along with Curd rice.
rava pulihora
Today, I am posting another Andhra special Pulihora which is made up of Rava and is usually prepared using lemons.It is also called Pulihora Pindi in coastal region of Andhra and is a specialty in that region.It is a very simple recipe and do definitely give it a try as it hardly takes any time to make .As this does not have any onion or garlic in the recipe, you can prepare this even during festivals instead of preparing a rice variety. Try it for Ugadi . You can include this as a lunch or breakfast item during Ugadi. Check out my Ugadi menu planner here.
rava pulihora
Nimmakaya Rava Pulihora | Pulihora Pindi Recipe:
(Serves 2)

Ingredients:
1 cup Rice Rava(see notes)
5-6 light colored Green chillies,slit
1/4 cup Groundnuts
12-15 Curry leaves
juice of 1 1/2 lemons
1-2 Red chilies(optional)
2 tbsp Chana dal
1 tbsp Urad dal
1/2 tsp Mustard seeds
1/2 tsp Cumin seeds
1/4 tsp Turmeric powder
Salt to taste
2-3 tbsp Oil

Method:
  • Boil 2 cups water with little salt,turmeric powder.Once it comes to a boil add rice rava and stir it well and let it cook for sometime until done.It takes 4-5 mins.Once it is done spread the cooked rice rava mixture on a wide plate until it is cooled down.
  • Meanwhile heat oil in a pan and crackle mustard and cumin seeds.
  • Add groundnuts and fry them until they turn crisp and slightly red in color.
  • Add chana dal and urad dal and fry them until they turn slightly red in color.
  • Add slit green chillies and fry them until they wilt.
  • Add curry leaves,red chillies and fry them for few seconds.
  • Cool the tempering mixture for some time and add this to the cooled rava mixture.
  • Mix the required amount of salt to lemon juice and keep it ready.We have already added some salt to the rava mixture while cooking,so do add the salt quantity accordingly.
  • Mix everything with hands as it ensures even mixing.Check for the taste of salt and lemon juice and add more if required.Let it sit for 1-2 hrs so that the flavors to blend well.
Serve it at room temperature with some fryums/chips/sliced cucumber.
rava Pulihora
Notes:
  1. Adjust the amount of chillies,salt and lemon juice as per your taste buds.
  2. I personally prefer it slightly on the sour side,hence I add more lemon juice.
  3. To prepare Rice rawa: Clean and Soak the rice for some time and drain it completely and spread over a cloth so that it will drain off excess water.Coarsely grind the pound mixture in a mixer and then sieve it(do it in whipper mode).Use the rawa which is in sieve and the flour that it is sieved can be used for dosas or regular rice flour.
rava pulihora

Saturday, April 6, 2013

Ugadi Recipes | Ugadi Menu

Ugadi festival is on the 11th of April. Ugadi is a major festival in Andhra and Karnataka as it is considered as the start of a new year.On Ugadi day, we prepare 'Ugadi Pacchadi' which is a mix of all the basic tastes 'shadruchulu'. It is a mix of tamarind juice, salt, chopped raw mango, jaggery and neem flowers and is adjusted according to our taste buds.
We usually prepare either 'Holige (Obattu)' or 'Boorelu (Poornalu)' or 'Bele Kadubu' for Ugadi as the main sweet along with some kheer/payasam and other festival delicacies.At our place,the usual Ugadi menu comprises of Maavinkayi Chitranna ( Raw mango rice) ,stir fry, vada, sundal, Holige Saaru, Holige, Payasam and Rice.
I am trying to give various options for Ugadi menu in every category to make your planning easy.So please go through it and celebrate the festival with more fun and food.
Ugadi Recipes

Check here to find out how to make Ugadi  Pacchadi for Ugadi.
Traditional Sweet Varieties:
  1. Hoornada Holige/Obbattu
  2. Halu Holige | Paal Poori | Paala Obabttu 
  3. Boorelu | Sukkinunde | Suzhiyan
  4. Karida Kadubu | Kari Kudumulu | Fried Sweet Dal Dumplings
  5. Garugu Hollige/ Hollige with rice flour-coconut filling
 Sundal & Stir fry varieties:
  1. Chana Dal Sundal
  2. Lobia Sundal/Alasandula Guggillu
  3. Kabuli Chana Sundal
  4. Kala Chana Sundal/Black Chickpeas Sundal
  5. Peanut sundal
  6. Sweet corn Sundal 
  7. Mixed Bean Sundal 
  8. Kosambari | Moong dal Salad 
  9. Beans Stir fry
  10. Beans-carrot Palya
  11. Raw Banana Stir fry
Vada/Snack varieties:
  1. Alasandula(Lobia) Vada/Fritters
  2. Masala Vada/Chana dal Vada
  3. Medu Vada
  4. Mixed Dal Ambode(Vada)
  5. Mosaru Ambode/Dahi Dal Vada
  6. Dahi Vada/Perugu Vada/Mosaru Vade
  1. Korra biyyam Payasam | Foxtail Millet Kheer 
  2. Moong Dal Kheer / Pesara Pappu Payasam
  3. Paal Payasam / Rice Milk Pudding
  4. Rava Payasam | Sooji Kheer 
  5. Sabudana Kheer | Sago Payasam
Rice Varieties:
  1. Chintapandu Pulihora- Andhra Style
  2. Dabbakaya Pulihora/Indian Grapefruit Rice
  3. Lemon Rice/Chitrannam
  4. Mamidikaya Pulihora/Maavinkay Chitranna
  5. Methi Peas Bath | Menthya Batani Anna
  6. Pulihora/Puliyogre
  7. Raw Mango Rice/Mamidikayi Gojju Annam
  8. Vangi Bath

Thursday, April 4, 2013

Pandu Mirapakaya Niluva Pacchadi | Andhra Red Chili Chutney

Andhra is known for its spicy pickles - Avakaya,Gongura and Pandumirapakaya(Red chili) Pacchadi being the most famous.During the season we get fresh red chillies in the market,it is usually ground with tamarind and salt and is stored in clean air-tight bottles for over an year.When we need to serve it with rice,scoop out a small portion of the pacchadi and temper it with mustard seeds and asafoetida in generous amount of oil.It is really a fiery chutney and if you are not used to spice, it can even bring tears in your eyes.We usually mix it with hot steamed rice and dal powder or kandi podi and a big dollop of ghee.It mellows down the spiciness to an extent and makes it very tasty too.

Pandumirchi Niluva Pacchadi | Red Chili Chutney Recipe:
shelf life: upto one year

Ingredients:
1 kg Fresh Red chillies
250 gms Tamarind
1 tsp Turmeric powder
250 gms Salt

Method:
  • Wash and wipe the fresh red chillies,remove the stalks and dry them on a kitchen napkin for 3-4 hrs until the moisture on top of red chillies is dried up completely.
  • Clean the tamarind and remove the fibres and keep it ready.
  • Grind red chillies with tamarind,salt and turmeric powder to a coarse paste.DO NOT add water while grinding.
Store it in air tight glass bottles.They stay good for several months to an year.

Pandu mirapakaya Pacchadi for Rice:

Ingredients:
2-3 tbsp Pandumirchi Niluva Pacchadi(as prepared above)
1 tbsp Oil
1 tsp Mustard seeds
a pinch of Asafoetida

Method:
  • Grind pandumirchi niluva pacchadi with few tbsp of water to a smooth paste.
  • Heat oil in a small pan and crackle mustard seeds and asafoetida and add this to pandumirchi pacchadi and mix well.
Serve it with hot steamed rice,dal powder/Kandi Podi and ghee.You can serve chopped raw onions along with it.

Notes:
  1. This Niluva Pacchadi would be very spicy initially and it reduces its spiciness over a period of time.
  2. You can use any variety of spicy red chillies to make this pacchadi.
  3. Pandumirchi Niluva pacchadi can be stored for long,when you need to serve all you need to do is to add a tempering of mustard seeds and asafoetida and add it to the pacchadi and mix. 

Wednesday, April 3, 2013

Chettinad Cauliflower Masala Dosa Recipe | Dosa Recipes

After a long time I am posting a DOSA recipe in my blog.Many of you know my love for Dosa as I have mentioned in many posts about my views/tips on preparing a wonderful Dosa .Hence I would not get into the technical details of  Dosa again and bore you guys.
chettinadu cauliflower masala dosa
Coming to today's Dosa recipe, I have never tried Cauliflower dosa in any restaurant and also I  am also not aware of any particular Chettinad style preparation for this dosa. A few recipes that catch my attention haunt me until I try it. This is one such recipe, which I saw at Anu's space and I had the huge urge for few months to prepare and finally prepared it a few months back and loved it too.This time I wanted to share it with my readers and hence I made it again to share it in my space.
cauliflower masala
This dosa tastes different and is a good change from the regular Masala Dosa because of its spicy cauliflower filling.What attracted me the most was the mashed version of cauliflower in the filling.Though I am not sure of the authenticity of the chettinadu style preparation, I have adapted the filling recipe from her blog and modified it to as per my requirements.The batter which I am mentioning here can be used to make any dosa like plain dosa, utappam or Masala dosa,it works wonders!!
Check out other must try Dosa recipes in my blog.
  1. Atukula Dosa/Sponge Dosa 
  2. Davanagere Benne Dosa 
  3. Erra Kaaram Dosa...from Rayalaseema 
  4. MLA Pesarattu / Upma Pesarattu 
  5. Paper Thin Rava Dosa..Hotel Style
  6. Mysore Masala Dosa
  7. Pav Bhaji Dosa
  8. Vegetable Dosa
cauliflower masala dosa  

Chettinadu style Cauliflower Masala Dosa:
Ingredients:

for Batter:
2 cups Raw rice
2 cups Idli Rice or Par boiled rice
1 cup whole white Urad dal
1/4 cup Toor dal
1/4 cup Chana dal
1/4 cup Flattened rice(Poha)
1 tsp Fenugreek seeds
Salt to taste 
Oil/Ghee, to roast dosas

to mix in batter before making dosas:
2 tbsp chiroti Rava
1 tbsp Sugar
a pinch of Cooking Soda

for Cauliflower Masala:
2 cups Cauliflower florets
1 big Onion,finely chopped
1 big Tomato,chopped
5-6 Garlic pods,peeled
1/2" Ginger,finely chopped
1 Green chilli,finely chopped
2 tbsp chopped Coriander leaves
1/2 tsp Rasam powder
1/2 tsp Sambar powder
1/2 tsp Red chili powder
1/4 tsp Turmeric powder
a sprig of Curry leaves
2 Red chillies,broken
1/2 tsp Mustard seeds
Salt to taste
to grind:
2 tbsp fresh grated Coconut
2 tsp Poppy seeds,soaked in water
1/2 tsp Saunf 
5-6 Pepper corns

Method:
to make dosa batter:
Wash and soak raw rice,idli rice(or par boiled rice), urad dal, toor dal, chana dal, fenugreek seeds together in water for  4-5 hrs.
Soak flattened rice(poha) for 1/2 hr.
Grind all the ingredients in the wet grinder to a fine batter by adding water at regular intervals.
Add required amount of salt at the end of grinding and mix well.
Allow the batter to ferment for 12-14 hrs.
On the day of preparing dosa take out the required amount of dosa batter into a vessel and add chiroti rava and sugar to it and mix well and let it keep for an hour.

to make Cauliflower masala:
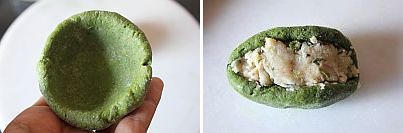
  • Clean and wash the cauliflower florets and soak them in salted hot water for 10-15 mins.Drain them and chop them finely.
  • Heat oil in a kadai/pan and crackle mustard seeds and add broken red chillies and curry leaves fry until they wilt.
  • Add garlic pods,chopped ginger and green chili and fry for a minute.Now add finely chopped onions and fry until they become translucent.
  • Add chopped cauliflower florets and fry well for 2-3 mins and add chopped tomatoes to it and fry for 3-4 mins.Cover it and cook until the tomatoes turns mushy and cauliflower is cooked.
  • Grind grated coconut with poppy seeds,pepper corns and saunf to a fine paste.Add little water if required for grinding.
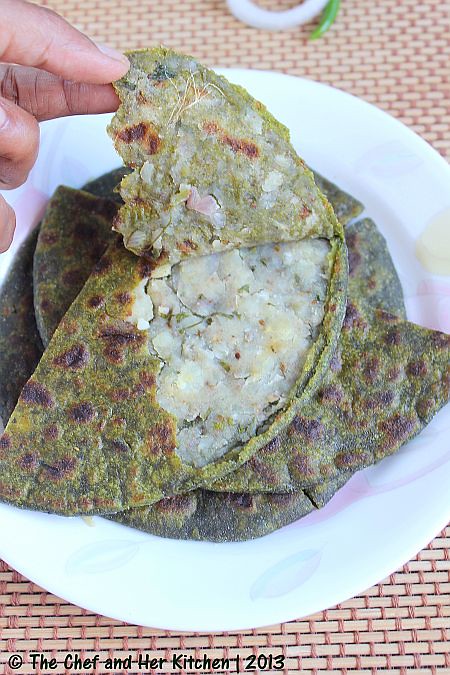
  • Add rasam powder,sambar powder,red chili powder,turmeric powder and salt to the cauliflower mixture and mash it nicely with a masher.It is your choice to keep the texture how ever you want.I mashed it completely like a spread,if you want you keep it chunky too.
  • Add the ground coconut mixture to it and let it cook for 3-4 mins until the raw smell disappears.You should keep the consistency of this very thick as we will apply this inside the dosa.
  • Switch it off and let it come to room temperature.Add chopped coriander leaves to it and mix and keep it ready.
to make Cauliflower Masala Dosa:
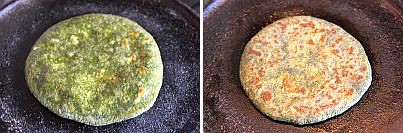
  • Make the tawa ready for making dosa,keep the stove on medium flame and pour a ladle full of batter in the middle of the pan and spread in a circular motion to form a 9 " dosa and pour some oil/ghee (1 tbsp roughly) all over the edges and in the center cover it with a lid.
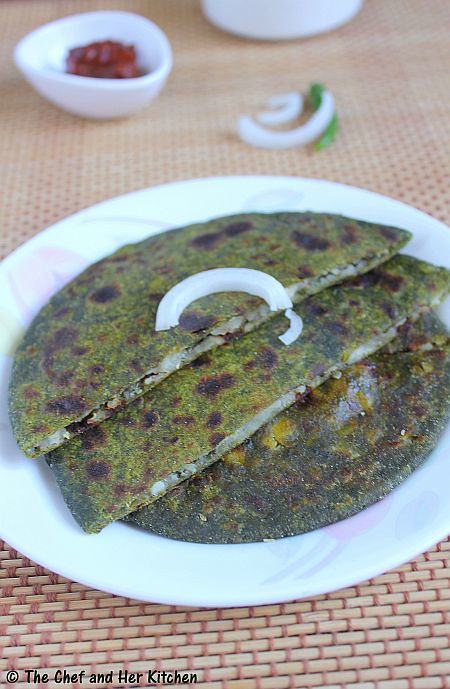
  • After it is roasted for a minute remove the lid and smear the cauliflower mixture(approx 3-4 tbsp) all over the dosa.
  • Keep the flame on HIGH and let it roast for another minute until it turns golden brown and crispy.
  • Fold it into half and serve.
Serve it with Coconut chutney and Sambar. Check out other side dishes for Idli/dosa here.
cauliflower masala dosa

cauliflower masala dosa
Tips:
  • The addition of sugar to the batter makes the dosas crisp and also gives a thick golden crust to dosas.
  • If your dosas did not turn out good,do not panic.Add 1/4 tsp cooking soda to a ladle and mix with 2 tbsp water well and that to the dosa batter and mix well and start making dosas.This will make the interior of dosa fluffy.
  • If you want you can avoid mashing the cauliflower florets and keep them as they are and follow the same process for the filling.I personally liked the idea of mashing it.
  • The dosa batter can be used to make any dosa like plain dosa, Utappam or Masala dosa.
cauliflower masala dosa

If you are interested in other dosa recipes,check out more varieties here.

Monday, April 1, 2013

Palak Aloo Paratha Recipe | Stuffed Paratha Recipes | Paratha Fillings

Stuffed Parathas are always a favorite at my place as its a complete meal when paired with pickle and curd.I had posted Palak Paneer Paratha recently where I used usual Paneer stuffing in a palak based atta dough.Today's recipe is very similar and is prepared in a same manner just that I used the regular Aloo stuffing which we make for Aloo parathas.
Aloo paratha is the most common favorite paratha for everyone,the addition of palak in the dough adds a healthy touch and a nice variation to the usual Aloo paratha.I have given a detailed tutorial to make a perfect paratha,so go through the recipe and the step by step pics to make a perfect paratha.

Palak Aloo Paratha Recipe:
(makes 6 parathas)

Ingredients:
for dough:
1 1/2 cups Wheat flour
2 cups Spinach
1/2" Ginger
2-3 Green chillies
Salt to taste
2 tsp Oil
Water,to mix

for filling:
2 big Potatoes,boiled and peeled
1 medium Onion,finely chopped(optional)
2-3 Green chillies,finely chopped
1 tsp grated Ginger
2 tbsp chopped Coriander
1 tsp Amchur(dried mango) powder
1 tsp roasted Cumin powder
Salt to taste

Wheat flour,for rolling
Ghee and Oil,to roast parathas

Method:
to make dough: 
  • Bring water to a boil in a big vessel and add salt to it.
  • Add spinach,green chillies and blanch the greens for 2 minutes.Strain the spinach and run cold water over it.Cool it completely.
  • Grind spinach with green chillies,ginger to a fine paste.
  • Add the ground spinach mixture to the wheat flour and add required salt and 1 tsp oil and mix well.
  • Add little water(if needed) and knead it into a smooth and soft dough.The dough should be slightly softer than the regular chapati dough for parathas as it will not only make easy to stuff the filling it will help in easy and even rolling of parathas.
  • Apply oil on top of the dough and cover it and keep it aside for at least half an hour.
to make filling:
  • Grate the boiled potatoes and put it in to the bowl.
  • Add finely chopped green chillies,onion,grated ginger,chopped coriander and mix well.
  • Add amchur powder,salt and cumin powder and mix well and keep it ready.
to make paratha:
  • Pinch the dough and take a big size lemon sized dough and place the dough in your left hand palm.
  • Dip your right hand fingers in the flour and try to make a cup shape(which can hold 3-4 tbsp filling) out of the dough by moving your fingers pressing with the thumb in the center.Take care that the edges should be slightly thinner and in the center it should be thick.
  • Fill the cup with 3-4 tbsp filling and seal the two sides of the dough(it would look like Karanji now) and gently press the corners to get a big round ball out of it.See the pictures for better idea.
  • If you stuff the filling in the dough in this way you will get evenly filled paratha and it also forms like pocket.If you find all the above process bit difficult,you can easily roll a 3" circle out of the dough and place the filling in the center and pleat the dough and seal it by gathering the dough around the edges.
  • Slightly flatten the dough(stuffed with filling) with hands and dip it in the wheat flour and gently roll it to a 6" disc of 1/2" thickness.You should not apply more pressure while rolling,so roll it gently.If you apply pressure the stuffing would come out.
  • Flip it on to a hot tawa and fry it until you see bubbles.
  • Turn it and apply oil/ghee and fry and then turn and apply oil/ghee on the other side.
  • Fry the parathas on both sides until you get crisp brown patches on both sides.
Serve them piping hot with Aam ka Achar/Mirch ka Achaar,curd/masala dahi and sliced onions.

Notes:
  1. You can skip spinach puree while making dough and make it plain as Aloo Paratha.
  2. You can even mix various greens along with palak like methi,dill along with palak while making puree for the dough in the recipe
  3. Paneer can also be stuffed instead of Aloo in the dough to make Palak Paneer Paratha,it tastes nice too.
The above pic shows you how the filling is spread across paratha evenly which makes the paratha tastes delicious in each and every bite.

Check out other Stuffed Parathas recipes:
 
back to top