Showing posts with label Payasam. Show all posts

Thursday, September 5, 2013

Palathalikalu | Pala Thalikalu | Vinayaka Chavithi Recipes

palathalikalu
Palathalikalu, Undrallu Payasam, Undrallu, Kudumulu, Bele KadubuUndrala Guggillu etc are the most favourite foods for Lord Ganesha and we prepare them without fail for Vinayaka Chavithi every year. Palathalikalu and Undrallu Payasam are made very similar just that the shapes are different where as in the former one the rice flour mixture is rolled into thin cylinders(or pressed even in sevai press) where as in the latter one the rice flour mixture is rolled into small balls also known as Ammini Kozhukattai in Tamil.
palathalikalu
Palathalikalu is a typical Andhra sweet but it is also prepared in few regions of Karnataka. 'Thalikalu' are made with rice flour in the shape of long cylinders and are steamed and then cooked in thickened milk. One can make thalikalu by using a sev press as well- using the big holed one if you are short of time, but there are chances that the sev will get broken into tiny pieces or melt into the payasam and hence I adapt to make the cylinders by hand even though it is time consuming.
pala thalikalu
In Andhra the base for payasam is milk which is thickened with rice flour and grated coconut is added to it, but in our house my mom thickens the milk by adding  ground coconut-cashew nut-poppy seed mixture which not only thickens the payasam nicely but also adds the taste to it. I strongly recommend you to try this way of payasam base- I am sure you will love it.

Check out other important recipes for Vinayaka Chavithi:
For a complete list of Various options for Ganesh Chaturthi menu, check out here.

palathalikalu

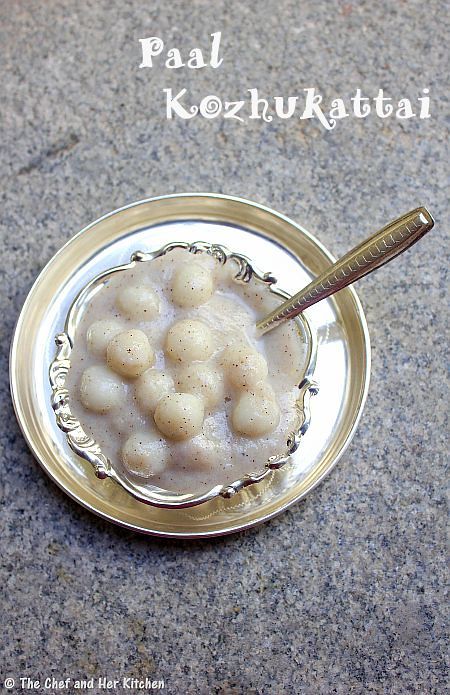
Palathalikalu Payasam Recipe:
Serves 2-3
Prep time: 20-30 mins | Cooking time: 30 mins | Total time: 1hr
Cuisine: Andhra - South Indian | Category: Festival Sweets

Ingredients:
for Thalikalu:
1/2 cup Rice flour *(use freshly home made)
2-3 tbsp grated Jaggery
1 cup Water
a pinch of Salt
1 tsp Oil/Ghee

for Payasam:
1/3 cup grated fresh Coconut
1 tbsp Poppy seeds
6-8 Cashew nuts
1 1/2 cup Milk
1/2 cup Water
1 1/4 cup grated Jaggery
1/4 tsp Cardamom powder

Method:
to prepare Thalikalu: 
  • In a vessel, add water, salt and oil and let it come to a boil.
    palathalikalu
  • After it boils, reduce the heat and add jaggery and rice flour. At this point don't touch the rice flour, leave it as it is for 10-12 mins over medium heat.
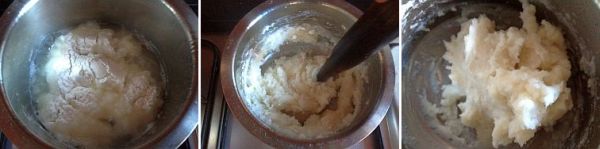
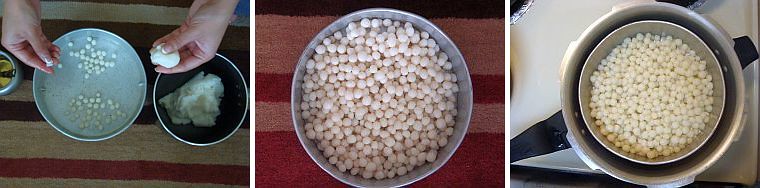
  • Take some dough in your hand, and using your fingers make small balls and make them into thin cylinders of 1 1/2 inches length as shown in picture.If the dough keeps sticking to you hand, smear little oil to your fingers to continue making the cylinders. This is the most time consuming process but the end product makes you forget all the pain you have taken while making it.
  • After you finish making all the cylinders, place the steamer(or vessel) in a pressure cooker without any lid on the vessel. Do sprinkle one or two tea spoons of ghee on the top of the cylinders and steam it for 10-15 min without using a weight (like you would make idli).
  • Once the pressure drops open the cooker and place the steamer(vessel) aside. You should be seeing shiny thalikalu as shown in the picture. 
 to prepare payasam:

  • Soak cashew nuts and poppy seeds in 1/4 cup warm milk for 15 mins.Grind cashew nuts, poppy seeds, grated coconut and cardamom into a fine paste.
  • Mean while boil milk and water and add jaggery and the ground coconut mixture. Cook it on low flame until the jaggery is melted.
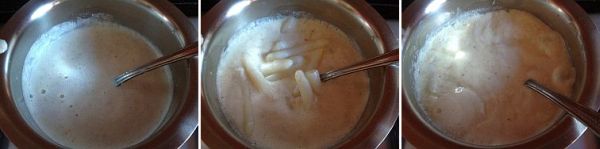
  • Add steamed rice balls and simmer for 6-8 mins until they absorb all the flavours and starts floating up. At this stage adjust the thickness of payasam by adding more milk to suit your required consitency. Do not boil for long as the mixture might curdle up sometimes.
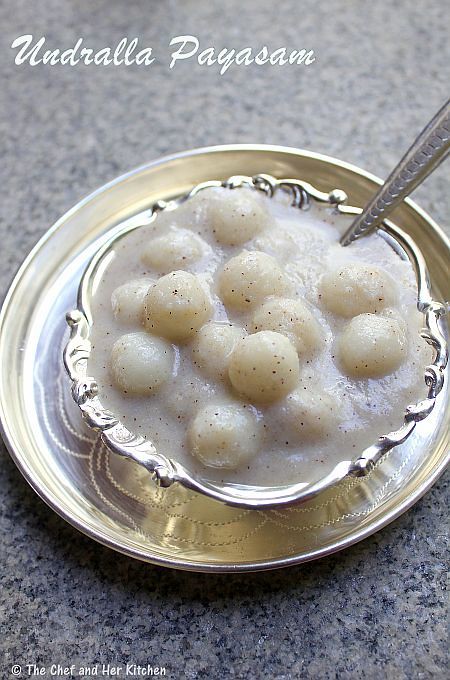
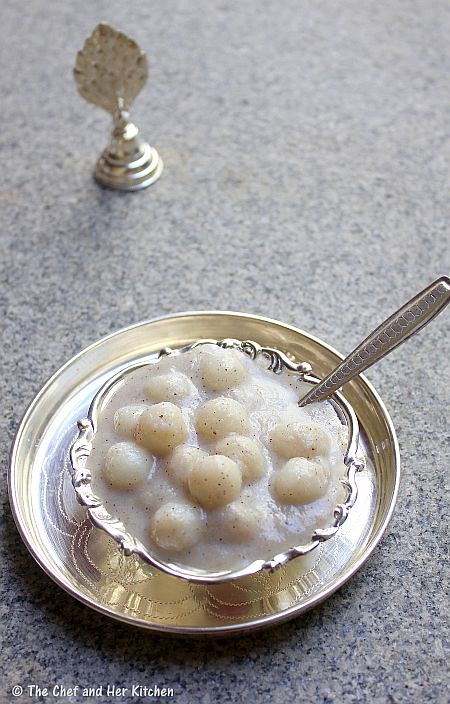
  • Let it sit for few minutes before serving which will help it to absorb the flavours and sweetness.
Serve it warm or at room temperature.

palathalikalu
Notes:
  1. Jaggery can be replaced with sugar in the recipe.
  2. The addition of jaggery while making the rice balls makes them mildly sweet and makes it delicious when cooked in the coconut-poppy seed kheer. How ever it is optional to add jaggery while making those rice balls, but I suggest you to add.
  3. If you do not have time to make those cylinders, you can use a sev maker(slightly big holes) to press them into long cylinders. You do not need to steam them, you can press them directly into the milk-water mixture and boil it until they float and then add ground coconut mixture and jaggery and boil for some time. 
pala thalikalu

Wednesday, April 10, 2013

Semiya Payasam | Vermicelli Kheer Recipe| Ugadi Recipes

semiya kheer
I would like to wish all my readers and friends ' HAPPY UGADI '. Ugadi is on the 11th of April. 
Today, I am posting a simple Vermicelli kheer recipe to celebrate the festival.The process of preparation of this kheer is no different from any other kheer. This kheer is usually prepared during festivals. If you havent planned anything yet with regards to what to make during Ugadi , then you should check out my Ugadi menu planner here.This should help you to plan a simple menu for the festival.
semiya payasam
Check out other Kheer recipes in my blog here.
vermicelli kheer

Semiya Payasam | Vermicelli Kheer Recipe:
(serves 3-4)

Ingredients:
1 cup Vermicelli
3/4 cup Sugar
3/4 liter full cream Milk
10-12 Cashew nuts
2 tbsp Raisins
a pinch of Cardamom powder
2 tbsp Ghee

Method:
  • Boil milk and simmer it for 12-15 mins until it reduced to 3/4th of the quantity.
  • Meanwhile heat ghee in a kadai and fry cashew nuts and fry them until golden in color and remove them and keep aside.
  • In the same kadai add raisins and fry them until they fluff up and remove and keep them aside too.
  • Now add vermicelli to the remaining ghee and fry for 1-2 mins.
  • Add boiling milk and reduce the flame and cook till the vermicelli becomes soft.
  • Add sugar and mix gently till it dissolves and let it continue cooking over low flame.Always cook over low flame otherwise the milk might curdle.
  • Add ghee roasted cashew nuts and raisins and cardamom powder to the kheer and mix and switch off the flame.
Serve it hot/warm/cold or at room temperature.
vermicelli payasam
Notes:
  1. You can add a pinch of saffron to the kheer while it is boiling.Rub it in a tbsp of milk before adding to milk for better color and flavor.
  2. I sometimes add condensed milk to the kheer ,so I usually reduce the quantity of sugar in the recipe.This makes the kheer more tastier,creamier and rich.

semiya kheer

Wednesday, October 10, 2012

Undrallu Payasam | Paal Kozhukattai | Paala Undrallu

I made this undrallu payasam recently during Ganesh Chaturthi,but one can make this on any festival.The process of making those tiny rice balls is bit tedious but it is worth the effort,ideally we make them with the left over dough of modak on Ganesh Chaturthi.
We do make a similar kind of payasa with long thin cylinders pressed in sev maker using the same dough like thick rice noodles which is called Palathalikalu,it tastes the same just that the shapes are different in both the sweet varieties.In general,many add rice flour to thicken the payasam base,but we make it with ground coconut, cashew nuts and khus khus paste which not only makes it thick,but rich,creamy and tastier.I have used my earlier pictorial of preparing the tiny rice balls for easy illustration.If you like a savory version do check out the Avarekaalu Kadubu post for a yummy savory version of ammini Kozhukattai.
Check out other important recipes for Vinayaka Chavithi:
For a complete list of various options for Ganesh Chaturthi menu, check out here.
Undrallu Payasam | Paala Undrallu | Paal Kozhukattai Recipe:
(makes 4-5 servings)

Ingredients:

for undrallu/ammini kozhukattai:
1 cup Rice flour *(use freshly home made)
2-3 tbsp grated Jaggery(optional)
2 cups Water
a pinch of Salt
1 tsp Oil
for coconut-poppy seed kheer:
1 cup grated fresh Coconut
1 tbsp Poppy seeds
6-8 Cashew nuts
1 1/2 cup Milk
1/2 cup Water
1 1/4 cup grated Jaggery
1/4 tsp Cardamom powder
Method:

Making of tiny rice flour Balls:
  • In a vessel, add water, salt and oil and let it come to a boil.
  • After it boils, reduce the heat and add jaggery and rice flour. At this point don't touch the rice flour, leave it as it is for exactly 15 mins over medium heat.
  • Switch off the flame and using a ladle mix it well until you get it into a smooth consistent dough (as shown in the picture). Once it cools a bit,you can use your hand at the end to knead into a smooth dough as shown in picture.
  • Take an empty vessel and apply oil on its base and edges.
  • Take some dough in your hand, and using your fingers make small balls as shown in picture (the smaller the balls, the better the taste.it all depends on your patience).If the dough keeps sticking to you hand, smear little oil to your fingers to continue making the balls.This is the most time consuming process but the end product makes you forget all the pain you have taken while making it.
  • After you finish making all the balls, place the vessel in a pressure cooker without any lid on the vessel. Do sprinkle one or two tea spoons of oil on the top of the balls and steam it for 10-15 min without using a weight (like you would make idly).
  • Once the pressure drops open the cooker and place the vessel aside. You should be seeing shiny balls as shown in the picture.
 for payasam:
  • Grind cashewnuts,poppy seeds,grated coconut and cardamom into a fine paste.
  • Mean while boil milk and water and add jaggery and the ground coconut mixture.Cook it on low flame until the jaggery is melted.
  • Add steamed rice balls and simmer for 6-8 mins until they absorb all the flavors and starts floating up.Taste it at this point of time and adjust the thickness of payasam at this stage by adding more milk or jaggery to suit your taste buds.Do not boil for long as the mixture might curdle up sometimes.
  • Let it sit for few minutes before serving which will help it to absorb the flavors and sweetness.
Serve it warm or at room temperature.

*Rice flour Preparation at home: Wash the rice nicely and spread on a cloth and let it dry in shade completely.Grind it to a fine powder in a mill or at your house in a mixie and sieve the floor.You can use it immediately,if you want to store then spread the floor on the cloth for a day in shade and store it in air tight container.This stays fresh for 2-3 months and can be used for many varieties.For modak/kudumulu especially this kind of rice flour is used. 
Notes:
  1. Jaggery can be replaced with sugar in the recipe.
  2. The addition of jaggery while making the rice balls makes them mildly sweet and makes it delicious when cooked in the coconut-poppy seed kheer.How ever it is optional to add jaggery while making those rice balls,but I suggest you to add.
  3. If you do not have time to make those tiny rice balls(kozhukattai), you can use a sev maker(slightly big holes) to press them into long cylinders.You do not need to steam them,you can press them directly into the milk-water mixture and boil it until they float and then add ground coconut mixture and jaggery and boil for some time.
 
back to top