Wednesday, June 7, 2017

Eggless Ragi Cookies Recipe | Eggless Finger Millet Cookies

ragi cookies
Eggless Ragi cookies recipe with step by step photos.Ragi/Finger millet is one of the most healthiest grains and is a rich source of various minerals.We get Ghee ragi biscuits in Bengaluru and they are really delicious.I just love them to the core that I feel guilty to eat them as it is loaded with lot of ghee.
ragi cookies
I sometimes give my kiddo the finger millet porridge and I always look to include these healthy grains in his diet too and I have found this easy and tasty way to make him eat these wonder grains.I have come up with this recipe after trying a couple of recipes on the internet and needless to say that they came out delicious.I have used a combination of ragi flour and wheat flour in the recipe and the addition of corn flour makes the cookies light.I have tried to reduce the butter quantity but they turned out bit dry and hence I recommend you to use the mentioned quantity in the recipe for utterly butterly delicious healthy(not so healthy,but it is ok for the kids) cookies. I have also added the chocolate chips to the cookies which makes it look like chocolate chip cookies which again tempts the kiddos.
finger millet cookies
Check out other Cookie recipes in the blog:
ragi cookies
Here is how to make eggless ragi cookies with step by step photos.
Eggless Ragi Cookies Recipe:

Yields: 20-22 cookies | Author: Prathibha
Prep time: 15 mins | Baking time: 15 mins | Total time: 30 mins
Cuisine: Indian | Category: Snacks-Cookies

Ingredients:
1/2 cup Ragi flour/Finger millet flour
1/2 cup Wheat flour
1.5 tsp Corn flour
1/2 tsp Baking powder
1/3 cup Sugar,powdered
1/2 cup Butter,cold,cut into cubes
2-3 tsp Milk
2-3 tbsp Chocolate chips, optional

Method:
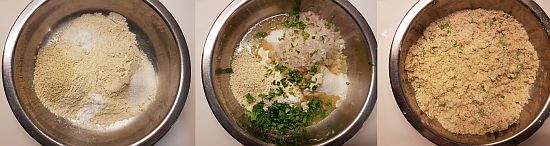
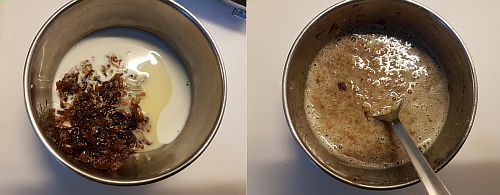
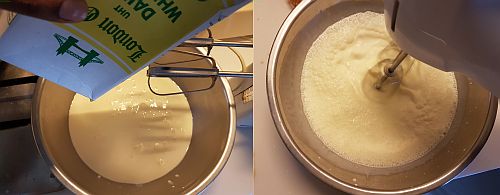
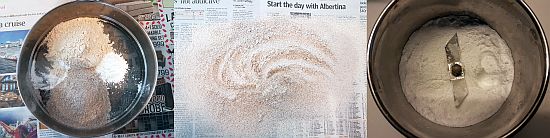
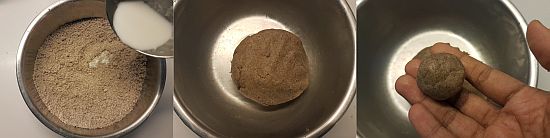
  • Sieve together ragi flour, wheat flour,corn flour with baking powder for two times until the mixture is uniformly distributed.
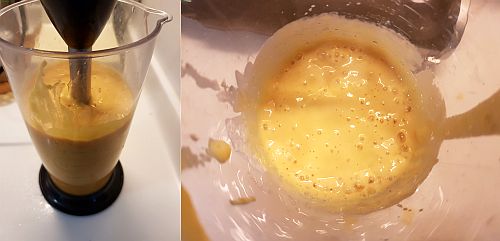
  • Powder the sugar and keep it ready.
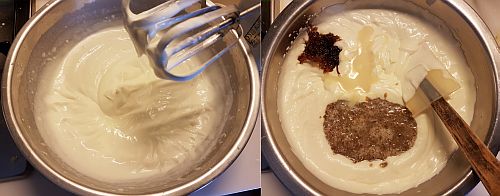
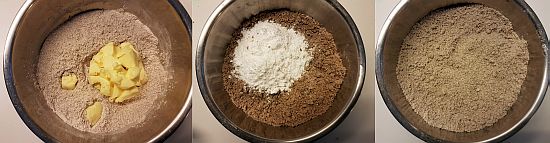
  • Add the chilled and cubed butter to it and mix it with the hands until it resembles the crumbs.
  • Add powdered sugar to it and mix nicely.
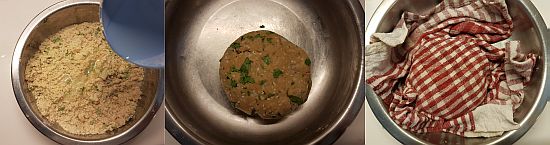
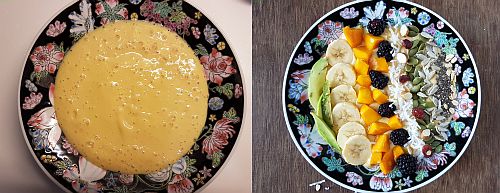
  • Now add milk just enough to bind it to a dough, do not knead it.Just add little milk to gather the dough.
  • Preheat the oven at 180 deg C for 10 mins.
  • Place a parchment paper on the cookie tray and keep it ready.
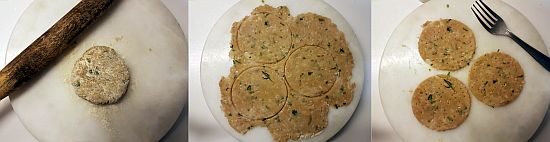
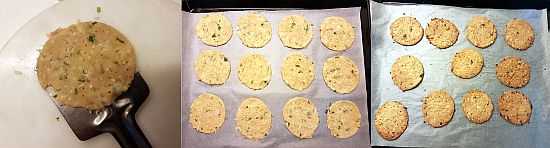
  • Make small balls out of the dough by hand or scoop out using a small ice cream scooper and place them on the prepared cookie tray at a distance giving them enough space to raise while baking.
  • You can stud few chocolate chips on top like how I did.
  • I do not like if the cookies spread more and hence I usually refrigerate the cookie tray for 10 mins in the refrigerator, however this step is optional.But if you feel the dough is slightly wet it is advised to keep the dough for a while in the refrigerator,this avoids the cookies get spread more while baking.
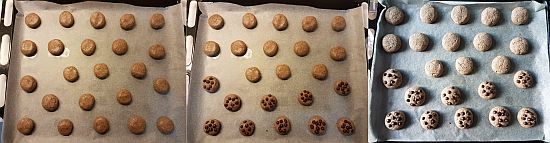
  • Bake it in the oven at 170 deg C for 12-15 mins, keep an eye on the cookies after 10 mins.The moment you see the brown patches at the edges and at the bottom of the cookies, it is time to bring them out of the oven.
  • The cookies might be slightly soft to touch on top but when they are cooled they will be perfect.Cool the cookies on the sheet for a while and then remove them carefully and place on the wire rack to cool further.Once they are cooled completely store them in an air tight container.
Serve them with a glass of  chilled milk or as a snack.

Notes:
  1. Add little milk just enough to gather the mixture to form a dough, do not knead it.
  2. Chill the cookies that are placed on the baking tray before baking to avoid them to spread more while baking.
  3. I like my cookies to be less sweet and hence 1/3 cup sugar was enough for us, if you like it more sweet increase it to 1/2 cup.
  4. I usually use 1/3 cup of butter for 1 cup of flour for my cookie recipes, but this recipe needs 1/2 cup to make it taste nice.I used even 1/3 cup of butter, it was nice to eat still but as it is ragi flour the cookies tasted better when used 1/2 cup butter for 1 cup of flour.
  5. I have not tried the recipe with ghee but I suppose it should work fine and will taste fantastic.

Thursday, June 1, 2017

Mango Falooda Recipe | Mango Dessert Recipes

mango falooda
Mango Falooda recipe with step by step photos.I was introduced to Falooda only in Mumbai.It had almost become a norm for me to have it in the famous shop Badshah on my every visit to crawford market. I love their rose falooda the most and I do not miss the mango falooda during mango season and order Kesar falooda too at times.One has an option of having 1/2 falooda and the portion they used to serve as half itself was so heavy for one person.
mango falooda
Rose falooda is the classic version of falooda and it is a medley of rose syrup , basil seeds , cold rose milk,falooda sev and ice cream.Rose syrup adds a nice flavor to the falooda and basil seeds cool the body in summers.Coming to Mango falooda recipe, the combination of mango puree ,cut mango cubes,mango ice cream in sweetened milk,falooda sev and basil seeds flavored with rose syrup and topped with nuts and tutti frutti which adds a nice bite to it, how can something like this go wrong?I would say that it is the utmost mango delicacy in one glass, it tastes amazing. Do not miss to try this simple and delicious mango falooda recipe this summer and before the mango season ends.More over one can do all the prep work ahead and just assemble it in 5 mins when you have guests,I am sure they would be bowled over with this Mango falooda.
mango falooda
Check out other mango desserts recipes in my blog:
mango falooda
Here is how to make mango falooda recipe with step by step photos.
Mango Falooda Recipe:

Serves 2 | Author: Prathibha
Prep time: 25 mins | Cooking time: 5 mins | Total time: 30 mins
Cuisine: Indian | Category: Desserts/Beverages

Ingredients:
1 large ripen Mango,chopped(alphonso or kesar)
1 cup Milk,boiled and cooled
1.5-2 tbsp Sugar
1/2 cup Vermicelli/Falooda sev
4 scoops Mango Ice cream/Vanilla Ice cream
2.5 tbsp Basil seeds(sabja seeds)
2-3 tbsp Rose syrup
2 tbsp chopped Cashewnuts
1 tbsp Tutti Frutti
2 glazed Cherries,to garnish 
1/3 cup Jelly,cut into cubes(optional)

Method:
  • Wash,peel and chop the mango into pieces.Reserve 1/3 cup of mango pieces and grind the rest to a smooth puree.Refrigerate it until it's usage.
  • Slightly dry roast vermicelli taking care that it does not change color and add water to it and cook until done and strain the cooked vermicelli and pour cold water on it,this ensures that the cooked vermicelli stay separate.If you are using falooda sev cook it as per the instructions.Chill it until its use.
  • Soak basil seeds in 1/2 cup water for half an hour or until it swell up nicely.
  • If you are using jelly,prepare it as per the instructions and let it set and cut it into cubes and keep it ready.
  • Boil milk and mix in the sugar and let it cool and refrigerate it until it is chilled.
  • Now take two tall serving glasses and pour 1-1.5 tbsp of Rose syrup in each glass and then add 1 tbsp of swollen basil seeds on it.
  • Add some mango cubes and jelly cubes (if using) and then add 3-4 tbsp of cooked falooda sev/vermicelli in both the glasses.
  • Now add few more mango cubes and swollen basil seeds and then add 4-5 tbsp of mango puree in both the glasses.
  • Now gently pour sweetened milk into the glass until the desired level and then add some more tablespoons of mango puree on top in both the glasses.Keep enough space to add the ice cream, else the drink will over flow once you add ice cream to it.
  • Add 1-2 scoops of Mango ice cream(or vanilla ice cream) and garnish it with chopped cashewnuts, tutti frutti, chopped mango pieces and a glazed cherry on top in both the glasses.
Serve immediately with long spoon and straw and enjoy!!

Notes:
  1. One can prepare the mango falooda according to their personal choice, there are no hard and fast rules while making it.
  2. I sometimes like to add mango milkshake instead of mango puree and milk separately, this actually keeps it thick.
  3. The addition of rose syrup is optional, if you do not have it skip it totally or use roohafza instead.
  4. You can use ready made/tinned mango puree when mangoes are not in season and skip mango pieces in the recipe and follow the same recipe.
  5. I love to add mango ice cream to the mango falooda but one can add simple vanilla ice cream to it and enjoy.
  6. Mangoes like alphonsos and kesar are best for this recipe, but one can use their locally grown sweet mango variety to prepare this recipe.You can add sugar while grinding the mango if your mango is not very sweet.
mango falooda
Technorati Tags: ,,,,,,

Monday, May 29, 2017

Baked Nippattu Recipe | Iyengar Bakery style Baking Nippattu

baking nippattu
Baked Nippattu recipe with step by step photos. If you have ever visited an Iyengar bakery in Bangalore you would have been familiar with these snacks - Benne Biscuit, Khara Biscuit,Kobbari Biscuit, Palya buns, Baked Nippattu,Honey cake,Plain cake,veg puffs,Khara buns, rusk,Vegetable toast, Khara bread etc to name a few and these are all my favorite goodies among all the available items in the bakery.When ever I visit Bengaluru it is must for me to eat these goodies and carry back few with me while coming back to my place.I usually get Khara buns, plain cake, Khara bread, rusk, mixed bicuits and baked nippattu along with me.Though the shelf life of Khara buns and Khara bread is less we enjoy it as our breakfast and dinner for two days and finish them off while the rest can be stored for a couple of weeks.
baked nippattu
Baked Nippattu is a baked version of the nippattu but the main ingredients used in the regular nippattu and baked nippattu are completely different.While the regular nippattu is made out of rice flour, baked nippattu is prepared using all purpose flour.Both the versions taste good on their own and I absolutely love both the versions. You can check out how to prepare traditional nippattu recipe here and today I am posting the Iyengar bakery style baked nippattu,which is also known as Baking nippattu.
baked nippattu
The recipe which I am posting today is adapted from Red chilies and it has been tried several times and I have replaced the flour with the wheat flour and have achieved good results.Though it tastes best with the regular flour the ones prepared with the wheat flour are no less in taste compared to the regular flour ones. The key taste factor in these baked nippattus is the onions which are baked to crisp and that gives a sweet hint of taste in every bite.Also, the more thin you roll the more it tastes better.Do try out this simple and delicious baking nippattu recipe and enjoy these homemade goodies with a cup of tea.
baked nippattu
Check out the other Iyengar bakery style snacks recipes in my blog: Khara Bread, Khara Buns, Coconut Biscuit, Vegetable toast.
baked nippattu
Here is how to prepare iyengar bakery style baked nippattu recipe with step by step photos.
Iyengar Bakery style Baked Nippattu Recipe:
Yields 25 crackers
Prep time: 30 mins | Baking time:20 mins | Total time: 50 mins+ resting time
Cuisine: Karnataka | Category: Snacks

Ingredients:
1 cup All purpose flour/Wheat flour
1/2 tsp Baking soda
1.5 tbsp Sesame seeds
1.5 tsp Sugar
3/4 tsp Salt
1 big Onion,finely chopped
2 Green chilies, finely chopped
2-3 tbsp finely chopped Coriander leaves
2 tbsp Butter,melted
3 tbsp Oil
2-3 tbsp Warm water

Method:
  • In a bowl add flour(or wheat flour) ,baking soda, sesame seeds,sugar and salt and mix nicely.
     
  • Add finely chopped onions, coriander leaves, green chilies, oil, melted butter to the flour mix and mix it nicely.
  • Now sprinkle warm water little by little and make it to a tight dough and knead it for a couple of minutes and cover it with a damp cloth and keep it aside for half an hour.
     
  • Preheat the oven at 180 deg C/350 deg F for 10-12 mins.
  • Knead the dough again for a minute and divide the dough into big lemon size balls.
  • Take one ball and dip it in dry flour and roll like a thin chapati. If this does not work place the ball in between two plastic sheets and press it to a thin roti using a puri presser.
  • Use a 2.5" round cutter and cut the rolled roti into circular discs as shown in the picture.
  • Prick them with a fork at a couple of places to avoid them getting puffed up while baking.
     
  • I used a flat spatula and lifted it carefully and place it on the parchment paper placed over a baking tray.
  • Now gather the scraps from the cut out circular discs and reroll to make the thin chapati and follow the same process with the left over dough too.Place the circular discs giving some space in between on the parchment paper.
     
  • Bake it in a preheated oven t 170 deg F for 15-18 mins until they are crisp. Keep an eye after 12 mins, do not bake it until dark brown as they get burnt and will not taste nice. 
  • I baked them in two batches and I got around 25 crackers.
  • Remove the tray and let the crackers down a bit on the parchment paper and then remove them and place on the wire rack and let them cool completely.
Store them in an air tight container and enjoy it with a cup of tea/coffee.

Notes:
  1. I have used both all purpose flour and wheat flour in the recipe and succeeded with the results.Hence I use wheat flour in the recipe instead of all purpose flour but I suggest to try with all purpose flour if you are attempting for the first time.
  2. Needless to say that Maida based ones taste better but the wheat flour one was equally good, you can take my words and try it.It was easier to roll the wheat flour one than the maida ones.
  3. I like the thin baked nippattus and hence I rolled the dough to a thin roti, if you like it thick you can keep it slightly thick. But the thinner ones turn out crispy and stay crisp even after a week when stored properly.
  4. Add little water and make it to a tight dough else you cannot roll it thin.
  5. Please do not compromise on the fat quantity used in the recipe, else it does not turn out nice.
  6. Cut the onions very finely else it will be difficult in rolling the dough.
  7. Do not forget to prick them nicely before baking.
baked nippattu

Friday, May 26, 2017

Mango Smoothie Bowl | Easy Breakfast Smoothie Bowl Recipes

mango smoothie bowl
Mango smoothie bowl recipe with step by step photos.Smoothie bowls have been the latest craze over the Instagram and I always admired those artistic looking smoothie bowls. Actually it does not require a post but I am posting a simple Mango smoothie bowl recipe which gives a fair idea about the ingredients that go in it so that any one can prepare it at home and enjoy.
mango smoothie bowl

If you have cut frozen fruits preparing a smoothie bowl is a breeze.The preparation process of smoothie bowl is very simple and one can create smoothie bowl according to their personal choice. The options for the base smoothies are endless - mixed berries, avocados, bananas, mangoes or combination of fruits. The toppings are left to each individual's choice - use the fruits of your choice along with the base fruit used in the smoothie, berries, various nuts like almonds, cashews, walnuts, pecans, pistachios and dried cranberries(or raisins). Apart from fruits,berries and nuts , the addition of various seeds - pumpkin, sunflower,melon seeds,chia seeds and coconut flakes adds a nice bite to the smoothie bowl. I usually serve mine with either granola or weetabix but one can even avoid it if you don't have it or can be eaten with cornflakes.
Smoothie bowls are quite heavy and keeps you full until mid morning.One can even blend oats with the frozen fruits with yogurt and add toppings of your choice.You can create your own smoothie bowl and enjoy those delicious looking smoothie bowls for your breakfast with out much effort.
mango smoothie bowl
Here is how to make mango smoothie bowl recipe with step by step photos:
Mango Smoothie Bowl Recipe:

Serves 1-2 | Author: Prathibha
Prep time: 15 mins | Cooking time: NIL | Total time: 15 mins
Cuisine: International | Category: Breakfast

Ingredients:
for smoothie base:
1 cup frozen Mango cubes
1 cut Banana,frozen
2/3 cup thick Curd/Greek Yogurt
1/4 cup Milk
2-3 tsp Honey

for toppings:
1/2 cup cut Mango cubes
1 small Banana,cut into pieces
1/2 Avocado,sliced(optional)
1/4 cup Blackberries(any berries will do)
1-2 tbsp Chia seeds, soaked in water for an hour
1.5 tbsp Pumpkin seeds
1 tbsp Sunflower seeds
1-2 tbsp chopped nuts of your choice(almonds,cashews,walnuts,pecans)
1 tbsp dried Cranberries(or raisins,optional)
2 tbsp Sweet coconut flakes,optional
1/3 cup Granola/Cornflakes or 2 Weetabix
1 tsp Honey,to drizzle

Method:

  • Blend frozen mango cubes and banana cubes with yogurt,milk and honey to a smooth puree and pour it into one large serving bowl or 2 small bowls.
  • Arrange the cut fruits - mango,banana,avocado and berries in a way you want.
  • Sprinkle the nuts,seeds,cranberries(or raisins),sweet coconut flakes in a way you want.
  • Add soaked chia seeds and sprinkle some chia seeds on top.
  • Top it with granola or crumble weetabix on top and drizzle honey over it.
Serve it immediately.Mix it and enjoy eating, its delicious!!

Notes:
  1. The addition of fruits are as per your wish. Bananas and berries go with any flavored smoothie bowl.
  2. You can be experimental with various toppings of nuts,seeds etc.
  3. You can create various fruit flavored smoothie bowls like Berry bowls where you can blend frozen berries with yogurt and milk to a desired consistency.
  4. In case you do not like frozen fruit, use fresh fruit instead.
  5. If you don't have chia seeds, use basil seeds instead.
mango smoothie bowl

Monday, May 22, 2017

Gulkand Ice Cream Recipe | Eggless Ice Cream Recipes

gulkand ice cream
Gulkand Ice cream recipe with step by step photos.Summers call for mocktails, fresh fruit juices. popsicles, ice creams and kulfis to beat the heat. I am not an Ice cream lover though I would like to eat them once in a while and I prefer Kulfi to Ice cream any day.But TH is very fond of Ice creams and he always buy a small ice cream tub or a cone or at least an ice cream bar when he accompanies me for shopping.
gulkand ice cream
Though I prepare Mango Ice cream and Mango Kulfi  without fail every mango season I never ventured out to try other icecream flavors at home back in India.But after shifting to Singapore we miss having those Indian Ice cream flavors and hence I made this Gulkand Ice cream recently and TH loved it to the core and finished the box even before I realized.So, this time I decided to blog about it before it gets disappeared again in my refrigerator.
gulkand ice cream
I am posting a very simple eggless and no churn gulkand ice cream recipe which I prepared following my basic Ice cream recipe.I use the same Ice cream base to prepare the Mango Ice cream and it turns quite creamy and delicious.Following the same base one can prepare various flavors like Chocolate, Pistachio, Butterscotch,Strawberry, Mixed berry, Paan etc.I hope I will try other flavors and post them in my blog at least in near future,till then enjoy my easy home made gulkand ice cream.
gulkand ice cream
Here is how to prepare Gulkand Ice cream recipe with step by step photos:
Eggless Gulkand Ice Cream Recipe:
yields: 12-15 scoops | Author: Prathibha
Prep time: 20 mins | Cooking time: NIL | Total time: 20 mins + freezing time
Cuisine: Indian | Category: Desserts/Ice Creams

Ingredients:
2 cups heavy Whipping Cream,chilled
1/2 cup full cream Milk,boiled and cooled
1/2 cup Condensed milk
5-6 tbsp Gulkand/Rose petal jam
few drops of rose essence,optional

Method:
  • Chill a large bowl with the beating blades in the freezer for an hour or two.
  • Reserve 2 tbsp of Gulkand and grind 1/4 cup Gulkand with full cream milk to a smooth puree.
  • Pour the heavy whipping cream to the chilled bowl and whisk it with the electric whisker until it forms soft peaks.
  • Add condensed milk, rose essence(if using),ground gulkand puree and reserved gulkand to the whipped cream and gently fold it until the mixture is uniform.You can even use the electric whisker but I prefer to fold to maintain the creaminess of ice cream.You can taste the mixture at this point and add more condensed milk if you need.
  • Pour it into a freezer safe box and cover it with lid tightly and freeze it for 7-8 hours until it is set.
Scoop it and serve.

Notes:
  1. This ice cream is set at once and hence try to whip the cream until soft peaks and fold the rest of the ingredients into the whipped cream gently whip helps in getting a creamy ice cream.
  2. You can even use rose syrup while mixing the ingredients which helps in giving a nice rose colored ice cream.As I did not have it I have not used it.
  3. Also adding rose essence gives a nice flavor to the ice cream, do not skip it.
  4. You can add sugar instead of condensed milk but I prefer the condensed milk as it gives nice creaminess to ice creams.

Thursday, May 18, 2017

Mango Pannacotta Recipe using Agar Agar | Layered Mango Pannacotta

mango pannacotta
Mango Pannacotta recipe using agar agar with step by step photos. Pannacotta is one of my favorite desserts and it is my go to dessert when I am confused which dessert to prepare for  the guests. I have already posted Vanilla Pannacotta which was always well received by my guests.I always demould the pannacotta and serve it with fresh fruit pieces and fruit reserves or berry coulis and hence it makes the dessert look even more tempting with minimum work.One can set the dessert either in small glass jar with both the layers of mango and vanilla(or coconut) one above the other or can set it in an angle like how I did to make it look more pretty.
layered mango pannacotta
I personally do not like hard pannacottas, for me the consistency should neither be runny nor hard.I like it soft, smooth and creamy kind of texture in my pannacotta. I always use China grass strands for pannacotta and always succeeded with the measurements as mentioned in the recipe to get the perfect texture.But I felt when it comes to agar agar powder you need to be bit experimental and decide on the quantity to get the texture you like. I had tried it once with 2 tsp agar agar powder for the mentioned quantity of milk(liquid) and I find the pannacotta bit hard and not for my liking and hence I mentioned 1.5 tsp of agar agar powder in the recipe. If you are sure of the quantity of powder for the amount of liquid, you please proceed with your measurements following the recipe.
vegan mango pannacotta

I have tried both the versions of Mango Pannacotta - using cream and the Vegan Mango Pannacotta using Coconut milk and I must say that I like the version with the cream more as it was more creamy compared to the vegan version and is my personal preference. However I am posting both the regular version using cream and the vegan version of mango panncaotta using coconut milk so that one can adapt either of the two versions according to their choice.
Check out other mango dessert recipes in my blog here - AamrasAmrakhandMango FudgeSeekaraneMango Ice-cream,Mango Kulfi, Layered Mango Phirni
mango pannacotta
Here is how to prepare  Mango Pannacotta recipe using agar agar with step by step photos:
Mango Pannacotta Recipe using Agar Agar:

Serves 10-12 | Author: Prathibha
Prep time: 15 mins | Cooking time: 15 mins | Total time: 30 mins + standing time
Cuisine: International | Category: Desserts

Ingredients:
for Mango layer:
2 large ripen Alphonsos,peeled and chopped
1/3 cup Water
1/4 cup Sugar
5 gms Agar-Agar strands or 1.5 tsp Agar Agar powder or 1 tsp Gelatine
juice of 1/2 Lemon

for Cream layer:
1 cup(250 ml) fresh full fat Cream,25%-30%
1 cup(250 ml) full fat Milk
1/2 cup Sugar
1 Vanilla bean or 2 tsp Vanilla extract
1/3 cup Water
5 gms Agar-Agar strands or 1.5 tsp Agar Agar powder or 1 tsp Gelatine

for Coconut cream layer-Vegan version(instead of cream layer):
1 cup Water
1 cup thick Coconut milk
1/2 cup Sugar
1/8 tsp Salt
1.5 tsp Agar Agar powder or 5gms Agar Agar strands
Method:

for Mango layer:
  • If you are using china grass sheets, cut them into tiny pieces and soak them in 1/3 cup water for half an hour.If you are using gelatine or agar agar powder just mix the powder in 2 tbsp HOT water.
  • Peel and cut the mangoes into cubes and grind it to a smooth puree in the mixie.Measure it to get 2 cups of Puree.
  • Remove the extra water from china grass mixture and keep enough water(2-3 tbsp) and boil the china grass mixture by mixing it continuously until the china grass melts and blends into the water.
  • Add sugar to the mixture and let it dissolve completely and add the mango puree to the mixture until it becomes hot(not bubbling) and switch off the flame.Add lemon juice to it and mix nicely.
  • Pour the mixture into individual small glass jars until they are filled into half. I have kept the jars in a muffin tray at an angle and poured the mixture and let it set until the time you prepare the cream layer.
for Cream layer:
  • If you are using china grass sheets, cut them into tiny pieces and soak them in 1/3 cup water for half an hour.If you are using gelatine or agar agar powder just mix the powder in 2 tbsp HOT water.
  • In a thick pot add milk and cream together and bring the mixture to a boil on low flame.
  • Add sugar to it and also add scraped Vanilla pod(or vanilla essence) to the mixture and mix well until the sugar dissolves.
  • Meanwhile if you are using china grass,remove the extra water and keep enough water(2-3 tbsp) and boil the china grass mixture by mixing it continuously until the china grass melts and blends into the water.
  • Remove the vanilla cream mixture off the heat.Add the strained melted china grass(agar-agar or gelatine) mixture and mix well immediately and keep it hot.
  • Pour the mixture in the glass jars on the mango layer and let them come to a room temperature.
  • Cover it with cling wrap or lids and keep it refrigerated for a minimum of 5-6 hrs or you can even keep it overnight.
for Coconut layer - Vegan version:
  • If you are using china grass sheets, cut them into tiny pieces and soak them in 1/3 cup water for half an hour.If you are using agar agar powder just mix the powder in the water and bring it to a boil.
  • Add sugar and let it dissolve completely.
  • Now add coconut milk and salt and mix nicely and let it come to a boil,you do not need to make it bubbling.
  • Add salt and mix it nicely.
  • Pour the mixture in the glass jars on the mango layer and let them come to a room temperature.
  • Cover it with cling wrap or lids and keep it refrigerated for a minimum of 5-6 hrs or you can even keep it overnight.
Garnish with small mango cubes and mint leaves.Serve it chilled.

Notes:
  1. I used small glass jars so I did not grease them but if you want to unmold you can grease the bowls before pouring the mixture.Run the knife around the set pannacotta and gently tap it onto the serving plate.
  2. It is a basic thumb rule to use 5gms of China grass for half liter of milk and hence I used the same measurements even for Pannacotta and I got really soft,silky and smooth dessert. 
  3. Do not add melted china grass mixture to the cream mixture when it is boiling,this might curdle the mixture.It is always advised to add it only after it is removed from the stove.Always strain the china grass mixture as they contain small particles of undissolved china grass in it.
  4. The addition of lemon is optional.But I highly recommend to use it as it lifts the mango flavor in the dessert.
  5. You can add 1/3 cup of orange juice while blending mango,it enhances the mango flavor in the dessert.
  6. For a VEGAN version avoid Gelatine in the recipe and use the coconut layer method instead of the cream layer method.
mango pannacotta

 
back to top