
 Vegetables


Baked Nippattu recipe with step by step photos. If you have ever visited an Iyengar bakery in Bangalore you would have been familiar with these snacks - Benne Biscuit, Khara Biscuit,Kobbari Biscuit, Palya buns, Baked Nippattu,Honey cake,Plain cake,veg puffs,Khara buns, rusk,Vegetable toast, Khara bread etc to name a few and these are all my favorite goodies among all the available items in the bakery.When ever I visit Bengaluru it is must for me to eat these goodies and carry back few with me while coming back to my place.I usually get Khara buns, plain cake, Khara bread, rusk, mixed bicuits and baked nippattu along with me.Though the shelf life of Khara buns and Khara bread is less we enjoy it as our breakfast and dinner for two days and finish them off while the rest can be stored for a couple of weeks.

Baked Nippattu is a baked version of the nippattu but the main ingredients used in the regular nippattu and baked nippattu are completely different.While the regular nippattu is made out of rice flour, baked nippattu is prepared using all purpose flour.Both the versions taste good on their own and I absolutely love both the versions. You can check out how to prepare traditional nippattu recipe here and today I am posting the Iyengar bakery style baked nippattu,which is also known as Baking nippattu.

The recipe which I am posting today is adapted from Red chilies and it has been tried several times and I have replaced the flour with the wheat flour and have achieved good results.Though it tastes best with the regular flour the ones prepared with the wheat flour are no less in taste compared to the regular flour ones. The key taste factor in these baked nippattus is the onions which are baked to crisp and that gives a sweet hint of taste in every bite.Also, the more thin you roll the more it tastes better.Do try out this simple and delicious baking nippattu recipe and enjoy these homemade goodies with a cup of tea.

Check out the other Iyengar bakery style snacks recipes in my blog: Khara Bread, Khara Buns, Coconut Biscuit, Vegetable toast.

Here is how to prepare iyengar bakery style baked nippattu recipe with step by step photos.
Iyengar Bakery style Baked Nippattu Recipe:
Yields 25 crackers
Prep time: 30 mins | Baking time:20 mins | Total time: 50 mins+ resting time
Cuisine: Karnataka | Category: Snacks
Ingredients:
1 cup All purpose flour/Wheat flour
1/2 tsp Baking soda
1.5 tbsp Sesame seeds
1.5 tsp Sugar
3/4 tsp Salt
1 big Onion,finely chopped
2 Green chilies, finely chopped
2-3 tbsp finely chopped Coriander leaves
2 tbsp Butter,melted
3 tbsp Oil
2-3 tbsp Warm water
Method:
- In a bowl add flour(or wheat flour) ,baking soda, sesame seeds,sugar and salt and mix nicely.
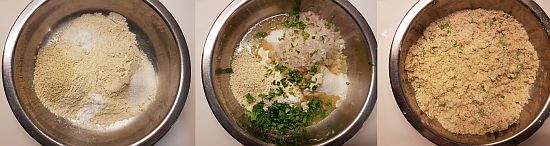
- Add finely chopped onions, coriander leaves, green chilies, oil, melted butter to the flour mix and mix it nicely.
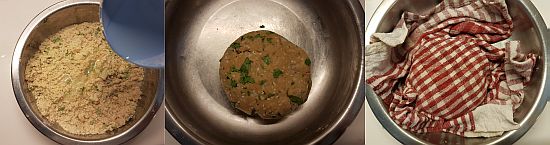
- Now sprinkle warm water little by little and make it to a tight dough and knead it for a couple of minutes and cover it with a damp cloth and keep it aside for half an hour.
- Preheat the oven at 180 deg C/350 deg F for 10-12 mins.
- Knead the dough again for a minute and divide the dough into big lemon size balls.
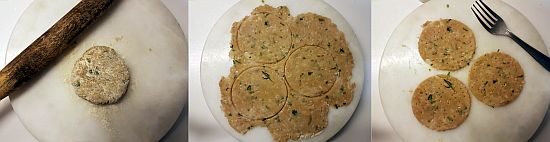
- Take one ball and dip it in dry flour and roll like a thin chapati. If this does not work place the ball in between two plastic sheets and press it to a thin roti using a puri presser.
- Use a 2.5" round cutter and cut the rolled roti into circular discs as shown in the picture.
- Prick them with a fork at a couple of places to avoid them getting puffed up while baking.
- I used a flat spatula and lifted it carefully and place it on the parchment paper placed over a baking tray.
- Now gather the scraps from the cut out circular discs and reroll to make the thin chapati and follow the same process with the left over dough too.Place the circular discs giving some space in between on the parchment paper.
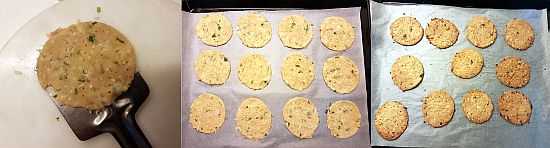
- Bake it in a preheated oven t 170 deg F for 15-18 mins until they are crisp. Keep an eye after 12 mins, do not bake it until dark brown as they get burnt and will not taste nice.
- I baked them in two batches and I got around 25 crackers.
- Remove the tray and let the crackers down a bit on the parchment paper and then remove them and place on the wire rack and let them cool completely.
Store them in an air tight container and enjoy it with a cup of tea/coffee.
Notes:
- I have used both all purpose flour and wheat flour in the recipe and succeeded with the results.Hence I use wheat flour in the recipe instead of all purpose flour but I suggest to try with all purpose flour if you are attempting for the first time.
- Needless to say that Maida based ones taste better but the wheat flour one was equally good, you can take my words and try it.It was easier to roll the wheat flour one than the maida ones.
- I like the thin baked nippattus and hence I rolled the dough to a thin roti, if you like it thick you can keep it slightly thick. But the thinner ones turn out crispy and stay crisp even after a week when stored properly.
- Add little water and make it to a tight dough else you cannot roll it thin.
- Please do not compromise on the fat quantity used in the recipe, else it does not turn out nice.
- Cut the onions very finely else it will be difficult in rolling the dough.
- Do not forget to prick them nicely before baking.

Technorati
Tags: baked
nippattu recipe,low fat snacks recipes,iyengar bakery style baked nippattu,bangalore bakery style baked nippattu,bakery snacks
recipes,bangalore specials,karnataka
recipes


3 comments:
I usually pick it up from bakery as we all like it...your pics looks exactly as the ones from bakery so indeed tempted to try...since it's not deep fried, good for health too....
we liked the recipe of nippattu . exactly backery backed look and exciting photos tempts anybody to try at home. Iam not clear why the broken pieces also shown in pictures .perhaps it indicates the brittleness of the nipattu
Yummy recipe.. Used WWF with Maida and rice flour in equal proportions. And was yum yum yum
Post a Comment
Thank you for visiting The Chef and Her Kitchen.
Do leave your comments and feedback,they are always welcome.Please do not leave any links.
Hugs,
Prathy