Showing posts with label Savory Bakes|Breads. Show all posts

Monday, December 12, 2011

Khara Buns | Savory Buns..Iyengar Bakery Style!!

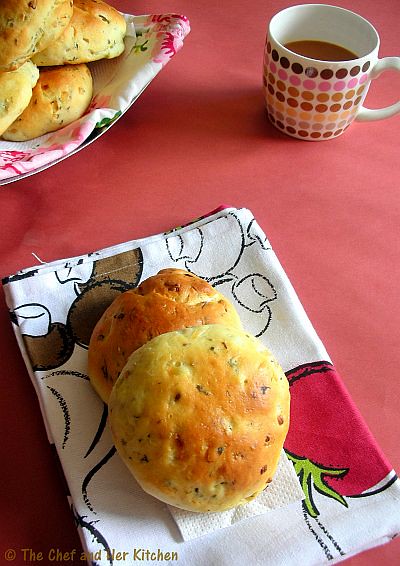
One more thing I love about Bangalore is those Iyengar bakeries which are widely spread across the city though few of them are pretty famous and are serving from few decades.Though there are so many stuffs to try in those bakeries,one should not miss to taste khara bun,palya bun,khara bread,plain cake,benne biscuit,khara biscuit,coconut cookies and baking nipattu as I am really fond of all these varieties.V.B bakery in V.V.puram is one of those oldest bakeries in Bangalore which sells few amazing bakery stuff and is also very famous in that area.

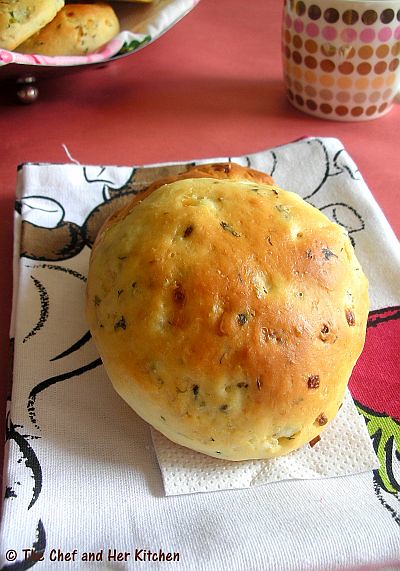
There are lots of variations for savory buns in Blogosphere,the version I am posting today looks and tastes similar to what we get in those Iyengar's bakeries and hence to avoid the confusion I named it as Iyengar bakery style and please note that this is not an authentic recipe from Iyengar bakery.I just like to eat those spicy soft buns as my evening snack with a cup of tea.

Khara Buns | Savory Buns Recipe:
(yields 7-8 buns)

Ingredients:
1 1/2 cups All purpose flour/Maida + 2-3 tbsp extra flour approx while kneading if necessary
1 1/2 tsp active dried Yeast
1/4 cup Milk
1/2 cup Water
1 1/2 tsp Sugar
2 tbsp Butter
1 tsp Salt

for masala:
3/4 cup finely chopped Onions
5-6 Green chillies,coarsely ground
a sprig of Curry leaves,finely chopped
1/3 cup chopped Coriander
1 tsp Cumin seeds
Salt to taste
1 tsp Oil

Other ingredients:
1 tbsp Butter,to brush the buns
1 tbsp Milk,to brush the buns
1 tsp Sesame seeds(optional),to sprinkle over the buns

Method:
  • Microwave water and milk together for 30 seconds until it is luke warm to touch.Pour this into a wide bottomed bowl.It should be luke warm to touch otherwise the yeast will not proof.
  • Dissolve in the sugar and yeast in it and mix thoroughly until dissolved.Leave this aside for 10-15 mins until the yeast mixture becomes frothy.This is the important step in proceeding further to the recipe.If the yeast does not proof throw it and start the process again from the scratch.
  • Meanwhile heat olive oil or regular oil in a pan and crackle cumin seeds over low flame and add very finely chopped onion and fry until it is translucent,add a pinch of salt in between to ease the process.Add coarsely ground chilli paste and stir fry for a minute.Add enough salt to it and do remember that we add salt even to the dough.Keep it aside until the mixture is cooled.
  • Add finely chopped coriander to it and mix well.
  • Stir in the melted butter and salt to the frothy yeast mixture and slowly add one cup of flour into it and mix well,I used a wire whisk for this purpose.Add the remaining flour slowly and mix until you get a lump of smooth dough.
  • Now put some flour on the broad white board or feel free to use the well cleaned and wiped kitchen platform(like I did) and take the lump in both hands and knead the bread towards you.
  • Follow the same method and knead it properly for 10 mins roughly until you get a non-sticky but still smooth dough.Add flour in between when the dough is sticky.
  • Now slightly press the dough with your hands to flatten it and keep the masala(fried onion mixture) in the centre and fold it from all the sides like how we do for stuffed paratha's.
  • Slowly start kneading again for 12-15 mins until the mixture is very well incorporated in the dough.The dough might become sticky because of the onions,so please feel free to add the flour when required while kneading the dough.
  • Cover this place of platform or the board with some cloth or paper as we need to use this place again for kneading.
  • Now grease your hands and a empty big bowl with oil and coat the dough with oil slightly and place it in the greased bowl.Cover with a clean kitchen towel and keep it in warm place until the dough doubles almost.It takes almost one to one-and-half hours depending the climatic conditions.I preheated my microwave for 20 seconds and kept the bowl in it.
  • After the first rise the dough would have doubled in size,knead the dough again gently for 7-8 mins,this process is important as it assures of removing air bubbles formed in the dough.
  • Divide the dough into 7-8 portions and shape them into buns and place them on a baking tray with space in between.You can line your baking tray with parchment paper.
  • Keep them again in the warm place for 45 mins - 1 hour for the final rise.Mean while preheat the oven at 220 degrees for 10 mins when you are about to finish the rising time of bread.
  • Brush the top of buns with milk very gently over the nicely risen buns and keep it in preheated oven and bake them at 180 degrees C for 15-18 mins until the top portion of the buns turn slightly golden and the buns should sound hollow when tapped the crust with hand.
  • Brush the top of buns with butter immediately after removing them from oven.This helps in giving the shine to the crust and also makes the crust softer and also makes the buns smell better.
Slice the bun into two halves and apply generously a dollop of fresh butter on it and enjoy them with a cup of tea/coffee.
Notes:
  1. You can add the finely chopped onions directly to the dough,but I recommend you to saute the onions before adding to the dough as I read somewhere that the raw onions might kill the yeast.
  2. You can add finely chopped dill leaves while sauteing the onions for different flavor.
Another interesting serving suggestion:
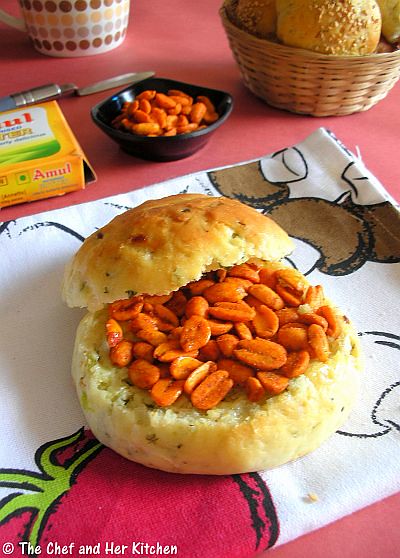
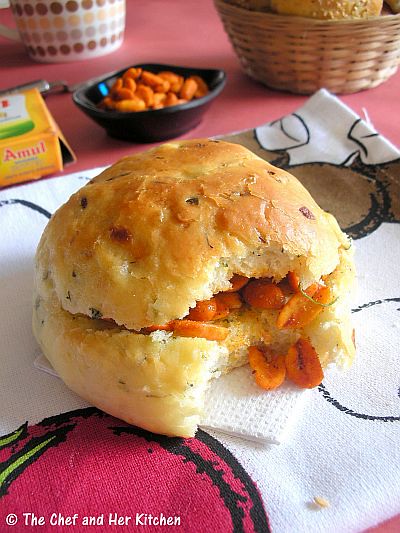
In VB bakery,Bangalore they serve these buns which are cut and slathered with LOTS of fresh butter and a layer of congress kadale(spiced up peanuts) which is called 'Bun-Butter-Congress' which is an absolute favorite to me and hubby.Go easy on butter and apply a nice thick coat of butter to enjoy those spicy buttery nutty buns...its damn tasty!!!!
Thursday, November 25, 2010

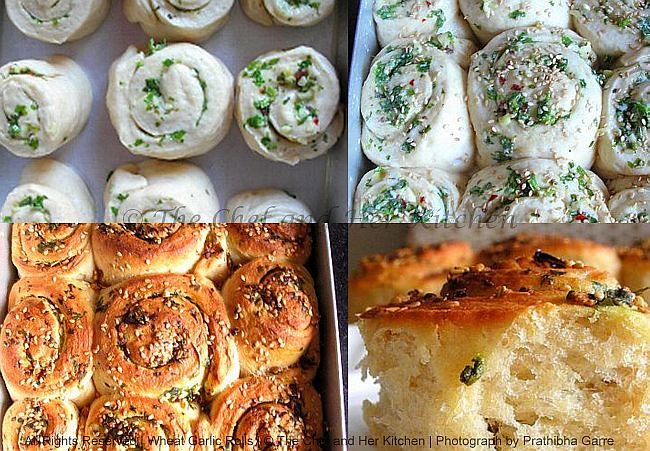
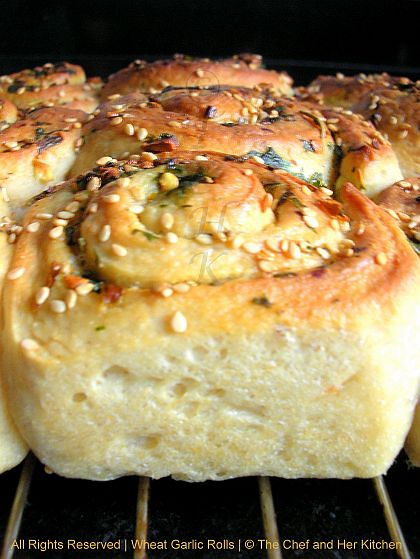
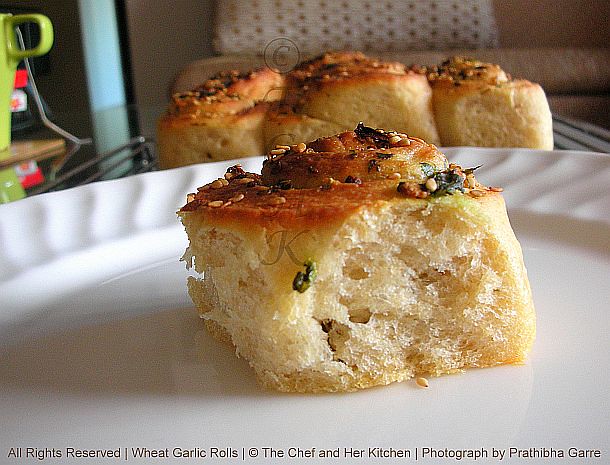
Whole Wheat Garlic and Herb Rolls...healthier version!!

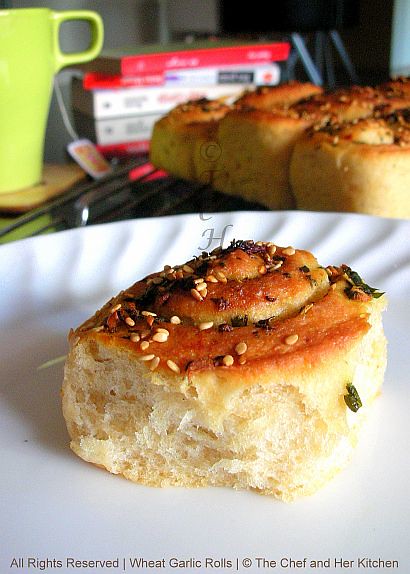
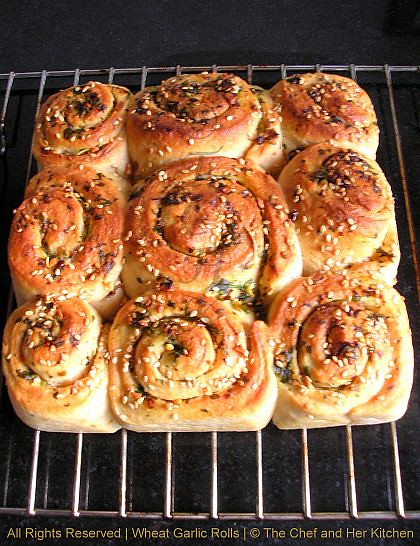
Baking has become my latest passion and I made it a point to bake something at least once a week as both of us thoroughly enjoy freshly baked home breads.You all would have seen these garlic rolls in our friends' blogs and one among them is suhaina's space and successfully attempted by many others(I dont remember their spaces now).I have made these rolls for a couple of times following her recipe and was happy with the flavor and taste of them.This time I tried by substituting some portion of white flour with wheat flour(adapted this idea from this post of sharmis' space) and added extra herbs to the spread to make it extra more flavorful.I was really happy with the outcome of those rolls and found not much of difference in taste in spite of the addition of wheat flour.

Ingredients:
1 cup whole wheat flour
1 cup all purpose flour

1 cup water
1 tsp active dry yeast

2 tsp sugar
2 tbsp extra virgin olive oil(EVOO)

for Extra touch:

1 tbsp white sesame seeds
1 tsp softened butter

for Garlic Spread filling:
2 tbsp softened butter(I used 1 tbsp butter + 1tbsp EVOO)
7-8 garlic cloves,finely chopped and crushed
2 green chilies,finely chopped
2 tbsp finely chopped coriander
1 tsp mixed Italian herbs

1 tsp red chili flakes


Method:
  • Microwave water for 30 seconds until it is luke warm to touch.Pour this into a wide bottomed bowl.
  • Dissolve in the sugar and yeast in it and mix thoroughly until dissolved.Leave this aside for 15-20 mins until the yeast mixture becomes frothy.This is the important step in proceeding further to the recipe.If the yeast does not proof throw it and start the process again from the scratch.
  • Stir in the olive oil and salt to the frothy yeast mixture and slowly add a cup of wheat flour and all purpose flour into it and mix well,I used a wire whisk for this purpose and mix until you get a lump of smooth dough.
  • Now put some flour on the broad white board or feel free to use the well cleaned and wiped kitchen platform(like I did) and take the lump in both hands and knead the bread towards you.
  • Follow the same method and knead it properly for 10 mins roughly until you get a non-sticky but still smooth dough.Add flour in between if required when the dough is sticky.Even you knead this for less time also it will still yield nice n fluffy buns.
  • Now grease your hands and a empty big bowl with oil and coat the dough with oil slightly and place it in the greased bowl.Cover with a clean kitchen towel and keep it in warm place until the dough doubles almost.It takes almost one to one-and-half hours depending on the climatic conditions.I preheated my microwave for 20 seconds and kept the bowl in it.
  • Cover this place of platform or the board with some cloth or paper as we need to use this place again for kneading.
  • After the first rise the dough would have doubled in size,take a knife and cut into two halves(divide one into slightly bigger one).
  • Now again knead the dough gently for 7-8 mins,this process is important as it assures of removing air bubbles formed in the dough.Repeat the process with the other portion as well.
  • Flatten one portion with a rolling pin to form a square of approx 1/2"thickness(say 8 or 9 inch square) and spread the garlic spread mixture in the center and roll it carefully to form a spiral.Cut into 4 portions to get 4 spirals.Repeat the process with the other portion to get 5 spirals.While rolling the dough with a rolling pin,if your dough is sticking to the rolling pin,feel free to smear the rolling pin and the dough with extra oil and try rolling.Even if you cannot acquire square shape it is fine,try making a round and apply the mixture and cut into lengthy strips and roll them.
  • Place the spirals in the greased square or round pan in the required order with the cut side up.
  • Keep them again in the warm place for 45 mins - 1 hour for the final rise.Mean while preheat the oven at 220 degrees for 10 mins when you are about to finish the rising time of bread.
  • Spread the remaining garlic spread mixture over it and brush the top of the spirals with milk very gently and sprinkle white sesame seeds over the nicely risen spirals and keep it in preheated oven and bake them at 180 degrees for 20-25 mins until the top portion of the bread turn slightly golden and the bread should sound hollow when tapped the crust with hand.If it is not,go ahead and bake for another 5-10 mins.By now your house would be filled with a very nice aroma of garlic and fresh bread.
  • Brush the top of the spirals with butter immediately after removing them from oven.This helps in giving the shine to the crust and also makes the crust softer and even the smell of the bread will be nice.
  • Run the knife around the edges and slowly remove the bread from the pan and let it cool on the wire rack.
Now pull your buns and enjoy them as a snack with a cup of coffee/tea or a whole meal with a hot bowl of soup.


Notes:(Updated)
  • Do not add the frothy yeast liquid at one go,keep some portion of the liquid aside and stir in the flour,if you feel the dough is getting harder add the remaining liquid portion little by little until you get a soft dough.Or if your dough is sticky add some extra flour.
  • While kneading the dough,you can add extra flour if you find the dough is very sticky.You can even smear your hand with oil and go ahead for kneading the dough.
  • While rolling the dough with a rolling pin,if your dough is sticking to the rolling pin,feel free to smear the rolling pin and the dough with extra oil and try rolling.Even if you cannot acquire square shape it is fine,try making a round and apply the mixture and cut into lengthy strips and roll them.
  • Using complete white flour instead of a 50:50 ratio of wheat and white flours will definitely yield softer,whiter buns.But I added in that proportion for the healthier side.But if you are trying for the first time I suggest you to try with the white flour only,as the wheat flour one's are slightly dense in texture compared to the white flour one's.
  • Keep an eye while you are baking them,do a toothpick test to confirm that the bread is done.If not bake it further for another 5-10 mins until done.

Monday, August 30, 2010

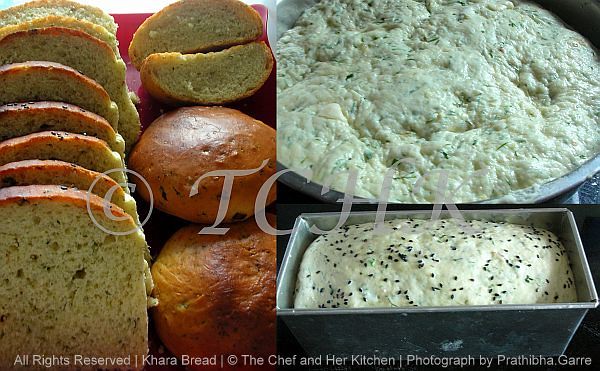
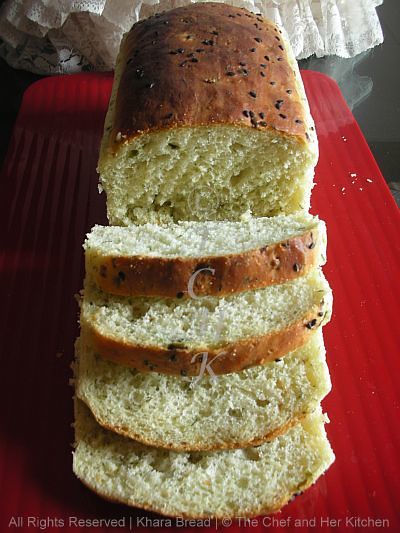
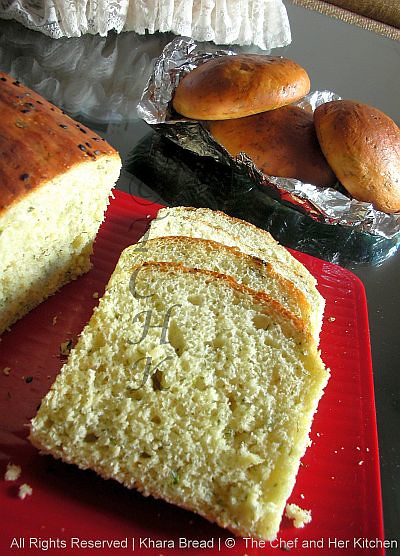
Khara Bread / Masala Bread with Dill Flavor...Bangalore Iyengar Bakery's Way!!

A hidden foodie in me prompted me to give a trial of baking bread some time back but was not successful because of the poor quality of local yeast available here in India.My husband is very fond of freshly baked breads,naan's etc etc which uses yeast in it,so he promised me that he will buy yeast along with other goodies during his next visit to abroad.Thankfully he could manage to pick few boxes of yeast for me during his last visit to Singapore.
In Mumbai every evening the bread waala's knock the doors and delivers fresh bread,buying a loaf of bread is so convenient here that I never thought of baking a simple bread at home,of course I agree freshly baked bread tastes always better.I wanted to make use of the yeast in a more effective way like making goodies which I don't get that easily here in Mumbai.

In my earlier post I have mentioned my love for the Iyengar bakery goodies which we get in Bangalore especially their khara bread,khara bun,palya bun,plain cake,toast etc etc.I have made this khara bread some time back by adapting some tips and techniques from here and here and added my personal touch to the recipe.I love the flavor of dill leaves which adds a nice taste to this bread and the bread turned super soft and light.Baking breads has become my latest passion after the successful attempt of khara bread which I have already made quite a lot of times.You will get to see lots of my baking experiments from now on in my blog which are already sitting in my drafts.

Ingredients:
3 1/4 cups all purpose flour + extra flour while kneading required
2 tsp active dry yeast
1 1/2 tbsp sugar
1 tsp salt
3/4 cup water
1/2 cup milk
2 tbsp olive oil or regular vegetable oil

For the Masala:
1 small bunch dill leaves,finely chopped
1 small bunch coriander leaves,finely chopped
1 big onion,very finely chopped
1 tbsp green chilli paste,coarsely ground
1 tsp cumin seeds
2-3 generous pinches of salt
1 tbsp olive oil or regular vegetable oil

Other Ingredients:
1 tsp black sesame seeds to sprinkle over top
1 tsp butter to brush the bread
1 tsp milk to brush the bread

Method:
  • Microwave water and milk together for 30 seconds until it is luke warm to touch.Pour this into a wide bottomed bowl.
  • Dissolve in the sugar and yeast in it and mix thoroughly until dissolved.Leave this aside for 15-20 mins until the yeast mixture becomes frothy.This is the important step in proceeding further to the recipe.If the yeast does not proof throw it and start the process again from the scratch.
  • Meanwhile heat olive oil or regular oil in a pan and crackle cumin seeds over low flame and add very finely chopped onion and fry until it is translucent,add a pinch of salt in between to ease the process.Add coarsely ground chilli paste,chopped greens and mix well and stir fry for a minute.Add enough salt to it and do remember that we add salt even to the dough.Keep it aside until the mixture is cooled.
  • Stir in the olive oil and salt to the frothy yeast mixture and slowly add cup by cup of flour into it and mix well,I used a wire whisk for this purpose and mix until you get a lump of smooth dough.
  • Now put some flour on the broad white board or feel free to use the well cleaned and wiped kitchen platform(like I did) and take the lump in both hands and knead the bread towards you.
  • Follow the same method and knead it properly for 10 mins roughly until you get a non-sticky but still smooth dough.Add flour in between when the dough is sticky.
  • Now slightly press the dough with your hands to flatten it and keep the masala(fried onion-greens) mixture in the centre and fold it from all the sides like how we do for stuffed paratha's.
  • Slowly start kneading again for 12-15 mins until the mixture is very well incorporated in the dough.The dough might become sticky because of the onions,so please feel free to add the flour when required while kneading the dough.
  • Cover this place of platform or the board with some cloth or paper as we need to use this place again for kneading.
  • Now grease your hands and a empty big bowl with oil and coat the dough with oil slightly and place it in the greased bowl.Cover with a clean kitchen towel and keep it in warm place until the dough doubles almost.It takes almost one to one-and-half hours depending the climatic conditions.I preheated my microwave for 20 seconds and kept the bowl in it.
  • After the first rise the dough would have doubled in size,take a knife and cut into two halves for two medium loaves.Otherwise cut into 3/4 and 1/4 th portions to make a big loaf and 4-5 medium sized buns like I did.
  • Now again knead the dough gently for 7-8 mins,this process is important as it assures of removing air bubbles formed in the dough.Repeat the process with the other portion as well.
  • Shape one portion into a loaf and place it in the greased loaf pan(9"x5").Divide the other portion of dough into 4-5 portion and shape them into buns and place them on a baking tray with space in between.
  • Keep them again in the warm place for 45 mins - 1 hour for the final rise.Mean while preheat the oven at 220 degrees for 10 mins when you are about to finish the rising time of bread.
  • Brush the top of loaf and buns with milk very gently and sprinkle black sesame seeds over the nicely risen loaf and buns and keep it in preheated oven and bake them at 180 degrees for 15-20 mins until the top portion of the bread turn slightly golden and the bread should sound hollow when tapped the crust with hand.I baked the bread and buns separately as my oven size is small,you should take care when you are baking both the bread and buns at the same time as the buns get baked fast.
  • Brush the top of the bread and buns with butter immediately after removing them from oven.This helps in giving the shine to the crust and also makes the crust softer and even the smell of the bread will be nice.
  • Run the knife around the edges and slowly remove the bread from the pan and let it cool on the wire rack.
Cut into the slices of desired thickness.Apply generously a dollop of fresh butter on the slice before serving.

This goes straight to champa's 'Bake-Off' event,'EFM-Cakes and Bakes' event going on at Srish Kitchen and also to Pari's 'ONLY-Kids' event.

image

Monday, August 23, 2010

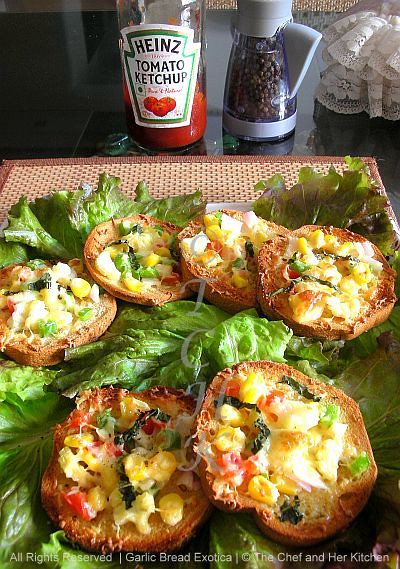
Garlic Bread Exotica

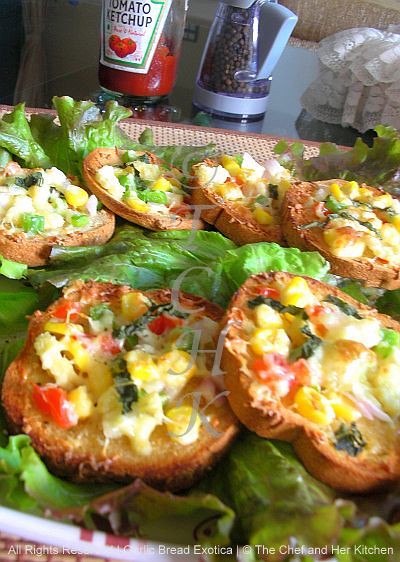
I am sure many people would be liking the garlic bread from pizza hut,this Garlic bread Exotica is always my favorite from Pizza hut.The fancy name Exotica is given to this because unlike the regular garlic bread this has some veggie toppings and lovely cheese over it .Garlic bread is traditionally prepared with french Baguette which has slightly crisp crust and softer inside but you can even prepare with regular bread. Last week I found these cute roundels in Mongini's,a popular bakery in Mumbai and I could not stop myself from buying them.The minute I saw them I know that I would not use them for sandwiches and will definitely enjoy making garlic bread with those cute roundels.This garlic bread is made according to my personal preference and almost replicates our favorite Pizza hut version.This is definitely a great appetizer for parties or it can be a good evening snack for kids and adults.This is even a ideal combination with soups,salad's and pasta's.

Ingredients:
12-15 slices of Baguette or regular bread or roundels
1/2 cup colored bell peppers,chopped(I used only green colored one)

4 tbsp onions,chopped

3 tbsp tomato,seeded and chopped

3 tbsp fresh/frozen corn kernels
1 baby corn,sliced into rounds(optional)
2 green chili's,finely chopped(for Indian touch,optional if making for kids)
5-6 tbsp grated mozzarella cheese(I used a mix of mozzarella and cheddar)

1 tsp red chili flakes or coarsely ground pepper

salt to taste


for Garlic spread:
3 tbsp butter,at room temperature
6-8 garlic pods,very finely chopped

1/2 tsp mixed Italian herbs
1 tsp chopped fresh basil(optional)


Method:
  • Mix butter with the finely chopped or minced garlic pods,Italian herbs and chopped fresh basil and keep it aside.
  • If you are using baguette cut it into thick 1" size slices diagonally and if you are using regular bread you can cut into rounds by using a big cookie cutter or just cut the edges and keep them as they are or cut into triangles.
  • Mix all the chopped vegetables peppers,tomato,corn,onions and green chillies in a bowl and keep it aside.
  • Take each roundel or triangle of bread and apply garlic spread and put one 2 tsp of mixed vegetables over it and sprinkle salt and red chilli flakes and top it with 2tsp of cheese(add according to your choice).
  • Arrange a baking sheet or aluminum foil over the baking tray and place all the bread and put it in pre heated oven at 160 degrees and broil it for 2-3 mins until the edges of bread are slight crisp and the cheese starts melting.
Remove it and sprinkle some more pepper flakes and serve them hot with tomato ketchup. I had mine for breakfast with some fresh mixed vegeatble salad.

I am sending this entry to Pari's 'ONLY'-Kids Delight event as this is ideal snack for kids

image

and this also goes to Sharmi's first event 'Lets Munch:Light Tea Snacks'.I wish her all the best for the first event.


Puliyogare/Tamarind Rice/ Puli sadham

Thursday, October 29, 2009

Banana Bread

Recipe courtesy: Joy of baking.

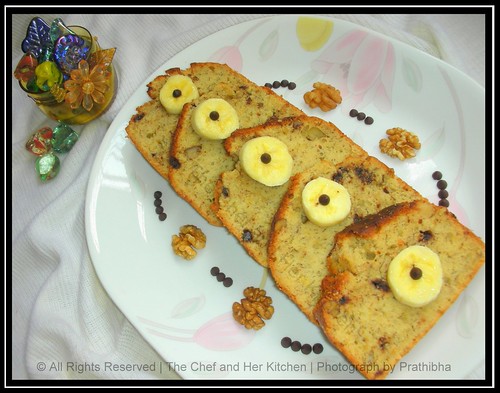
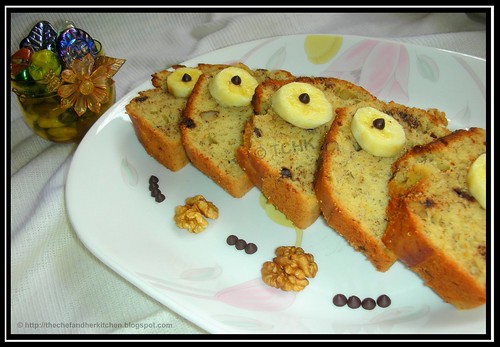
I have tried this a couple of times and everytime I am happy with its results.I have blindly followed the recipe without any modifications other than the addition of some chocolate chips to it.This is one perfect tea time bread and is very easy to prepare.We just loved the aroma of banana in it and the combination of banana and walnuts is incredible.I like to cut it into thick slices and the bread a little bit and have it with a cup of tea either as morning breakfast or evening snack.Try it and I am sure even you will say the same thing.I even tried the banana bread - eggless version which is equally amazing and I will try posting it some time later.

Ingredients:

1+3/4 cup(245 gms) All Purpose flour
3/4 cup(150 gms) White sugar

2 large eggs,at room temperature

1 tsp baking powder

1/4 tsp baking soda

1/4 tsp salt

1 tsp ground cinnamon

1/2 cup (113 gms) Unsalted butter
3 large ripen banana's

1 tsp vanilla essence

1 cup walnuts,chopped


Method:
  • Grease a Loaf pan( 9 x 5 x 3) with butter and dust it with flour evenly or place a butter paper in the pan.
  • Preheat the Oven to 180 deg for 10 mins.
  • Slightly toast the walnuts in oven or on stove top and chop them into small pieces.
  • Melt butter and let it cool to the room temperature.
  • Beat the eggs with a hand whisker slightly until it is done.
  • Sift together flour,baking powder and baking soda twice to let them mix uniformly.
  • Grind sugar to a fine powder.
  • Mash the Banana with hands until all the lumps are removed.Add in sugar powder and mix properly.
  • Now add beaten eggs,vanilla essence and cooled butter to the banana mixture and mix until everything is mixed properly.
  • Add all the dry ingredients(Flour mixture,salt and cinnamon powder) to the wet ingredients(banana mixture) and gently fold using a wooden spoon or rubber spatula and mix until the batter is thick and chunky.(Do not over do the process of mixing as that yields in a rubbery bread).
  • Slightly coat the walnuts and choco chios with 1/2 tsp of flour and add to the batter and fold in roughly.
  • Gently scrape the batter into the greased loaf pan and place it in the oven and bake at 180 deg for 45-50 mins or bake until the crust is brown and tooth pick should come out clean when inserted.
  • Cool it on the wire rack and slice it and serve.
Note:
  1. As I did not have enough walnuts at that time I added 1/2 cup of walnuts and 1/2 cup of chocolate chips instead of 1 cup walnuts.
  2. You can even add other dry fruits like raisins,pecans,etc.
  3. You can even add 2-3 tsp of cocoa powder to the batter to get the chocolate flavor of banana bread.


Serving Suggestions:
  1. Toast the banana bread slice and serve it warm with tea.
  2. Apply peanut butter to the toasted slice of banana bread and serve.
  3. Serve it slightly warm(by keeping it in microwave for few seconds) with vanilla icecream.
  4. Serve it at the room temperature.
 
back to top