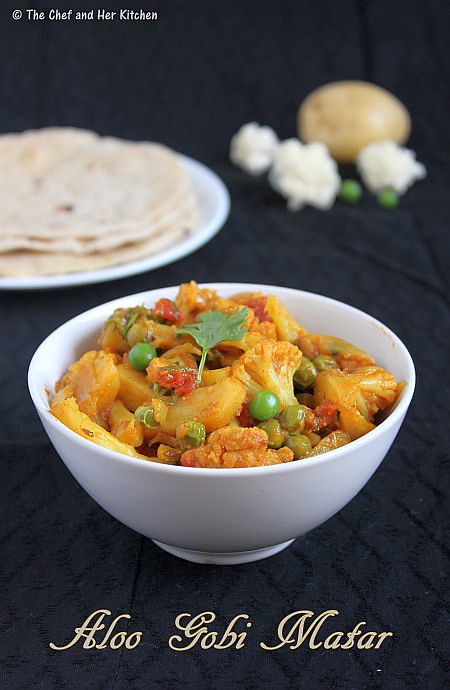
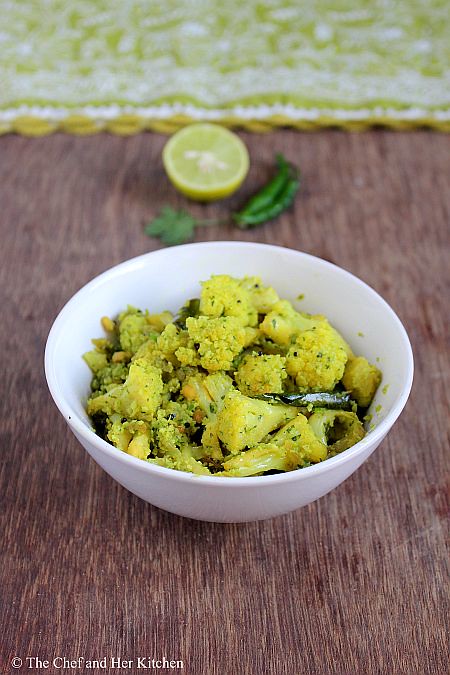
Thursday, May 9, 2013

Aloo Gobi Matar Recipe | Easy Side Dishes for Roti

Roti with some vegetable sabzi and dal is a routine for my weekday dinners.I do not plan much for weekday cooking and usually decide based on the availability of vegetables in my refrigerator at that time.Sometimes we would be left with less quantity of various vegetables and the resultant curry would be usually a combination of such vegetables.Few vegetables pair up beautifully and aloo is one such versatile vegetable which pairs nicely with almost everything.Today, I am posting a very simple but classic recipe of Aloo Gobi Matar(Dry) sabzi which is a great combination with rice and rotis.
Aloo Gobi Matar Dry Sabzi Recipe:
(serves 3-4)

Ingredients:
2 large Potatoes,peeled and cut into 1" thin pieces
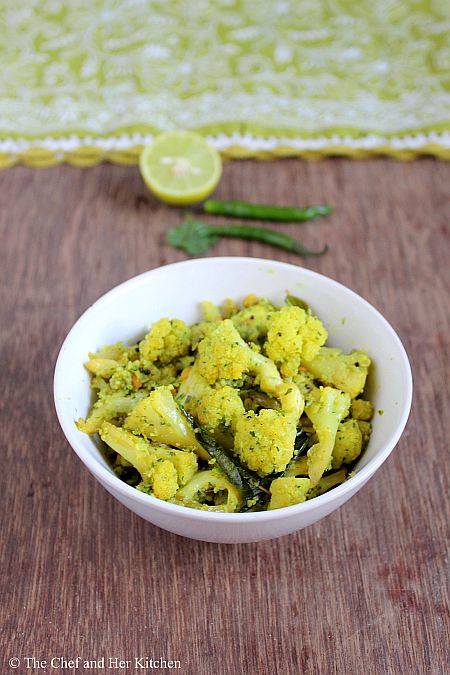
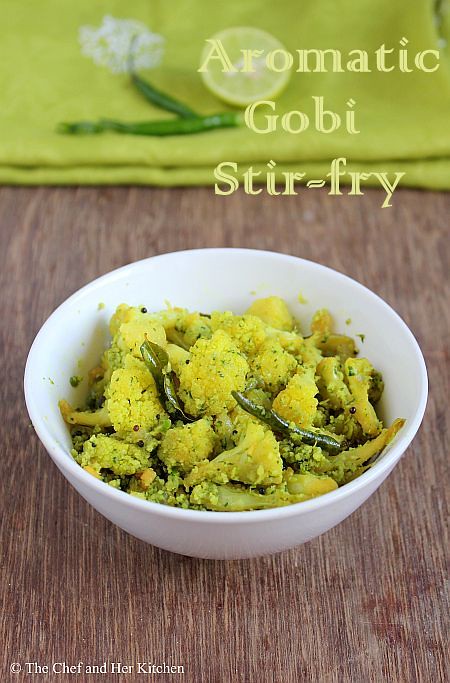
1 small Cauliflower,cut into thin florets
1/2 cup fresh/frozen Green peas
1 big Onion,roughly chopped
2 Tomatoes,finely chopped
2 tsp Ginger-Garlic paste
2 tsp fresh Coriander leaves ,chopped
1 tsp Red chilli powder
1 tsp Coriander powder
1/2 tsp roasted Cumin powder
1/2 tsp Amchur powder or juice of 1/2 lemon
1/2 tsp Garam masala
1/2 tsp Kitchen king masala(optional)
1/4 tsp Kasuri methi,slightly crushed
a pinch of Turmeric powder
1/2 tsp Cumin seeds
2-3 tbsp oil
Salt to taste

Method:
  • Blanch the cauliflower florets and green peas separately in salted hot water for few minutes until they are tender and remove them and keep them aside.Do not over cook them.
  • Heat oil in a thick kadai and crackle cumin seeds and add sliced onions and ginger garlic paste and fry for sometime until the onions turn pink in color.
  • Add the potatoes and fry them for 2-3 mins and add blanched gobi florets and green peas to it and fry them again for another 2-3 mins.
  • Add finely chopped tomatoes to it and mix well.
  • Cover it with lid and reduce the flame and cook for 8-10 mins until they are soft and tender.You should take care that they would not become mushy.You can sprinkle some water on top of the vegetables for faster cooking.
  • Add all the masala powders,turmeric powder and fry for some time.
  • Now add slightly crushed kasuri methi and mix well and cover it and cook for 2-3 mins until all the masalas are incorporated.
  • Add finely chopped coriander and remove it from stove.If you are using lemon juice add it now.
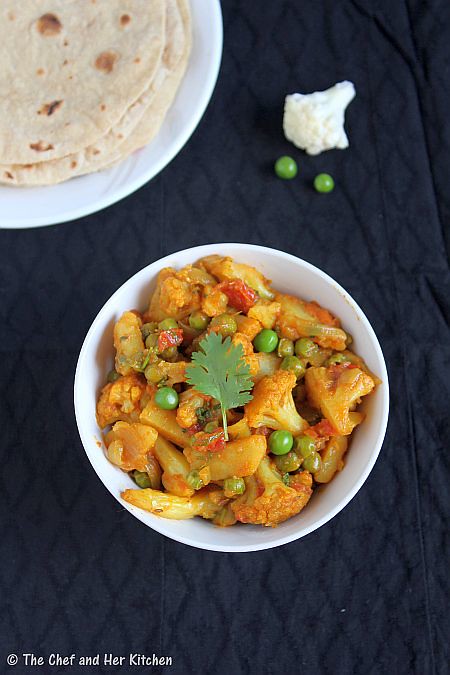
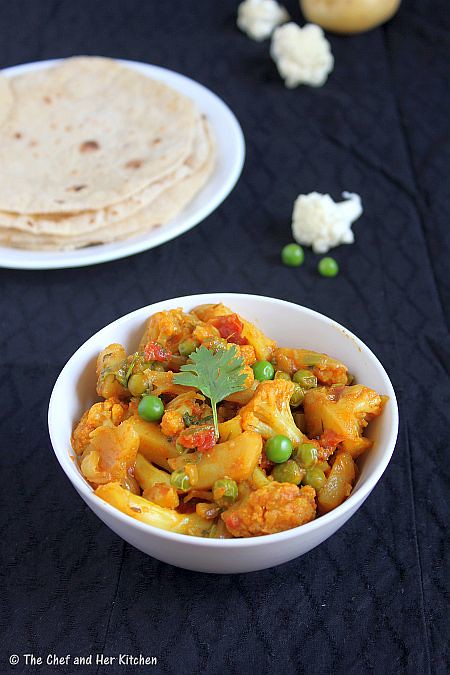
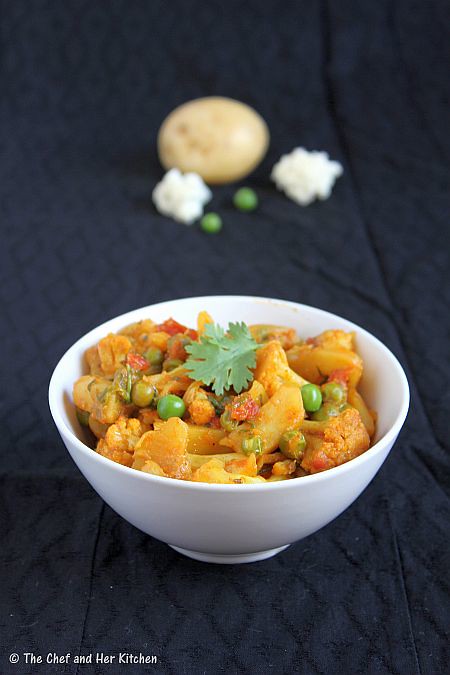
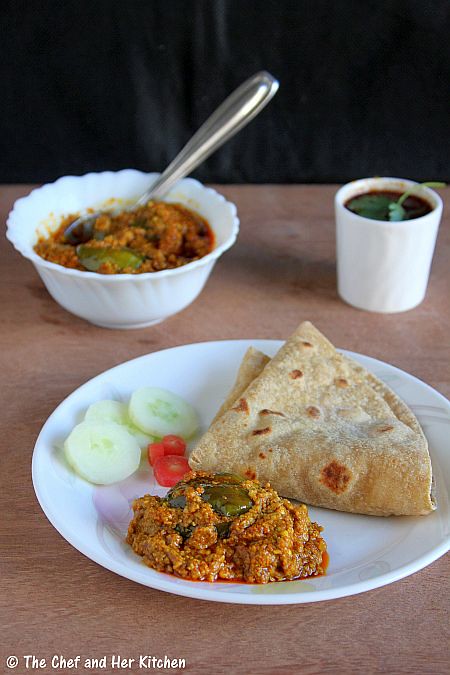
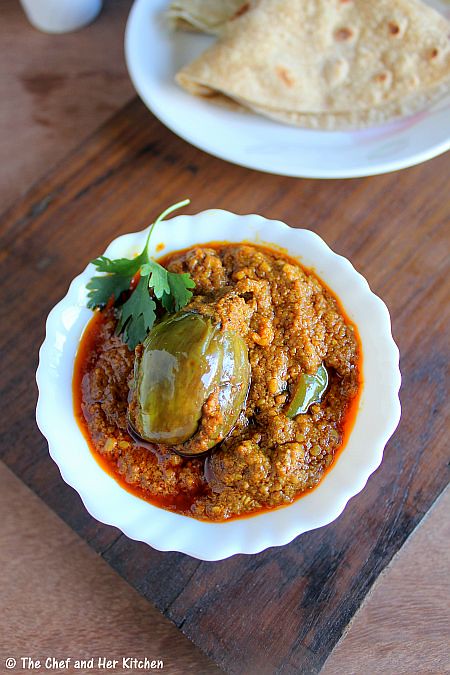
Serve it hot with Roti/Chapthi/Rice/Jeera rice.
Notes:
  1. You can try various combinations like Aloo Gobi,Gobi Matar,Aloo Matar or plain Aloo,plain Gobi sabzi following the same process.Add the vegetable quantities accordingly.
  2. You can skip kasuri methi and kitchen king masala if you do not have.But I prefer to add them as they adds a nice flavor to the curry.
Check out other Dry Vegetable curries with aloo and gobi here.

Monday, May 6, 2013

Broccoli Tikkis(Cutlets) | Broccoli Recipes

broccoli tikkis
Broccoli is one of those pretty vegetables which is not only colorful but is also a very healthy and tasty vegetable.I know many would not prefer broccoli but thankfully me and TH both love it absolutely and we usually prefer it having in all forms.I add the broccoli florets in salads, stir fries, pasta, soup, parathas and few snack varieties like these tikkis.The recipe for this tikki is similar to any other tikki recipe. I used potato and roasted chickpea flour for binding and spiced it up minimally. Ever since I tried peanuts in Bengali style Vegetable Chops I am hooked to the taste of a bite of crunchy peanuts in the tikkis I started adding it to even my regular vegetable cutlets.It tastes very good , so do give a try!!
broccoli tikkis

You can check out other Cutlets/Tikkis recipes in my blog.
broccoli tikkis

Broccoli Tikkis | Broccoli Cutlets Recipe:
makes around 12-14 cutlets

Ingredients:
1 small Broccoli head
1 large(or 2 medium) Potato,boiled
2 tbsp Besan/Chickpea flour (or 2 Bread slices)
2-3 tbsp roughly crushed roasted Peanuts or Cashew nuts
1 tbsp Raisins
1 small Onion,finely chopped
3-4 Green chillies,finely chopped
1 tsp finely chopped Ginger
1/2 tsp Amchur powder or juice of  1/2 lemon
Salt to taste
Chat masala,to sprinkle
Oil,to shallow fry

Method:
  • Cut broccoli into florets and wash them nicely and blanch them in hot water for 1-2 mins.Drain and pour cold water on them and keep them aside.
  • Grate the boiled and peeled potato and keep it ready.
  • Grate the broccoli florets or pulse them in food processor/mixer a couple of time to get the grated broccoli.Do not run in mixer for long as we need just the small bits of it.
  • Dry roast the besan until you get the nice aroma for a couple of minutes.Cool it.
  • Heat a tsp of oil and add finely chopped onions and fry until they turn translucent.Add raisins and fry until they bulge and then add chopped green chillies and ginger and give a stir quickly and switch off the flame.Cool the mixture.
  • In a bowl mix the grated potatoes,broccoli,onion mixture,crushed peanuts(or cashew nuts), roasted besan(or bread) and mix well.
  • Add enough salt and lemon juice(or amchur powder) to it and mix well. 
  • Start making round tikkis of 2 " wide and 3/4 " thickness with the mixture.You will get around 12-14 tikkis with this mixture.Arrange them in a single layer on a plate and cover it with a cling film and refrigerate for half an hour.You can avoid refrigerating if pressed for time.
  • Apply few tbsp of oil on a thick hot tawa and arrange the cutlets in a single layer and roast them on both sides until golden and crisp.You can even shallow fry them in a flat pan with 1/2" depth oil until crisp.Drain the tiikis on a kitchen napkin.
  • Sprinkle chat masala on top of hot tikkis.
Serve them hot with Green Chutney and Meeta Chutney.
broccoli cutlets
Notes:
  1. If your cutlet is not holding its shape while making you can add another bread slice (run in the mixer to powder) to it and mix and start making cutlets.
  2. You can even dip the tikkis in corn starch slurry and coating them with bread crumbs.This gives a thick and crispy crust to the cutlet,it is optional.
  3. You can add few cooked and slightly mashed green peas to the mixture.
  4. The addition of peanuts/cashew nuts adds a nice crunch to the tikkis,hence I recommend you to add them.If you keep the cutlets longer the peanuts will become soft,so its better you consume them immediately after you prepare them.
broccoli cutlets

Also check out other Broccoli recipes in my blog here.
broccoli cutlets

Wednesday, May 1, 2013

Instant Oats Paniyaram | Indian Oats Recipes

'Paniyaram' which is also called as 'Paddu' or 'Gunta Ponganalu' is a very common breakfast variety at my place. I usually make it at least once when I prepare dosa batter. When the dosa batter turns sour, it is ideal to use it to make paniyaram.Today, I am posting a variation of Paniyaram which is an instant variety using Oats which makes it healthy too.Oats can be used in most south Indian varieties. I have already posted recipes such as Instant Oats Idli,Instant Oats Uthappam and Instant Oats Dosa.Try this healthy and instant Oats Paniyaram recipe. It is very delicious. Would highly recommend it.
Check out other versions of paniyaram here.

Instant Oats Paniyaram | Oats Paddu Recipe:
(Serves 3-4)

Ingredients:
1 cup Quick cooking Oats(Quaker/Saffola)
1 cup Sooji/Rava
1 cup sour Curd
3 tbsp Chana dal
1 big Onion,finely chopped
3 tbsp chopped Coriander
2-3 tbsp chopped Curry leaves
1 tsp Cumin seeds
1 tsp Eno/Fruit salt
1/4 tsp Cooking Soda
Salt to taste

Method:
  • Soak chana dal in water for 1-2 hrs. Drain them.
  • Dry roast oats and sooji separately until they start changing their color.Do not roast much.Cool them and grind them together in a mixer to a coarse powder.
  • Beat curd well and add it to a big bowl add ground oats and sooji and mix well.Add enough water to it to get the consistency of dosa batter.
  • Add salt and cooking soda to the mixed batter and leave it aside for 1 hr.You should leave it at least for 20 mins aside.
  • Add finely chopped onions, coriander, curry leaves along with green chilli paste,cumin seeds, soaked chana dal and mix well.

  • Check the consistency of batter,it might become thick as the sooji absorbs water when it is soaked.Add extra required water to it to get the dosa batter consistency.
  • Just before making paniyaram add eno to the batter and mix well.
  • Heat the paniyaram/gunta panganalu pan/Aebliskever pan and add 1/2 tsp of oil in each impression.When it is piping hot keep the flame on LOW and pour the batter using a table spoon until it covers 3/4 th and pour some more oil over it and cover it with a lid.Let it roast on low-medium flame until golden brown in color.
  • When you see the edges turning golden in color use a sharp knife and run it around the edges of each paniyaram and turn them to the other side and roast until golden brown on both the sides.

Notes:
  1. You can add grated carrots or blanched corn to the batter and make paniyaram.
  2. Make sure that you use sour curd to make this.
  3. You can refrigerate the batter and use it on next day as well.Add eno to the batter before using it.
  4. If you do not have eno you can use only cooking soda in the recipe.

If you are interested check out other Oats recipes here:

Sunday, April 28, 2013

Spicy Oven Roasted Chickpeas Recipe | Low Calorie Snacks

Low Calorie Snacks
The morning time on a week day would be busy in packing breakfast, fruits and snack box for TH as  he leaves quite early in the morning. I usually pack the breakfast for him and most of the times it would be Muesli,Cereals,Sandwich,Burger and sometimes south Indian breakfast items.As he works for long hours, apart from the breakfast, I also pack fruits and a few snacks.Both of us usually prefer to take small meals through the day rather than having a three meal day.  
Low Calorie Snacks
I am always on the look out for healthy and low fat snacks.While I do prepare various instant varieties like salads,sundal etc, I always look for snacks which could be prepared ahead and stored for a few days.This oven roasted chickpeas is one such recipe, which I prepare very frequently as both of us love chickpeas in all forms. This is definitely a protein packed and low fat snack which is perfect to munch with your evening cuppa.I am posting the chatpata Indian style roasted chickpeas. The flavors are very versatile and one can be creative in the use of flavors.
Low Calorie Snacks
You can check out few low fat snack recipes in my blog.I would add few more snacks soon.

Spicy Oven Roasted Chickpeas Recipe:
shelf life: stays crisp for 2 days,but can be stored up to a week

Ingredients:
2 cups white Chickpeas / Kabuli Chana(or Kala chana)
1 Bay leaf
1/4 tsp strong home made Garam masala or 1/2 tsp ready made garam masala

to marinate:
1 tbsp Olive oil
1 tsp Red chili powder
1 tsp Chaat masala
1/4 tsp Turmeric powder
1/2 tsp Amchur powder
1/4 tsp Pepper powder
1 tsp Salt(or to taste)

Method:
  • Wash and soak chickpeas for 7-8 hours or overnight.Pressure cook chickpeas with a bay leaf and garam masala  for 2 whistles and reduce the flame and keep it for 5-6 mins.Switch it off. Once the pressure drops drain the chickpeas and spread them as a thin layer on a kitchen towel and let the moisture dries up.
  • In a bowl add olive oil, red chili powder, pepper powder, chaat masala, turmeric powder, amchur powder and salt and whisk well.
  • Add the drained and dried chickpeas to the mixture and mix it nicely and let it marinate for half an hour.
  • Line a baking tray with a silver foil and spread the marinated chickpeas in a single layer.
  • Bake it in the oven at 160 degrees for 30-35 mins until they turn crisp.Try to mix them in between once or twice.Keep an eye after half an hour,they might get burnt.Every oven differs in time and temperature,so judge them accordingly.When you touch them after they are done they would be slightly soft and they would become crisp once they are cooled down completely.
Store them in air tight container.They stay crisp for 2-3 days.
Notes:
  1. I make it in small quantities and finish them in 2-3 days.I think you can keep the roasted chickpeas up to a week.
  2. You can play with the flavors for chickpeas.You can experiment with garlic,pepper powder and salt or adjust the spices according to your wish.
  3. Every oven differs in time and temperature,so judge them accordingly.
  4. You can use kala chana(black chickpeas) instead of white chickpeas in the recipe. 
 

Thursday, April 25, 2013

Challa Mirapakayalu | Curd Chillies | Dahi Mirchi | Sundried Items

I am a big fan of accompaniments for any dish as they elevate the taste of the original dish and one such example of this is, "Challa Mirapakayalu".If it is paired with Andhra style Pappu (dal) or rasam or any simple curry or even with plain curd rice it tastes extremely delicious.
We usually pick light colored green chillies which are less spicy, to make these curd chillies.These green chillies are marinated in sour buttermilk for a couple of days and are dried in the sun.Though the process is very simple,it is time consuming.The whole process takes some 10-12 days as they are supposed to be marinated in the buttermilk mixture for half a day , dried and then marinated again and then dried . This process is to be continued for a couple of days. I have explained the process in detail,so please go through the recipe thoroughly before you attempt it.
Challa Mirapakayalu | Dahi Mirchi  Recipe:
(stores up to an year)

Ingredients:
1/2 kg Green chillies (light or dark colored variety)
1 liter slightly sour Buttermilk (neither thin nor thick)
Salt to taste

Method:
  • Select the green chillies which are slightly plumpy.You can use the light colored or dark colored variety according to your wish.Light colored ones are less spicy where as the dark colored ones are very spicy.
  • Wash the green chillies and dry them on a kitchen napkin for 1-2 hrs or you can use them immediately.
  • Slit them vertically keeping the ends intact and also retain the stalks of green chillies.If you are using light colored green chillies you can keep the seeds and for dark colored ones you can remove the seeds slightly as they are spicy.
  • Add salt to buttermilk and beat nicely,the consistency of buttermilk should neither be very thin nor thick.
  • Add the green chillies to the buttermilk mixture and make sure they are well immersed in the buttermilk.
  • Cover it and soak it for 3 days and leave it aside.They will slightly change in color after 3 days.
  • After 3 days squeeze them(keep the buttermilk mixture) slightly with hands and arrange them in a single layer on a plastic sheet and dry them under sun until evening.In the evening again add them to the left over buttermilk mixture and let it sit in the buttermilk mixture overnight.
  • Next day morning squeeze them again and dry them until evening and follow the same process for the chillies until all the buttermilk mixture is finished.It might take few days 5-6 days.
  • After the buttermilk mixture is finished you can dry them in sun for another few days until they are completely dried.The whole process takes 10-12 days in total for marinating,drying and remarinating and complete drying process.So be patient while doing this.
  • Store them in an air tight container.It stays for more than a year.
Deep fry them in oil when required until they turn brown and become crisp.Serve them as an accompaniment with Dal/ Sambar/ Rasam/ Curd and Rice and also Curd rice.
Notes:
  1. I suggest to use the light green colored green chillies for this as they are less spicy.
  2. Few make a stuffing with cumin powder and some spices and stuff it in the chillies, I would post that version sometime later.

Sunday, April 21, 2013

Bharli Vangi | Maharastrian style Stuffed Brinjals

A few food combos such as  'Rajma-Chawal', 'Jolada Rotti-Ennegayi', 'Chapati-Usli', 'Jhunka-Bhakri', 'Avakay-Steamed Rice','Khichdi- Kadhi', 'Kadhi-Chawal' feature in my menu quite often as I  love to indulge in them once in a while. A few of these combos are regularly made at my place , but some of them are prepared less often - more due to my laziness in preparing them. Jolada rotti - Ennegayi is infact one such combination.
I have already posted a version of stuffed eggplants - 'Bagara Baingan' in my blog which is a typical Hyderabadi style dish. Today, I am posting a Maharasthrian version of stuffed eggplants called "Bharli Vangi".Both the recipes are similar but they differ in their taste and texture. Bharli Vangi pairs well with Jowar bhakri or Rice flour Bhakri or Chapati.
 
This recipe needs a bit more oil which makes it delicious and am sure the pictures explain that.You can see a layer of oil floating on the top.Though I do not prefer using a lot of oil in cooking,it was an exception that day. I have also mentioned the preparation of a version with less quantity of oil, in my notes.
Bharli Vangi | Maharashtrian style Stuffed Eggplants Recipe:
(Serves 3-4)

Ingredients:
10-12 small Eggplants
1/2 cup Ground nuts,dry roasted and skinned
2 tbsp roasted Sesame seeds
2 tbsp Coriander powder
2 tsp Red chili powder
1 tsp Cumin powder
1 tsp Garam masala or Goda masala
1/2 tsp Turmeric powder
a small gooseberry sized Tamarind,extract to pulp
1 tbsp grated Jaggery(optional)
Salt to taste
2-3 tbsp Oil

Method:
  • Remove the stems of eggplants and slit the eggplant into four by keeping the top portion intact.Drop them in salted water for 10 mins.
  • Grind roasted and skinned groundnuts and sesame seeds to a coarse powder.
  • In a wide bowl add groundnuts and sesame seeds powder, coriander powder, cumin powder, red chili powder, garam masala(goda masala), turmeric powder, salt and mix well.
  • Add tamarind pulp and grated jaggery to the above mix and mix well.Sprinkle some water to the mix so that the mixture becomes little wet and would be easy to stuff the eggplants.You should not mix it to a paste,you should add only enough water to bind the masalas together.
  • Stuff all the eggplants with this masala mixture and keep them aside.
  • Heat oil in a big thick bottomed kadai and arrange the stuffed eggplants side by side and let them fry for 2-3 mins.Add the remaining masala over them.
  • Cover it and reduce the flame and cook on low-medium flame for 20-25 mins.Flip the eggplants carefully a couple of times in between so that they would roast evenly on all sides.Check the top portion of eggplant is cooked or not by inserting the knife.
  • Pour half to one cup of water depending on the consistency you need and cover it and let them cook again for 7-8 mins until the oil floats on top.
Serve it hot with Chapati/Jowar Bhakri/Roti/Rice or any other Bhakri.

Notes:
  1. You can add finely chopped sauteed onions to the masala mix before stuffing the eggplants.
  2. Eggplants can be replaced by potatoes and follow the same recipe.
  3. You can even mix both the eggplants and potatoes and prepare the same recipe.
  4. This recipe needs a bit more quantity of oil than usual as the stuffed eggplants cook faster in oil.If we add water to them initially they would take longer time.
  5. You can even cover the kadai with a deep bottomed plated filled with water while cooking.It ensures that the eggplants are cooked evenly and also you can use less oil.
Also check out another similar version of Stuffed Eggplants -" Bagara Baingan" recipe in my blog.

Friday, April 19, 2013

Red Coconut Chutney | Side dish for Idli/Dosa

 coconut chutney
What to prepare as a Side dish for Idli/Dosa is always a confusion and since I get bored eating the same side dish again, I usually change the flavor and color of the chutney which makes it taste different every time.I have posted a version of Coconut chutney earlier, which is the usual way I prepare.I make various variations of this such as Red Coconut chutney and Green coconut chutney The addition of raw onion and garlic adds a nice flavor to the chutney and the addition of red chillies and byadige red chillies adds a bright red color to the chutney.
red coconut chutney

You can check out other chutney varieties for Idli/Dosa here:
Red Coconut Chutney Recipe:
(serves 2-3)

Ingredients:
1/2 cup grated fresh Coconut
1 small Onion,chopped
2-3 dry Red Chillies
2-3 Byadige Red Chillies
2 small Garlic pods
2 tbsp Chana dal
1 1/2 tsp Tamarind pulp
Salt to taste

to temper:
2 tsp Ghee/Oil
1/2 tsp Mustard seeds
1 tsp Urad dal
a sprig of Curry leaves
a pinch of Asafoetida

Method:
  • Heat 1 tsp Oil and add chana dal and fry until they turn red in color and add red chillies and byadige red chillies until they are crisp and keep them aside.
  • Grind grated fresh coconut with onion, garlic pods, roasted chana dal and dry red chillies, tamarind pulp and salt to a paste.
  • Heat ghee/oil in a small tempering pan and crackle mustard seeds and add urad dal and fry until it turns red in color.Add curry leaves and asafoetida and fry it.
  • Add the tempering to the chutney and mix well.
Serve it with Idli/Dosa/Paniyaram.
coconut chutney
Notes:
  1. Instead of chana dal you can add 3-4 tbsp fried gram(roasted gram) in the recipe.
  2. Adjust the red chillies according to your spice level.The addition of byadige red chillies gives a nice red color to the chutney,so do not miss adding them.
red coconut chutney

You can check the regular Coconut Chutney recipe here.

Wednesday, April 17, 2013

Cauliflower Stir fry | Aromatic Gobi Curry Recipe

Cauliflower is one of those veggies which features regularly in my kitchen and Ajwani Aloo Gobi with mustard flavor is one of my most favorite preparations with it. It serves as a nice combination with rotis. I usually prepare this Cauliflower curry or this simple aromatic Gobi stir fry which tastes well even with rice.
This recipe is quite simple to make and is very aromatic because of the addition of coriander and garlic while pounding the coconut masala.You can adapt this recipe to various vegetables like Potatoes, Ladies finger, Tindora, Clusterbeans, French beans, Long beans, Brinjal and Cabbage and follow the same process but adjust the cooking time accordingly. While a few vegetables like potatoes needs to be cooked first others such as cluster beans, french beans, long beans are to be steamed , the rest of the veggies listed above should be sauteed in oil until they are done.Now let's see how this simple and versatile recipe is prepared.
cauliflower stir fry

Cauliflower Stir Fry | Aromatic Gobi Curry Recipe:
(Serves 2)

Ingredients:
1 small Cauliflower,cut into small florets
1 Onion,finely chopped
juice of 1/2 Lemon
a sprig of Curry leaves
1/4 tsp Turmeric powder
1 tbsp Chana dal
1 tsp Urad dal
1/2 tsp Mustard seeds
2 tbsp Oil

to grind:
1/4 cup grated fresh Coconut
3-4 Green chillies
3-4 Garlic cloves
2-3 tbsp chopped Coriander leaves
Salt to taste

Method:
  • Clean and check the cauliflower florets and add them to the boiling water with salt and turmeric powder and switch off the flame and leave them aside for 2-3 mins.Drain and keep them aside.
  • Heat oil in a kadai/pan and crackle mustard seeds and add chana dal and urad dal and fry until they become golden in color.
  • Add curry leaves and finely chopped onion and fry well until they turn pink in color.
  • Now add drained cauliflower florets and fry for 2 mins.
  • Add 2-3 tbsp of water and cover it and cook it on low flame for 7-8 mins until the cauliflower is cooked.Take care that it should not become mushy,it should be cooked and firm to touch.
  • Meanwhile grind grated coconut with green chillies,garlic cloves,coriander leaves and salt to a coarse paste.Do not add water while grinding it.
  • Add the ground masala to the cooked cauliflower and fry it for some time and cover it and cook for 2 mins.
Serve it hot with Roti/Rice/Chapati.
Notes:
  1. You can skip onion and garlic in the recipe if you are preparing on festivals.
  2. Soaking the cauliflower florets in salted water will remove if there are any insects in cauliflower.I always do this even after checking the florets to make sure for myself.

Also check out other cauliflower recipes in my blog:

Sunday, April 14, 2013

Lemon Pickle | Nimboo ka Achar Recipe

I have posted many mango pickle recipes last year in my blog which were sourced from my MIL. The lemon pickle recipe which I am posting today is also sourced from her during her recent visit.Apart from the lemon pickle she brought various other pickles and powders. We also prepared a few varieties of pickles together and you might have already seen a few of them on my blog. I intend to post a few more shortly.
Lemon pickle pairs really well with Curd rice.If you get fresh lemons you must try this lemon pickle as it is not only delicious to eat but also keeps your body cool in the summers.
Lemon Pickle Recipe:
shelf life: up to 1 year

Ingredients:
30-35 big sized Lemons
1 cup Salt
1 cup Red chili powder
2 tbsp Turmeric powder
1 tsp Fenugreek powder
1 cup Sesame oil
1 tbsp Mustard seeds
1/4 tsp Asafoetida

Method:
  • Wash and wipe the lemons with a clean cloth.Cut them into 8 pieces lengthwise or quarter them into 8 pieces.
  • Mix the lemons with 3/4 cup of Salt and turmeric powder until they are mixed nicely.
  • Put this mixed lemons in a clean and sterilized glass bottle and close it with lid and leave it aside for 10 days.You can mix it once in a while in 3 days.By this time the lemons would leave water.
  • After 10 days add red chili powder,fenugreek powder and 1/4 cup salt to the lemon mixture.You should not remove any water which oozes from the lemons.
  • Heat sesame oil and crackle mustard seeds and asafoetida and cool the oil completely.
  • Add the oil(which is cooled down) to the lemon pickle and mix well.
  • Leave it for 10-15 days to get marinated.
Serve it with Curd rice or you can even serve it with any Upma variety,it tastes nice.
Notes:
  1. After 10 days when lemon is mixed with salt and turmeric powder,check the salt and increase the salt amount accordingly from 1/4 cup if needed.
  2. Few squeeze the lemons slightly and remove the seeds and mix the lemons with lemon juice and follow the same procedure.You can follow this method too if you want.Do not squeeze the lemons hardly as it will make the pickle bitter.
  3. You can also store just the marinated lemons with salt and turmeric powder through out the year.When needed you can take out some portion and add red chili powder according and temper it with sesame oil,mustard seeds and asafoetida.You can even avoid the tempering with oil and add just the red chili powder to it.
Check out the recipes for various Andhra style Mango Pickles and North Indian Achar here.

 
back to top