Tuesday, September 26, 2017

Sooji Halwa Recipe | Suji Halwa | Rava Sheera Recipe

sooji halwa
Sooji halwa recipe with step by step photos.Sooji halwa is one of the most easiest desserts which can be prepared in no time and makes an excellent dessert or a simple sweet or prashad.South Indians make Rava Kesari which is similar to sooji halwa with added kesar color where as sooji halwa is commonly prepared in the other parts of the country.Sooji halwa is usually prepared along with puri and dry black chickpeas on the eighth day(Ashtami) during Navaratri in north India and is prepared for any festivals like Ganesh chaturthi,Navaratri etc.
sooji halwa
I am posting a basic version of Sooji halwa, there are no hard and fast rules for preparing this halwa, the recipe I am posting has just right sweetness the way my family prefers but you can increase the sugar and ghee quantities according to your requirements.Sometimes I add fresh fruits like apple,banana,mango,pineapple to the sooji halwa to make it in different flavors.
sooji halwa

sooji halwa
If you want to make the sooji halwa rich add milk or a mix of milk and water in the ratio as mentioned and proceed with the same recipe.The addition of nuts again is individual choice,I even add roasted almonds along with cashewnuts and raisins which adds a nice bite to the halwa.I sometimes add saffron to the halwa instead of cardamom powder.If you are preparing the halwa for prashad you can add a pinch of edible camphor which gives a divine taste to the halwa.I prefer to make sooji halwa rather than Rava kesari as I am against the usage of synthetic colors in our regular food.
rava sheera
Check out other halwa recipes in my blog:
rava halwa
Here is how to make sooji halwa recipe with step by step photos.
Sooji Halwa | Rava Sheera Recipe:
Serves 2-3
Prep time: NIL | Cooking time: 20 mins | Total time: 20 mins
Cuisine: Indian | Category: Dessert

Ingredients:
1/2 cup Sooji/Rava
1/3 cup Sugar
3-4 tbsp Ghee+ 1 tbsp Ghee
1 1/4 cups Water
1/2 tsp Cardamom powder
7-8 Cashew nuts,chopped
2 tbsp Raisins

Method:
  • Heat ghee in a thick bottomed kadai and add cashewnuts and fry them until they turn light brown in color and remove them and then add raisins and fry them until they swell up and remove them and keep aside.
  • In the remaining ghee add rava and roast it on low flame until you get nice aroma from it.
  • Meanwhile boil water in another container and pour this water in the roasted sooji and keep stirring it continuously and let it cook until done.You can even boil the sugar in the water and add it to the roasted sooji and mix.
  • Add sugar to it and cook further,initially the mixture will become watery.Let it cook further until it is done.
  • Add cardamom powder, fried cashew nuts,raisins and 1 tbsp ghee and mix it nicely.
  • Cover it and leave it for a while.
Serve it hot/warm or at room temperature.

Notes:
  1. This is mildly sweet,if you want it more sweeter add 1-2 tbsp of sugar to it.
  2. The addition of ghee at the end will keep the halwa soft and does not harden after it sits for a while too.
  3. You can prepare it in complete milk or mix of milk and water using the same ratio as mentioned.
  4. You can increase the water to 11/2 cups for a soft halwa.
  5. You can even add roasted almonds,chopped figs in the halwa for a richer taste.Instead of cardamom powder you can add saffron soaked in hot milk which gives a nice flavor and color to the halwa.
  6. You can prepare various fruit based halwas like banana halwa by addding chopped banana at the end and cook for a minute or by adding chopped mangoes to make mango halwa.You can add finely chopped apple pieces,pineapple pieces while boiling the water and proceed with the same recipe for apple halwa and pineapple halwa.
rava sheera

Tuesday, September 19, 2017

Pasta Payasam | Macaroni Kheer Recipe | Kheer Varieties

pasta payasam
Pasta kheer recipe with step by step photos.Navaratri is around the corner and it is a norm to prepare a different sweet and sundal variety for naivedyam on those nine days.I have been planning to post the pasta kheer recipe from so long and finally I am able to post it for this navaratri.The preparation process of pasta payasam is very similar to any other payasam variety just that we need to boil the pasta and then add to the milk unlike other kheer varieties where vermicelli or sooji or rice is cooked in the milk.
pasta payasam
I usually get various pasta varieties which includes penne, shell, spiral, fettucine, macaroni, linguini, fusili, sphagetti etc but penne pasta is the favorite at my place as it absorbs the sauce well compared to the other ones.I have used macaroni for this payasam but one can either use shell or penne pasta varieties to prepare this kheer and I will not recommend other pasta varieties as they will not absorb the fluids well. The kheer absorbs the milk and thickens as it sit and hence while making the kheer add enough milk and adjust the sweetness as for your preference.
pasta payasam
pasta payasam
Check out other Kheer recipes in my blog here.
pasta payasam
Here is how to make pasta payasam recipe with step by step photos.
Pasta Payasam Recipe:
Serves 3-4
Prep time: 2 mins | Cooking time: 25 mins | Total time: 30 mins
Cuisine: Fusion | Category: Sweets/Desserts

Ingredients:
1 cup Macaroni or any other small Pasta variety
1/4 cup Sugar
1/2 cup Condensed milk
3/4 liter full cream Milk
10-12 Cashew nuts
2 tbsp Raisins
15-20 Saffron strands
2 tsp Ghee

Method:
  • Soak saffron in 2 tbsp warm milk for 10-15 mins.
  • Boil macaroni in a big pot of hot water,add little ghee and let it cook for 12-15 mins until done or follow the instructions given on the pack.
  • Boil milk and simmer it for 12-15 mins until it reduced to 3/4th of the quantity.
  • Add cooked pasta to the simmering milk and reduce the flame and cook for another 5-7 mins.
  • Add saffron soaked milk,sugar and condensed milk and mix gently till it dissolves and let it continue cooking over low flame.Always cook over low flame otherwise the milk might curdle.
  • Meanwhile heat ghee in a kadai and fry cashew nuts and fry them until golden in color and remove them and keep aside.
  • In the same kadai add raisins and fry them until they fluff up and remove and keep them aside too.
  • Add ghee roasted cashew nuts and raisins and cardamom powder to the kheer and mix and switch off the flame.
Serve it hot/warm/cold or at room temperature.

Notes:
  1. You can add 1/2 tsp Cardamom powder to the kheer while it is boiling.
  2. You can make any kheer varieties like sago,vermicelli,millets etc.Sago and vermicelli needs to be roasted in ghee before adding to the milk mixture.
  3. The kheer tends to thickens as it sits and hence make sure it has enough liquid when you finish making kheer.If it is thickened at the time of serving you can add boiled and cooled milk to the kheer.
pasta payasam

Monday, September 11, 2017

White Chocolate Sponge Cake | White Chocolate Cupcakes

white chocolate cake
White chocolate sponge cake with step by step photos.I bake pretty good tea cakes,cookies and breads regularly for my family but I am still novice when it comes to decorate the cakes.Somehow I take an extra plunge to decorate a cake on my own to mark the celebrations at home.Though the final look of the cake is not perfect,it gives me an immense pleasure when I bake and decorate a cake for the loved ones.Don't you agree?
white chocolate cake
I follow many food groups on facebook and I must say that fb group has become a nice medium to learn new recipes.When I came across this white chocolate cake recipe from flours and frostings blog in one of the baking groups I follow I was sure that I would be doing this for my son's birthday.Though I had ordered another cake for the party celebration I prepared this on his actual birthday and also for his school to share with his friends.
white chocolate cupcakes
I followed the recipe to the T and it is a very simple recipe to follow and it tastes amazing with white chocolate flavor.I love white chocolate and hence it was a double treat for me,I strongly recommend anyone to try this no fail easy cake recipe.I am not an expert in decorating and hence kept it simple but I have mentioned in the recipe how I did in case if anyone wants to know the procedure.
white chocolate cake

white chocolate cake
Check out other celebration cake recipes in my blog:
white chocolate cupcakes

Here is how to make white chocolate sponge cake with step by step photos:
White Chocolate Sponge Cake Recipe:

Yields 8" Round/Square cake | Recipe source: here
Prep time: 20 mins | Baking time: 40-50 mins | Total time: 60-70 mins
Cuisine: International | Category: Desserts/Snacks

Ingredients:
1 1/2 cups(190 gms) All purpose flour
3/4 cup(170 gms) White Chocolate,chopped
3/4 cup(150 gms) Sugar
3/4 cup(180 ml) Milk
6 tbsp(80 gms) Butter,cubed
3 Eggs
1 tsp Vanilla extract
1 1/2 tsp Baking powder
1/2 tsp Salt

Method:
  • Preheat the oven at 170 deg C/350 deg F for 10-12 mins.
  • Place a parchment paper and grease an 8" round or square tin and dust it with the flour.I used a 7" round tin and 6 cupcake tin.
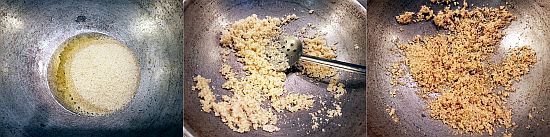
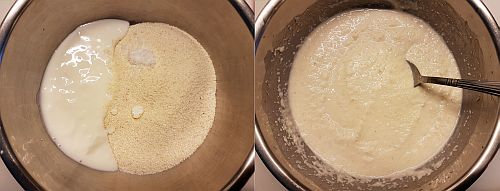
  • In a thick bottomed sauce pan heat cubed butter, chopped white chocolate and milk and let it cook until the chocolate and butter melts and forms a uniform liquid.Keep this mixture WARM.
  • Sieve together the flour,baking powder and salt a couple of times and keep it ready.
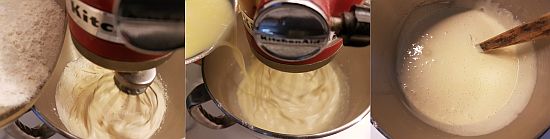
  • Using a stand mixer or electric beater beat the eggs with the sugar and vanilla essence until it triples in volume and the mixture should turn PALE in color.If you draw an eight on top of the mixture,you should be able to see the whole 8 before it disappears,this consistency indicates that it is right.
  • Reduce the speed of the beater/mixer and add the flour mixture gradually and mix well until it is incorporated.
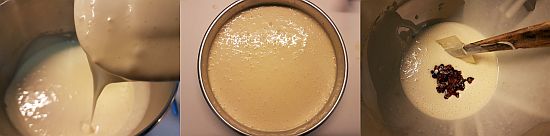
  • Add the warm chocolate-milk-butter mixture and continue beating until you get a smooth mixture.
  • Now pour the batter in the prepared pan until it is 3/4 th of  the height of the pan.I added few dried cranberries to the remaining mixture and poured in the prepared cupcake tin.
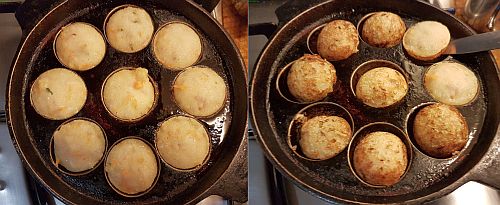
  • Bake it for 40-45 mins until done.It should pass the toothpick test,if you insert the toothpick in the center and remove it should come clean which indicates that the cake is done.I refrigerated the cupcake tin while I baked the big cake and then baked the cupcakes for 15-18 mins until they are done.
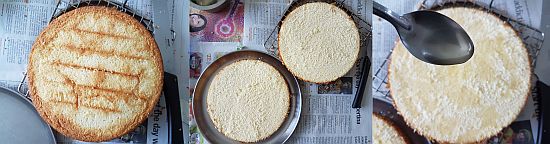
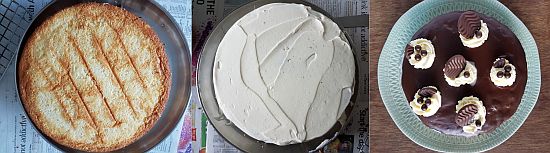
  • Cool the pan nicely for 10 mins and run a knife around the edges and invert the pan and gently tap it on to a plate and then transfer it to a wire rack to let it cool down completely.
Serve it warm or at room temperature or slice and decorate with whipped cream or ganache frosting.

to decorate(how I did):
  • Sugar syrup - Boil water along with sugar until it forms a nice syrupy liquid,strain the water and let it cool.Add lemon juice to it and mix and keep it in fridge.
  • Cut the Cake into two or three pieces depending on the height of your cake.
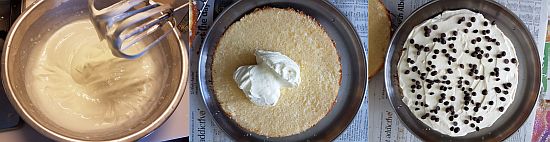
  • Whip chilled heavy fat cream in a chilled bowl and added little icing sugar and vanilla essence and whipped until it gave stiff peaks.
  • Place a cake on the serving platter.Place the butter paper along the sides from the platter so that it can be removed once the process is completely done.
  • Soak with 1/4 cup sugar syrup.Spread some whipped cream filling on cake and add some chocolate chips over it and cover those with the other piece of cake.Soak cake again with 1/4 cup syrup.
  • You can do a crumb coat,refrigerate it and give another thick coat for a neat look.You can even apply a thick coat of whipped cream on level it nicely on the top and around the edges.
  • Melt 1 part of chocolate with 2 parts of heavy cream in a thick vessel on a stove top and let it cool down a bit.I poured this on the chilled frosted cake and let it drip on the edges and let it set.Once it is set you can pipe few patterns with the whipped cream and decorate it with chocolates.
Notes:
  1. I reduced the sugar by 1/4 cup in the cake recipe as I frosted the cake with whipped cream and chocolate ganache.
  2. They stay good for 2-3 days when stored well in an airtight container.
white chocolate cake

Tuesday, September 5, 2017

Instant Sooji Appe | Instant Rava Paniyaram Recipe | Rava Appe

sooji appe
Instant sooji appe recipe with step by step photos.It is always a difficult task for me to plan the breakfast as I decide what to prepare the stuff instantly most of the times rather than planning it in advance and only on weekends I plan my breakfast menu the previous night.My weekend breakfasts are elaborate where as on weekdays it would be a quick fix or easy breakfast options.Appey or Paddu or Paniyaram or Gunta Ponganalu or Gunta Punugulu is one of the favorite breakfasts for me.We usually make Gunta ponganalu with left over Idli/dosa batter or avalakki paddu or instant oats paniyaram or this instant sooji appey.
sooji appe
rava paniyaram
Sooji appey does not need any fermentation and can be prepared instantly with the easily available ingredients at home.This recipe is very similar to my oats paniyaram recipe just that I do not add oats to it.
Check out other appey recipes -  Gunta ponganalu with left over Idli/dosa batter, avalakki paddu ,instant oats paniyaram.
sooji appey
Here is how to make instant rava paniyaram with step by step photos:
Instant Rava Paniyaram | Sooji Appe | Rava Appey Recipe:

Serves 2
Prep time: 10 mins | Cooking time: 20 mins | Total time: 30 mins+ standing time
Cuisine: South Indian | Category: Breakfast/Tiffin

Ingredients:
1 cup Sooji/Rava
1/2 cup sour Curd
1 big Onion,finely chopped
1 Carrot,grated
1/4 cup grated fresh Coconut
3 tbsp chopped Coriander
2-3 tbsp chopped Curry leaves
1/2 tsp Cumin seeds
1 tsp Eno/Fruit salt
1/4 tsp Cooking Soda
Salt to taste

Method:
  • Dry roast sooji lightly and do not roast much.
  • Beat curd well and add it to a big bowl add sooji and mix well.Add enough water to it to get the consistency of dosa batter.
  • Add salt and cooking soda to the mixed batter and leave it aside for 1 hr.You should leave it at least for 20 mins aside.
  • Add finely chopped onions, grated carrot,grated coconut,coriander, curry leaves along with green chilli paste,cumin seeds and mix well.
  • Check the consistency of batter,it might become thick as the sooji absorbs water when it is soaked.Add extra required water to it to get the dosa batter consistency.
  • Just before making paniyaram add eno to the batter and mix well.
  • Heat the paniyaram/gunta panganalu pan/Aebliskever pan and add 1/2 tsp of oil in each impression.When it is piping hot keep the flame on LOW and pour the batter using a table spoon until it covers 3/4 th and pour some more oil over it and cover it with a lid.Let it roast on low-medium flame until golden brown in color.
  • When you see the edges turning golden in color use a sharp knife and run it around the edges of  each paniyaram and turn them to the other side and roast until golden brown on both the sides.

Notes:
  1. You can add blanched corn to the batter and make paniyaram.
  2. Make sure that you use sour curd to make this.
  3. You can refrigerate the batter and use it on next day as well.Add eno to the batter before using it.
  4. If you do not have eno you can use only cooking soda in the recipe.
instant sooji appey

 
back to top