Showing posts with label Andhra. Show all posts

Monday, February 12, 2018

Gutti Kakarakaya | Andhra style stuffed Bitter gourd Recipe

gutti kakarakaya
Gutti Kakarakaya recipe with step by step photos.I have mentioned many times before that Bitter gourd is a favorite vegetable to TH and it is a norm to make a bitter gourd variety in any form atleast in one meal over the weekend.He likes the simple preparations like bitter gourd fry, bitter gourd onion curry where as I prefer to eat the stuffed versions as the bitterness can be balanced in the stuffed version. I had already posted a couple of stuffed bitter gourd recipes like Stuffed Karela with Besan, Stuffed Karela with Onion and today I am posting another version which is my mom's signature recipe.
gutti kakarakaya
Though I was never a fan of bitter gourd but always love my mom's Kakarakaya Podi and her version of stuffed bitter gourd which she fondly calls as 'Kakarakaya Biscuit'. I don't know why she gave it that name but even I got used to call this version as Kakarakaya biscuit.My mom's Kakarakaya podi is always a hit among my family and friends,whoever has tried it till date they just loved it and asked for extra helpings, it accompanies in my lunch quite often.
stuffed bittergourd
Check out other bitter gourd recipes in my blog:
stuffed bittergourd
Here is how to make gutti kakarakaya recipe with step by step photos:

Gutti Kakarakaya | Andhra style stuffed Bittergourd Recipe:
Serves 2 | Author: Prathibha
Prep time: 15 mins | Cooking time: 30 mins | Total time: 45 mins
Cuisine: Andhra | Category: Main course-Dry Curry

Ingredients:
6-8 small Bitter gourds
1.5 tbsp Coriander seeds
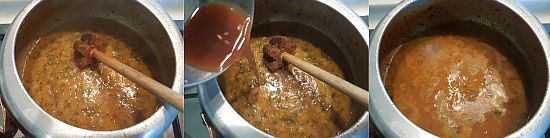
1 tbsp Tamarind pulp
1/3 tsp Turmeric powder
1.5 tsp Red chili pwoder
1 tsp grated Jaggery
Salt
2-3 tbsp Oil,to fry

to roast and grind:
1.5 tbsp Chana dal
1.5 tbsp Urad dal
1/2" Cinnamon
3-4 Cloves
1/4 cup grated dry Coconut
1 Onion,sliced
5-6 Garlic pods

Method:
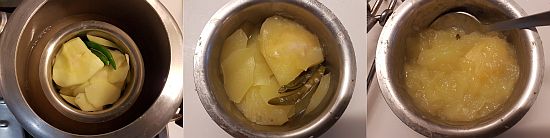
  • Wash and trim the edges of the bitter gourds,peel them and make a cut vertically keeping the edges intact and scoop out the seeds.Peeling the skin is optional.
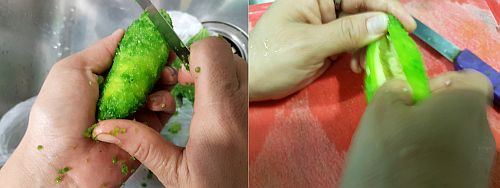
  • Apply salt all over the bitter gourds inside and outside and leave it for 1-2 hours.You can even par boil them in tamarind water for 5-6 mins.Both the methods reduce the bitterness.
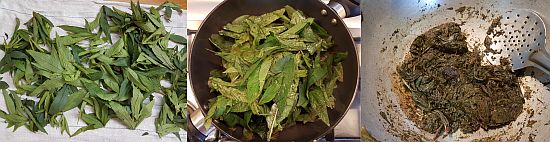
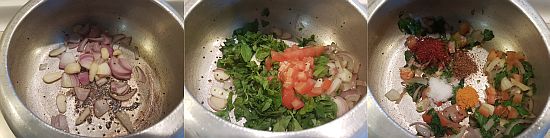
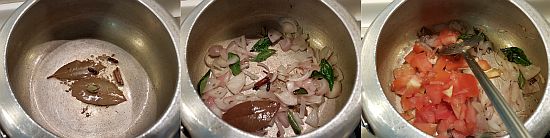
  • Dry roast chana dal,urad dal along with cinnamon and cloves until the dals turn slightly red in color,remove them.
  • In the same pan add dry coconut,sliced onion and garlic pods and fry for a couple of minutes.Cool them.
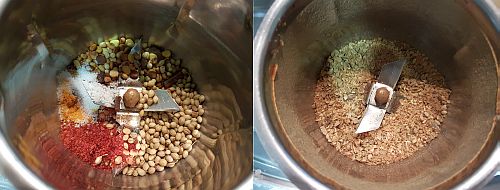
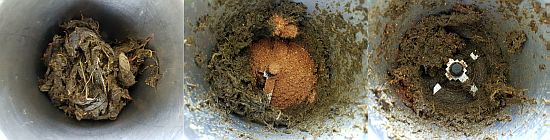
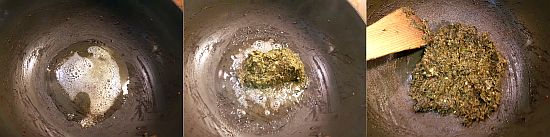
  • Grind raw coriander seeds with the roasted dals, red chili powder, turmeric powder to a coarse powder.
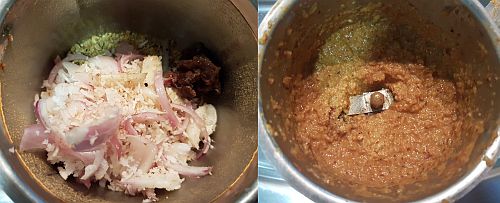
  • Add the roasted coconut,onion,garlic and tamarind pulp and jaggery and grind to a paste.
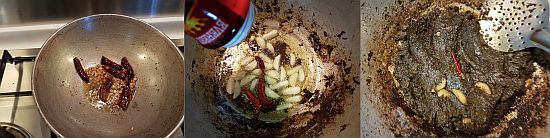
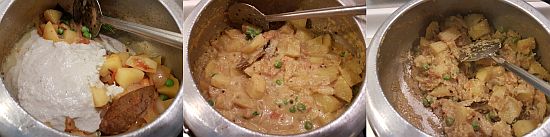
  • Heat 1 tbsp oil and add the ground paste and fry nicely until the mixture is dry and starts leaving the oil at the edges.
  • Stuff the slit bitter gourds with this mixture.
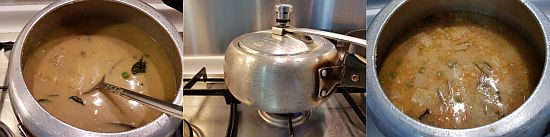
  • Heat a wide pan and add 2 tbsp oil and place the bitter gourds with the stuffed side down and let them cook over low-medium flame until they are brown and roasted on all the sides.Keep turning them in between for even roasting.
Serve it hot with hot steamed rice.You can mix it with rice or eat as a side dish with dal/sambar/rasam.

Notes:

  • You can stuff the fried mixture in small brinjals to make gutti vankaya or blanched dondakaya(tindora) to make gutti dondakaya or in ridge gourd roundels to make gutti beerakaya.All the versions taste yumm.
  • I did not have dry coconut at that moment and hence I used grated fresh coconut.
stuffed bittergourd
Technorati Tags: ,,,,,,,,,

Wednesday, January 3, 2018

Raw Mango Rasam | Maavinkay Saaru

raw mango rasam
Raw mango rasam with step by step photos.A typical south Indian meal always comprises of a rasam variety and it is my comfort food too. I am always happy to eat a simple meal of rice with a vegetable fry and rasam and would not complain about the other missing varietes as in a typical south Indian thali.My most favorite rasam varieties are Karnataka style Bele Saaru, Holige Saaru and Tomato Rasam but there are few other varieties like mint rasam,pacchi pulusu, pepper rasam, mango rasam, tomato dal rasam which I thoroughly enjoy too.
raw mango rasam
Preparing a good rasam is again an art, not everyone can prepare a well balanced rasam which makes a lip smacking meal when mixed with hot rice and paired with fryums.I do not like very thin rasam which is flavorless, the rasam should be of right consistency and even though it is thin it should not lack the flavors and should be perfectly balanced in taste.My FIL is a big fan of my rasam varieties, he always get excited the moment he sees a rasam on our lunch table.A simple rasam rice is always a comfort meal for south Indians like how a dal chawal is a comfort food for north Indians.
Check out other rasam varieties in my blog - 
raw mango rasam
Here is how to make raw mango rasam recipe with step by step photos.
Raw Mango Rasam Recipe:

Serves 2 | Author: Prathibha
Prep time: 5 mins | Cooking time: 25 mins | Total time: 30 mins
Cuisine: South Indian | Category: Main Course - Side dish

Ingredients:
1 raw Mango
2 Green chilies
1/2 tsp Turmeric powder
2 tsp Jaggery
Salt,to taste

to temper:
2 tsp Oil/Ghee
1/2 tsp Mustard seeds
2-3 Red chilies,broken
8-10 Curry leaves
1/4 tsp Asafoetida

Method:
  • Wash and peel the skin of raw mango and cut into slices and reserve the mango seed.In a bowl add cut mango slices,mango seed and green chilies and close it with lid(no need to add water) and pressure cook for 3 whistles.
  • Once it cools down mash it nicely with the back of a spoon or puree it in the mixer.Reserve the mango seed aside.
  • In a small pan heat oil/ghee and crackle mustard seeds,add broken red chilies, curry leaves and asafoetida and fry until the red chilies turn slight brown in color.
  • Add mashed mango puree along with the cooked mango seed and 1.25-1.5 cups of water and add turmeric powder, rasam powder,salt and jaggery and bring the rasam to a boil.Check the seasoning and adjust it.Boil it well.
Serve it hot with hot steamed rice,fry and papads.

Notes:
  1. You can add 1/3 cup of cooked and mashed toor dal or moong dal to the rasam while boiling for a different taste.
  2. You can serve it as a soup or hot beverage.
raw mango rasam

Monday, November 6, 2017

Gongura Pickle Recipe | Andhra Niluva Gongura Pacchadi

gongura pickle
Gongura pickle recipe with step by step photos.Gongura pickle does not need any introduction as it is one of the most popular pickles from the state of Andhra and any Andhra meal is incomplete without gongura pickle being served in it.Gongura pickle is sour and spicy and is made out of red sorrel leaves,it can be stored for a couple of months if made carefully. I also have posted a version of Gongura Pacchadi with Green Chilies and Gongura Pacchadi recipe using Red chllies which have less shelf life and should be consumed in a day or two.Gongura pickle is usually mixed with hot steamed rice,ghee and is eaten with raw onions on the side, the onions elevate the taste of the gongura pickle and hence do not miss to serve it with onions.
gongura pickle
I do not miss to get these wonderful greens when ever I go to little India and in fact it has become a norm to keep a bottle of Gongura pickle or Pulihora Gongura pickle handy in my refrigerator these days.It is much better to eat the homemade pickles rather than the preservative loaded ready made pickles.I also prepare another version of gongura pickle - Pulihora Gongura pickle which is prepared in a different way with the addition of tamarind and few other spices and even this Pulihora Gongura pickle can be stored for a couple of months.Both the pickles taste absolutely delicious in its own way, try these pickles at home and enjoy the delicious home made andhra famous gongura pickle.
Apart from the pickles we make various other pacchadi,dal,curry and rice varieties with these greens and these greens give a peculiar taste and sourness to the recipe which makes it even more tastier.Check out all Gongura recipes in my blog here:
niluva gongura pacchadi
Here is how to make gongura pickle recipe with step by step photos.
Gongura Pickle | Niluva Gongura Pacchadi Recipe:
Shelf life:1 month | Author: Prathibha
Prep time: 15 mins | Cooking time: 30 mins | Total time: 45 mins
Cuisine: Andhra | Category: Pickles/Accompaniments

Ingredients:
1 big bunch or 8-10 cups tightly packed Gongura(Red sorrel) leaves
1 tbsp Mustard seeds
1.5 tsp Fenugreek seeds
6-8 Red chilies
Salt to taste
1.5 tbsp Sesame oil

to temper:
4 tbsp Sesame oil
1 tsp Mustard seeds
5-6 Red chilies,whole or broken
15-16 Garlic cloves,peeled roughly
1/4 tsp Asafoetida

Method:
  • Dry roast mustard seeds,fenugreek seeds and red chilies until they are nicely roasted.Cool them and grind them along with salt to a fine powder.
  • Remove the gongura leaves from the stems and wash them thoroughly and drain the water thoroughly. Spread a big kitchen towel and spread the leaves on the towel and let them dry in shade for 3-4 hours.They do not need to get wilt just that the water has to be completely absorbed by the towel.
  • In another pan heat oil and add gongura leaves(dried for a while) and saute them until they become soft and pulpy.Do not add water to the leaves at any point of time.Continue frying for 7-8 mins until the water evaporates from the leaves mixture.
  • Cool the gongura leaves and grind it to a paste along with the ground spice powder.
  • In the same/another pan heat 4 tbsp of sesame oil and crackle mustard seeds and then add garlic cloves and red chilies and fry them until they turn slight brown in color and add asafoetida and then add the ground gongura mixture and fry it nicely for 8-10 mins until the mixture starts leaving the oil along the edges.Sometimes the oil gets seeped inside the pickle but it will start leaving after a couple of hours when stored in the bottle,so do not worry.
  • Cool it thoroughly and store it in an air tight glass bottle in the refrigerator.It stays good for a month or two in refrigerator when handled carefully.
Serve it with hot steamed rice with ghee and raw onions on the side.

Notes:
  1. You can add 1.5 tbsp of Coriander seeds while roasting the mustard and fenugreek seeds.The addition of coriander seeds is optional.I add sometimes and skip it sometimes and however the taste does not alter much.
  2. If you are using tella gongurs(not the typical red gongura leaves) you need to add a small gooseberry sized tamarind while frying the gongura leaves for the sourness.
  3. The amount of red chilies can be altered according to your spice level.
  4. Do not skip garlic in the recipe as it adds a nice taste and also always serve the gongura pickle with raw onions on the side.
  5. Sesame oil is recommended for the recipe, if you do not have you can use regular oil.
  6. Always use a clean and dry spoon when you take out the pickle and close the lid tightly and store it in refrigerator for increased shelf life.
  7. You can take the required portion of the pickle and mix in the chopped onions and serve it with hot steamed rice and ghee.
gongura pickle


Thursday, July 13, 2017

Kothimeera Pacchadi | Coriander Chutney for Idli,Dosa

kothimeera pacchadi
Kothimeera pacchadi recipe with step by step photos.Idli and Dosa appears quite frequently for breakfast in any south Indian home. It is always challenging to think of a different side dish for Idli and Dosa apart from the usual fare like Coconut Chutney and sambar. Though I make various chutnies like Tomato ChutneyTomato-Onion ChutneyCarrot ChutneyCapsicum ChutneyPeanut Chutney, Fried gram chutney but the moment I hear about any new chutney recipe I would like to try it immediately as we south Indians are never tired of the various chutney varieties.
kothimeera pacchadi
During my last visit to my mil's place I had noticed a couple of vaious chutney variety jars sitting in the fridge and everyday she used to serve with different combinations of chutnies and powders with Idli and Dosa.These chutnies do not have large shelf life like couple of months but they are good to store for a couple of weeks or until a month. Niluva tomato pacchadi and this Kothimeera pacchadi were few among those pacchadi varieties which she keeps preparing often.Though I do not prepare Idli and dosa on daily basis but we love to indulge them over weekends atleast twice or thrice a month.Hence I never needed to make storable chutnies at my place but when my inlaws visited us last month Idli and Dosa featured quite often for our breakfast.Hence I had prepared few chutney varieties like niluva tomato pacchadi, mamidi allam pacchadi, allam pacchadi and this kothimeera pacchadi and these chutnies stayed quite well for a month. Though we prepare the regular chutnies, it is always nice to have an array of chutnies and powders to be served along with Idli and Dosa,it definitely jazz up your breakfast a bit.
kothimeera pacchai for idli,dosa
Check out other chutney and powder varieties for Idli and Dosa:
coriander chutney for idli,dosa
Here is how to prepare Kothimira pacchadi recipe with step by step photos.
Kothimeera Pacchadi | Coriander Chutney Recipe for Idli,Dosa:

Serves 3-4 | Author: Prathibha
Prep time: 5 mins | Cooking time: 20 mins | Total time: 25 mins
Cuisine: Andhra | Category: Accompaniments,Side dish for Idli/Dosa

Ingredients:
1 big bunch Coriander leaves(roughly 3-4 cups)
8-10 Green chilies
1 big lemon sized Tamarind
1/2 tsp Turmeric powder
1 tsp Cumin seeds
Salt,to taste
1 tbsp Oil

to temper:
1/2 tsp Mustard seeds
2 tsp Oil

Method:
  • Wash and drain the water from the coriander leaves and green chilies and chop them roughly.
  • Heat oil in a kadai and crackle cumin seeds and then add green chilies and fry until they wilt a bit.
  • Add chopped coriander leaves,turmeric powder,tamarind and salt and fry until they become wilted and become a lump,this might take 12-15 mins.Cool it.
  • Grind the coriander leaves mixture to a coarse paste in the mixer.If needed add a couple of tablespoons of water while grinding it.
  • Heat oil in the same pan and crackle mustard seeds and then add ground paste and fry for another 3-4 mins until there is no moisture left in the chutney.Let it cool.
  • Store it in an airtight glass container in the refrigerator.It stays nicely up to 3-4 weeks.
Take out required portion as required into the cup and add little water and dilute it and serve it as a side dish with Idli/Dosa/Uthappam.

Notes:
  1. If you want to prepare the coriander chutney for rice, you can add a tbsp of urad dal and chana dal each before frying the green chilies and coriander leaves and proceed the same way.This chutney cannot be stored more than 2-3 days.
  2. This chutney is extremely spicy and tastes best when served with other mild chutnies like coconut chutney, tamarind chutney.
  3. You can reduce the number of green chilies in the recipe if you cannot bear much spice in the recipe.
  4. If you want you can add bit of jaggery or sugar in the recipe to cut down the spice.
kothimeera pacchai for idli,dosa
Technorati Tags:

Thursday, July 6, 2017

Menthi kura Pappu | Andhra style Methi Dal

menthi kura pappu
Menthi Kura Pappu recipe with step by step photos.Dal is a must in every meal across all the states in India just that the preparation process different from state to state.The south Indian version dal is made very thick and it consists of a tempering of mustard seeds and tamarind pulp is added in the dal which gives a distinct taste compared to the versions from the other states. I have already posted a typical Andhra version of Methi dal before and today I am posting a simple pressure cooker everyday dal version where the dal is cooked along with the spices and greens directly in the cooker.The preparation process is so verstaile that one can prepare various varieties of dals using the same process and it is a breeze to make using this version.
In Andhra, Menthi kura pappu is mixed with hot steamed rice and a dollop of ghee and it tastes so heavenly and the addition of a simple fry and fryums make the meal even more tastier.You can check out other Andhra style dal varieties here - Beerakaya PappuGongura PappuMamidikaya PappuMamidikayi-Vankaya PappuPesara KattuPalakura PappuTomato Pappu.
menthi kura pappu
Here is how to prepare the Andhra style Methi Dal recipe with step by step photos:
Menthikura Pappu | Methi Dal Recipe:

Serves 3-4 | Author: Prathibha
Prep time: 10 mins | Cooking time: 20 mins | Total time: 30 mins
Cuisine: Andhra | Category: Sidedish

Ingredients:
1/2 cup Toor dal
1 1/2 cups Fenugreek leaves/Methi ,loosely packed
1 Onion, roughly chopped
1 Tomato, roughly chopped
1-2 Green chilies,slit into pieces
5-6 Garlic pods
1 tsp Coriander powder
1/2 tsp Cumin powder
1 tsp Red chili powder
1/2 tsp Turmeric powder
1 small amla sized Tamarind
1/2 tsp Mustard seeds
1/4 tsp Asafoetida
Salt to taste
1 tbsp Oil

Method:
  • Wash and soak the toor dal for 15-20 mins.
  • Remove the fenugreek leaves from the stems and wash them and chop them roughly.
  • Soak tamarind in 1/4 cup of water and extract the juice and keep it ready.
  • Heat oil in a cooker and crackle mustard seeds and then add sliced onions,green chilies and garlic cloves and fry them well until the onions turn translucent.
  • Add chopped methi leaves and tomatoes and fry for 2-3 mins.
  • Now add turmeric powder, coriander powder, cumin powder, red chili powder and salt and fry for another couple of minutes.
  • Add washed and drained toor dal and fry for a minute and add 1.5 cups of water and let it come to a boil.
  • Close the lid and pressure cook it for 3 whistles and simmer the flame and cook it for another 7-8 minutes.
  • Once the pressure drops take a dal masher(pappu gutti) and mash the dal nicely to get the uniform dal mixture and add the extracted tamarind juice and keep it again on high flame for another 3-4 mins until the dal is thick and uniform in consistency.
Serve it hot with hot steamed rice,ghee and papad or rotis/phulkas.

Notes:
  1. This is a simpler version of dal but one can prepare the dal following a traditional way by cooking the dal with methi leaves and then do the rest of the process as mentioned above and add cooked and mashed dal( with leaves) to the fried onion tomato mixture and cook as above.
  2. You can prepare various dals like Bottlegourd dal, tomato dal,Amaranth greens dal(thotakura pappu), Brinjal dal by following the same procedure.
  3. The dal tastes better when it is made thick and cooked properly, hence adjust the water accordingly.
andhra style methi dal
Technorati Tags:

Thursday, May 11, 2017

Drumstick leaves Rice | Murungai Keerai Sadam | Drumstick leaves Recipes

drumstick leaves rice
Drumstick leaves rice recipe with step by step photos.Drumstick leaves has very good amount of Iron and it is a powerhouse of nutritional values and hence it is advised to include it often in our diet. But it is a very tedious process to remove the leaves from the stems otherwise these leaves have a peculiar taste compared to other greens.It was difficult for me to get these greens regularly when I was in Mumbai but I am enjoying these greens in Singapore. So, when ever I make a trip to little India I always load my bags with all the various greens like drumstick leaves, gongura leaves, palak, methi etc.
Though it is tedious to pluck the drumstick leaves but it is worth the effort because of the nutrients provided by these greens to us.
drumstick leaves rice
My mom prepares drumstick leaves curry, stir fry, rasam, drumstick leaves podi and add it to the dosa batter and adai batter to prepare dosas.Most of the times I end up making dosa or curry with them but when I get it in large quantities I prepare drumstick leaves rice variety or podi so that I can eat it on daily basis for long time.I prepare this rice in a similar way as I prepare curry leaves rice so one can adapt the same recipe to prepare curry leaves rice by replacing the drumstick leaves with the curry leaves in the recipe.
drumstick leaves rice
Check out other rice varieties using greens in my blog:
murungai keerai sadam
Here is how to prepare drumstick leaves rice recipe with step by step photos:
Drumstick leaves Rice Recipe | Munagaku Rice:

Serves 2 | Author: Prathibha
Prep time: 15 mins | Cooking time: 30 mins | Total time: 45 mins
Cuisine: South Indian | Category: Main course - Rice variety

Ingredients:
1 cup Sonamasuri/ Raw Ponni(or equivalent)
2-2.25 cups Drumstick leaves
5-6 Cashewnuts,broken
1 tbsp Chana dal
2 tsp Urad dal
1/2 tsp Mustard seeds
2 tbsp Oil,preferably Sesame Oil
Salt,to taste

to roast and grind:
1 tbsp Chana dal
2 tsp Urad dal
1 tsp Cumin seeds
1 tsp Pepper corns
4 Red chilies
1.5 tsp Tamarind
2-3 tbsp Sesame seeds, optional

Method:
  • Wash and soak rice for half an hour and cook it as you wish.I cook the rice in the rice cooker by adding 2.5 cups of water and it comes out nice and fluffy.Cool the rice.
  • Dry roast chana dal and urad dal until they turn brown and then add cumin seeds, peppercorns and red chilies and fry further until they are fried and the red chilis starts getting black spots.Add sesame seeds and tamarind and fry for another minute.Cool them and add salt and grind it into a coarse powder.
  • Remove the leaves from the stems of drumstick leaves and wash them nicely and drain off the excess water.
  • In the same pan add a tsp of oil and add the drumstick leaves and fry them until they turn slightly crispy, do not cover the pan else the leaves will turn soft.Continue frying until the leaves becomes slightly crisp,it will take roughly 8-10 mins.
  • Cool them and add to the powdered spices and grind again to a powder.
  • In a big kadai heat oil and crackle mustard seeds and add chana dal and urad dal and fry until they slightly red in color and then add broken cashewnuts and fry until they turn golden brown in color. Now add the ground drumstick leaves powder mixture to it and mix nicely and cook for a minute.At this stage you can store this mixture for 8-10 days in the refrigerator and use the required amount of mixture when required.
  • Now add the cooled rice to the drumstick leaves mixture and mix it nicely.
Serve it with fryums.

Notes:
  1. You can avoid sesame seeds if you want but it gives a nice balanced taste to the rice.
  2. When I get hold of drumstick leaves I usually make this mixture in large quantity and store it in refrigerator.So all I need to do when I want a variety rice is to mix with cooked rice and it is ready.
  3. You can prepare the curry leaves rice in the same process by replacing the drumstick leaves with the curry leaves.
drumstick leaves rice
Technorati Tags:

Tuesday, May 2, 2017

Potato Kurma Recipe | Aloo Kurma | Side dish for Roti,poori

aloo kurma
Potato Kurma recipe with step by step photos.Aloo Korma is a typical south Indian recipe which is a perfect combination with poori and in Andhra it is paired with Ghee rice which tastes absolutely delicious.We usually prepare either Potato masala or Potato kurma or Mixed vegetable kurma or Mixed vegetable Sagu for poori and it goes very well with it.I love the combination of ghee rice and alu korma and for me it is a match made in heaven kind of food. I had this combo for the first time at my close friend's place when I was in school and I instantly fell in love with that combo and from then I always prefered to eat with Ghee rice or Coconut rice instead of poori.
potato peas kurma
Check out other side dishes for Poori:
potato kurma
Here is how to prepare the Potato Kurma recipe with step by step photos:
Potato Kurma | Aloo Kurma Recipe:
Serves 2-3 | Author: Prathibha
Prep time: 15 mins | Cooking time: 25 mins | Total time: 40 mins
Cuisine:Andhra | Category: Side dish

Ingredients:
2 Potatoes,peeled and diced into cubes
1/4 cup fresh/frozen Green peas
1 Onion, sliced
1 small tomato, chopped
10-12 Curry leaves
1.5 tsp Coriander powder
1 tsp Red chili powder
1/4 tsp Garam masala
1/2 tsp Turmeric powder
1 tbsp Coriander leaves,to garnish
Salt, to taste

to temper:
2 tbsp Oil/Ghee
1 tsp Cumin seeds/Shahijeera
1 Bay leaf
2-3 Cloves
1/2" Cinnamon
1-2 Cardamom pods,slightly crushed

to grind:
1/3 cup fresh grated Coconut
4-5 Cashewnuts
1 tbsp Khus Khus( I did not add)
1 tsp Fennel seeds
1/2" Ginger
2 Garlic pods
2 Green chilies

Method:
  • Heat oil in a cooker and add all the ingredients under the section ' to temper' and fry for a couple of minutes.
  • Add sliced onions and curry leaves and fry until they turn translucent,then add chopped tomatoes and fry well.
  • Now add peeled and cubed potatoes and green peas and fry well for 2 minutes and then add turmeric powder, garam masala, red chili powder, coriander powder and salt and fry the masalas for a minute.
  • Meanwhile grind all the ingredients under the section ' to grind' to a fine paste by adding enough water.
  • Add the ground paste to the fried potato mixture and continue frying until the masala is nicely fried with no raw smell.
  • Now add 1.25 cups of water and let it come to a boil and then close the lid and pressure cook for 2 whistles.
  • Once the pressure is dropped remove the lid and add coriander at the end.
Serve it hot with poori/roti/chapathi/Ghee rice/Coconut rice/Jeera rice/Pulao.

Notes:
  1. In Andhra style Kurma fennel seeds are not added, but I highly recommend to add it as it gives a nice flavor to the kurma.
  2. The addition of green peas is optional but I like to add it.
  3. Khus khus is an essential ingredient for south Indian style kurma and also it gives the thickness to the gravy, so do not skip it. I did not add it as it is not available here.
  4. The gravy thickens as it sits so add water accordingly.
potato kurma
 
back to top