Tuesday, August 27, 2013

Karasev | Spicy Sev Recipe | Krishna Janmashtami Recipes

spicy sev
Karasev (Spicy Sev) is one of the most loved snacks in India, however there are variations to it like Garlic Sev, Potato Sev, Onion Sev etc. I absolutely love any flavor but Garlic flavored Karasev is my most favourite one among them. Today I am posting the most basic Karasev recipe which is quite easy to make at home. Try this easy Karasev (Spicy Sev) recipe for Krishnashtami tomorrow. If you are looking for some easy options for Janmashtami, try out Poha Kheer, Paal Payasam, Oats-Nuts Ladoo, Makhana Kheer , Mosaru Avalakki, Mixed Dal Vada and Poha Chiwda.  Check out my complete collection of recipes for Gokulashtami here.
spicy sev
Even though these are deep fried, homemade snacks are always considered healthy when compared to store bought ones because of the usage of good oil. It works out cheaper and it is also very easy to prepare - Its just that we need to make our mind to prepare these savoury snacks at home. My mom used to make various snacks during our  childhood and we used to enjoy munching them. Because of the easily availability of snacks now a days in market she has reduced the preparation of these kind of deep fried snacks but homemade is always best and try your hands on preparing this easy karasev .
kara sev

kara sev

Karasev Recipe | Easy Spicy Sev Recipe:
Shelf life:15-20 days
Prep time: 10 mins | Cooking time: 30 mins | Total time: 40 mins
Cuisine: Indian | Category: Snacks/Savouries
Ingredients:
3 cups Bengal Gram flour (Besan)
1 1/2 cups Homemade Rice flour
1 big ladle(3-4 tbsp) hot Oil
1 tbsp Red chili powder
Salt to taste (1.5 tsp roughly)
Oil, for deep frying
Method:
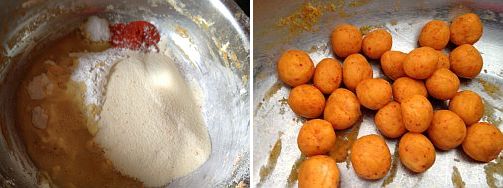
  • Sieve besan and rice flour together.
  • Add red chilli powder,salt and hot oil and mix it nicely until the mixture is mixed nicely. Divide the flour into 2-3 portions.
  • Meanwhile heat oil in a deep heavy bottomed kadai for deep frying.
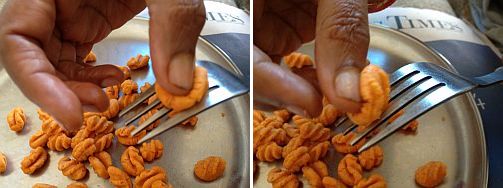
  • Sprinkle enough water to each portion separately and make the dough just before frying. The dough should neither be very smooth nor very thick. It should be soft and smooth, the mixture will be slightly sticky.
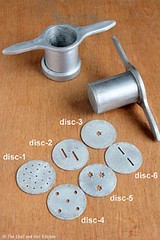
  • Use a 5 holed round disc(disc no:4 in the above pic) of your murukku maker.
  • Fill one portion of the mixed soft dough in the murukku maker and squeeze directly in hot oil in circular motion. Do not make it very thick while squeezing, try to spread in a thin layer.
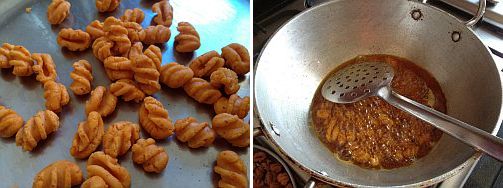
  • Fry them over medium-high flame until they turn golden brown in color and the bubbles subsides in the oil and then turn to the other side and fry again until you get golden in color.
  • Remove from oil using a perforated ladle and drain on a colander or kitchen napkin. Repeat the process of sprinkling water and kneading the dough and pressing into hot oil and frying with the remaining portions.
  • Once it is cooled down to room temperature you can store it in dry air-tight container. You can store it like the swirls or slightly crumble them while storing.
Serve it as a snack with tea/coffee.

karapusa
Notes:
  1. Instead of red chili powder you can soak 8-10 red chillies in water for 10-15 mins and grind it to a fine paste. You can even add few pods of garlic while grinding the red chillies.
  2. You can even use 1 tsp freshly ground pepper corns and reduce the red chili powder to 1 tsp in the recipe.
  3. They stay good for 15-20 days when stored in an air tight container.
  4. You can use any fancy shaped disc of your murukku maker to make this. Also you need to fry it accordingly for long if you are using big holed ones.
  5. If the deep fried sev is absorbing more oil which means that the amount of hot oil you added is more in the recipe and if the deep fried sev is dry which indicates that you have added less hot oil in the recipe while kneading the dough.
kara sev

Check out my complete collection of recipes for Gokulashtami here.

Also check out the wide collection of Diwali Sweets Recipes and Payasam/Kheer Varieties.

Technorati Tags: , , , , , , , , ,

Monday, August 26, 2013

Paal Payasam Recipe | Gokulashtami Recipes | Rice Kheer

paal payasam
Paal Payasam is one of the most important offerings to Lord Krishna for Krishna Jayanthi. My mom usually prepares it by boiling the rice in milk over stove top which is very time consuming but it adds a nice creamy taste to the kheer. I have already posted that version of Paal Payasam prepared on stove top earlier. This time I am posting a quick recipe for Paal Payasam using pressure cooker method and also by giving a small twist by adding chana dal. We do make another kheer variety with Rice and Chana dal combination with the base being coconut-khus khus mixture which is a very thick and creamy kheer- I would post it some other time. My MIL makes a similar version of kheer(rather you can say halwa as the texture would be very thick) in North Indian style where she uses basmati rice and pressure cooks it in more quantity of milk for longer duration until it forms like thick mawa, I am yet to post this in my space. It seems like my recipe list to post is never ending.
rice and milk kheer
Coming back to today's post -  Paal Payasam with Rice and Chana dal, if you want you can avoid chana dal and follow the same recipe but the addition of chana dal adds a nice bite to the kheer. We have a tradition to prepare this Paal Payasam for house warming using the milk which we use for the milk ceremony and is considered good for us.
rice kheer

If you have not decided your menu for Sri Krishna Janmasthami which is nearing , go through my
Gokulashtami recipe collection, it might be helpful to you. For quick reference I would suggest you to try any of these following quick recipes:
rice and milk pudding

Paal Payasam with Rice and Chana dal Recipe:
Serves 3-4
Prep time:10 mins | Cooking time: 30-40 mins | Total time: up to 1 hr + soaking time
Cuisine: Karnataka - India | Category: Kheer - Sweets

Ingredients:
1/4 cup Basmati Rice
1/4 cup Chana dal(optional)
1 litre thick whole cream Milk
1/2 cup Sugar, approx.
1/2 tsp Cardamom powder
8-10 Cashew nuts, slit
2 tbsp. Raisins(optional)
1 tbsp. Ghee

Method:
  • Wash and soak chana dal for half an hour. You can avoid chana dal in the recipe.
  • Clean the basmati rice and keep it ready. You can either pulse it slightly or use the whole basmati rice as it is.
  • Heat 1 tsp ghee in a cooker or thick deep pan and dry roast basmati rice slightly until the moisture evaporates and add chana dal and 1.5 cups of milk roughly and pressure cook for 2 whistles. If you are cooking directly in the pan, it takes quite longer but you need to add more milk for cooking it.
  • Once the pressure drops you can add remaining 3- 3.5 cups milk and sugar and let it boil on low flame for 12-15 mins. The kheer thickens slowly and it also would become thick as it sits, so make sure you switch it off accordingly.
  • Meanwhile heat remaining 2 tsp ghee in a pan and add cashew nuts and fry them until they turn golden color and remove them and keep aside. Add Raisins and fry until they bulge and remove them as well.
  • Just before removing it from stove add cardamom powder and fried cashew nuts and raisins and mix well.
Serve it warm, hot, cold or at room temperature.
paal payasam

Notes:
  • Chana dal is optional in the recipe, but it adds nice bite to the payasam. Give it a try with chana dal its nice.
  • You can even add saffron strands soaked in milk to the kheer at the end which will give a nice saffron color to the kheer.
  • The addition of nuts and raisins is again optional, but for me any kheer is incomplete with out nuts.
  • If you are short of time you can pulse basmati rice in mixer so that it can be cooked faster. If you have rice rava you can even use it.
  • Basmati rice adds a nice flavour to the kheer, hence I suggest to use basmati rice for this kheer. But you can use any rice variety also.
Wishing you all Happy Krishnashtami in advance!!
paal payasam

Sunday, August 25, 2013

How to make Paneer | Home made Paneer (Cottage Cheese)

homemade paneer
How many of you make Paneer at home regularly?
Well,I know many of you would be doing it regularly but I should admit that I do not prepare it regularly but I do it when needed. It is not that we do not eat paneer dishes often, I prepare paneer based dishes at least once a week - such is our love for paneer. The reason why I do not make at home regularly is that we get very good quality of Malai Paneer in Mumbai and apart from that, we do get flavoured Paneer like Jeera Paneer, Chili Paneer, Masala Paneer to name a few. So every time I do my grocery shopping I usually pick up a block and just prepare delicious paneer based recipes. Sometimes it happens that I would not have planned ahead and the situation arises to make fresh paneer at home and then I usually prepare at home.
'Paneer' is also known as 'Cottage Cheese' and is used in various curries, gravies, starters, sweets, snacks, pulaos etc.One should break the myth that preparing paneer is difficult or we cannot make soft paneer at home. It  is very easy to prepare paneer at home with very few steps, just follow the instructions carefully and I am sure that you would love the freshness of home made Paneer. After all anything home made is always better.This is a very basic process I am mentioning here with more details keeping in mind the beginners in cooking. Also do not forget to check the notes for the tips and variations in making paneer.
how to make paneer

If you are looking for some basics in cooking, even these posts might interest you:
Home made Paneer (Cottage Cheese) Recipe:
Yields 200-250 gms Paneer approx.
Cooking time:10 mins | Standing time: 40-45 mins | Total time: 1 hr
Cuisine: Indian | Category: Kitchen Basics
Materials needed: sieve, cheese/muslin cloth, vessel, heavy weight

Ingredients:
1 litre Whole Milk
1/4 cup Curd(Yogurt) or 1-2 tbsp. Vinegar or juice of 1 Lemon

Method:
  • Bring milk to a boil in a deep vessel. Mean while whisk the curd and keep it ready. If you are adding lemon juice extract the juice and keep it ready.
  • Once the milk rises to the top lower the flame and add curd or lemon juice or vinegar and mix it immediately with a spoon. The milk would start curdling, if it does not curdle enough add some more curd or lemon juice to it and keep stirring so that the curdled milk would not coat the pan. Once the milk curdles completely, you would see a lump of crumbled paneer separating from the slightly yellowish- light greenish liquid. At this stage switch off the stove.
  • Line a sieve with a muslin or cheese cloth and place a vessel underneath to collect the whey.
  • Pour the curdled paneer on top of the cloth and let all the whey strain through.
  • Bring the edges of the cloth together. At this stage you can hang it up to half an hour, I usually do not hang and I usually let it sit on the strainer for 10 mins roughly. Do not throw the whey, you can use it to knead the dough for rotis or use it to thinner your dals etc.
    whey,separated from milk
  • Place the cloth with paneer upside down on  plate (the extra cloth folded would be towards the plate so that you would get even surface on one side). See the pictures for better idea.Place a heavy weight on top of it. I used my marble roti maker and placed a steel vessel filled with water on top of it.
  • Let it rest for 30-45 mins based on the time limit you have. I usually do not suggest you to keep more than this as it will make paneer bit hard. This much time is more than enough for paneer to hold in the shape of a block.
  • Remove the paneer from the cloth and cut off the edges so that you would be remained with a square block. Cut them into shapes as required.
Use Paneer as required in curries, gravies, pulaos, snacks etc.

Notes:
  1. It is best to use the paneer fresh.If you want to store the paneer for 2-3 days, immerse the block in water and store it in refrigerator in an air tight container and change the water daily.
  2. Do not boil once you see the light greenish colored whey separated from paneer as it will make the paneer hard later once it is set.
  3. Do not throw the whey, as I mentioned you can use it to make atta or to thinner your dals or gravies. You can even use to curdle the milk, this is supposed to be a better way to curdle milk.
  4. The usage of whole milk makes the paneer soft, how ever you can use regular milk and still get decent paneer.
  5. Just in case if you find that your paneer is not very soft and it is bit hard , immerse it in warm water for half an hour. Paneer would definitely soften and is ready to use.
  6. You can pep up the paneer to spicy paneer or flavoured paneer by adding 2 tsp of cumin seeds while curdling the milk to make Jeera Paneer or you can add a mix of 2 tbsp. chopped coriander leaves along with 1 tsp of cumin seeds and 1/2 tsp of finely chopped green chillies to make Masala Paneer. You can even add 1/2 tsp of red chili flakes while curdling to make spicy chili paneer.

    home made paneer

Friday, August 23, 2013

Karam Gavvalu Recipe | Krishna Jayanthi Recipes | Janmashtami Recipes

karam gavvalu
Gavvalu is a unique snack native to the region of Andhra.Gavvalu in Telugu means Shells, as they resemble the shape of shells , this snack got its name as Gavvalu.There are two variations to this recipe - one is the sweeter version and the other is the spicy version. The sweeter version is basically where the plain dough is rolled to the shape of gavvalu and deep fried and dipped in sweet sugar syrup whereas in the spicy version red chili powder is added to the dough itself and rolled into gavvalu and deep fried. I love both the versions - sweet and spicy and today I would share the spicy version of Gavvalu. Gavvalu is a favourite to Lord Krishna and is a very good item to prepare for Gokulashtami(Janmashtami).
Also check out other Janmashtami recipes here for more ideas.
kaaram gavvalu
One need to have a Gavvalu Peeta(Chekka) which is a serrated wooden board specifically designed for this purpose. But if you do not have it you can use either a new comb or back side of a big fork to prepare this. This takes lot of time to prepare as the process of rolling them into small rounds and them rolling them again on the gavvalu peeta to attain the shape of it. One needs to be patient to prepare this or if you have some one to help it would be easy to prepare. You can try with a small portion initially if you want to give it a try. Usually it is prepared with a mix of maida(plain flour) and rice flour but my mom uses chiroti rava(a finer variety of rawa) as it makes these gavvalu more tastier and crispy. However I mentioned few pointers in the notes,please go through before you prepare them and adapt the recipe as per your requirements. These Gavvalu are quite addictive and I would like to warn you ahead that you would finish the whole batch soon once it is prepared.
karam gavvalu
karam gavvalu

Karam Gavvalu | Spicy Gavvalu Recipe:
Shelf life:15-20 days
Prep time: 25-30 mins | Cooking time: 20 mins | Total time: 45-50 mins
Cuisine: Andhra | Category: Snacks/ Savouries

Ingredients:
1 1/2 cups Homemade Rice flour
1 cup fine Chiroti Rava(or regular sooji, see notes)
1/2 cup Maida(plain flour)
1 big ladle(4 tbsp roughly) hot Oil
2 tsp Red chili powder
Salt to taste
Oil, to deep fry

Method:
  • Mix Rice flour, maida and chiroti rawa in a bowl.
  • Add red chili powder, hot oil and required amount of salt to the flour mixture and mix well.
  • Add water slowly and knead it into a slightly stiff dough.
  • Leave it aside for 15-20 mins.
  • Pinch a small portion of it and make into very tiny balls and arrange them on a kitchen napkin or on a plate.
  • Now roll it on the serrated gavvalu mould or a new comb or a big fork as shown in the picture.This process is bit time consuming to make in large portions. It is bit easy if you have the gavvalu chekka(wooden mold) , if you do not have it use the back side of the fork or a clean comb. Apply oil to the comb initially so that the dough would not stick to it. Arrange them on a plate before frying. Prepare all the gavvalu before you fry as the rolling process takes time. If you do not have patience to roll them in the shape of gavvalu you can deep fry the small rounds as they are, even they taste delicious.
  • Meanwhile heat oil in a kadai for deep frying. Add the prepared gavvalu and deep fry them on low-medium flame until they are crisp and golden brown in color. Do not over load the kadai with more balls at once, deep fry them in small batches. If you fry them on HIGH flame they would get burnt outside and remain uncooked inside.
  • Drain them in a kitchen napkin.
Store them in air-tight container and serve them along with a tea/coffee or munch them as they are.

Notes:
  1. Chiroti rawa(very fine variety of rawa also called as Holige rawa) makes these balls very crisp and also have nice texture. If you do not get it you can use normal rava,just pulse it in mixer for a couple of times and use it in the recipe.
  2. You can replace chiroti rawa with maida if you do not get it. But the chiroti rava makes it more crispier.
  3. You can even add a tbsp. of sesame seeds to the dough. It adds to the taste.

Thursday, August 22, 2013

Mushroom Biryani Recipe | Mushroom Recipes

mushroom biryani
Biryanis are always considered special at my place be it a Vegetable Biryani or Mushroom Biryani.The preparation of Dum biryani takes a lot of time and hence I usually make it for some special occasions and I always prefer making biryani in a simple way. While its simple to make it still requires lot of preparation work including marinating mushrooms or vegetables.Yes!! you read it correctly, I marinate the mushrooms or vegetables before I make biryani.This process not only makes the vegetables/mushrooms absorb the flavours beautifully but also make the biryani more tasty.I always prepare Biryanis in large quantity so that we can eat the same for lunch as well as dinner,so it is actually worth the effort.
mushroom biryani
I have posted a Veg Dum Biryani recipe long back using a ready made biryani masala. That post always reminds me to prepare and post the Veg Dum biryani in a typical way but I plan to post them some other time.Today I am posting an aromatic one pot Mushroom Biryani recipe.Biryani makes a perfect one pot meal when served with raita and papad.
mushroom biryani

If you are interested check out my Vegetable Dum Biryani and Baby Potato Biryani recipes which I posted earlier.
mushroom biryani

Mushroom Biryani Recipe:

Serves 2
Prep time:45 mins | Cooking time:45 mins | Total time:1.5 hrs
Cuisine: Indian | Category: Biriyani-Main Course
 
Ingredients:
1 heaped cup Basmati Rice
200 gms(12-15) white button Mushrooms
1+1 large Onions,thinly sliced
few Saffron strands,soaked in 1 tbsp milk
1" Cinnamon,torn into pieces
3-4 Cloves
1 Star anise
2 Bayleaves
2 Green Cardamom ,slit
1 tsp Shahi jeera
1.5 tbsp Oil
1 tbsp ghee/Butter
 
to grind:
2 medium tomatoes
1/4 cup Mint leaves
1/4 cup Coriander leaves
3-4 Garlic pods
3/4" Ginger
3-4 Green chillies
1 tsp Fennel seeds(Saunf)
 
to marinate:
3 tbsp thick Curd
1/2 tsp Turmeric powder
1/2 tsp Red chili powder
1/2 tsp Home made Garam masala
1 tsp Coriander powder
1/2 tsp roasted Cumin powder
a handful of Mint leaves,torn
a handful of Coriander leaves,torn
Salt to taste
 
Method:
  • Clean mushrooms nicely,I usually rub the mushrooms with flour to remove the excess dirt and wash them and pat dry them.Trim the stalks and cut the mushrooms into 4 slices. Do not cut them very thin.
  • In a big bowl whisk curd and add all the ingredients mentioned under 'to marinate' and mix nicely.
  • Add sliced mushrooms to the yogurt mixture and mix gently. Let it marinate for half an hour.Give a gentle mix once in between while it is marinating.
  • Grind chopped tomatoes with the rest of the ingredients mentioned under 'to grind' to a smooth paste.
  • Wash and soak basmati rice in water for 10-15 mins. Drain the water from it and keep it ready.
  • Heat oil and ghee in a kadai(or pressure cooker in case if you want to pressure cook) and add shahi jeera followed by cinnamon, cloves, slit cardamom, star anise and bay leaves and fry them for a minute.
  • Add thinly sliced onion(of 1 onion thinly sliced) and fry well. You can add a pinch of sugar or salt to let them caramelize faster.
  • Once they turn slight brown in color add ground paste and fry well until the masala does not stick to the pan. This would take 4-5 mins.
  • Add marinated mushrooms with all the mixture and fry them for 3-4 mins until the mushrooms start leaving the water and slightly become tender. If needed saute for some more time.
  • Add soaked and drained basmati rice and fry well for 2-3 mins. Do this process gently by not breaking the rice granules.
  • Add saffron strands soaked in warm milk to the mixture and also enough salt. Remember that we have added some salt in the marinade,so add accordingly.
  • At this point you can follow any of the following 3 methods.
  • option-1:If you are using pressure cooker you can add 1 and 3/4 cups of water and pressure cook it for 1 whistle and simmer it for 5-6 mins.
  • option-2:If you want to prepare in kadai add 1 and 3/4 cups of boiling water and cover it and cook for 10-12 mins until done.
  • option-3:Transfer all the rice mixture into the rice cooker and add 1 and 3/4 cups of hot water and cook it until done.I always follow this process while making pulaos and biryanis as they come out perfect in rice cooker.
  • Do not get tempted to open the lid immediately after it is done. Leave it for 10 mins,this helps the rice to absorb all the flavors and stay fluffy.
  • Meanwhile heat oil in a kadai and deep fry sliced onions(of 1 onion thinly sliced) until they turn crisp.If you want to avoid deep frying you can even caramelize in little quantity of oil.Add 1 tsp of sugar while you are caramelizing the onions,it makes the process quicker.
  • Using a fork fluff the rice gently.Add caramelized onions and gently mix.
Serve it hot with Raita and papad,I served it with Baingan Raita.
Biryani tastes best if it sits for sometime, so if you are willing to serve it later reheat it and serve.
mushroom biriyani
Notes:
  1. I used water to cook the rice in the recipe,if you wish you can even substitute half the quantity with coconut milk in the recipe.
  2. The addition of all the masalas and mint leaves lend a nice flavor to biryani,so do not miss them.
  3. Use good quality strong Garam masala,if you use store bought one increase the quantity accordingly.
  4. Mushrooms absorb the flavors better when marinated. So try to marinate it at least for half an hour by then you can finish other preparation process.
  5. In order to clean mushrooms you can remove the thin layer over the mushrooms using a sharp knife or you can even rub the mushrooms with maida or rice flour to remove the excess dirt. Always wipe the mushrooms with a dry towel before it is added to the recipe, this way the mushrooms will not shrink much.
mushroom biriyani
If you are interested check out other Mushroom recipes in my blog.

Tuesday, August 20, 2013

Chivda Recipe | Thin Poha Chiwda | Janmashtami Recipes

chivda
Poha Chivda is a very common and popular snack in Maharasthra and Karnataka.It is a low fat snack and also is very easy to prepare at home.It is a weekly affair for me to prepare some low fat snacks which I can pack for TH and also for me to munch along with my tea and this Poha Chivda fits the bill.I prefer to prepare Chivda varieties like Sago Chivda, Poha Chivda, Murmur Chivda over the deep fried snacks for our regular snacks as they are less in fat content. As it is poha chiwda you can try this for Krishna Janmashtami festival which is nearing by.
low fat chivda
Poha Chivda(Chiwda)can be prepared in two ways, one variety is prepared with the thick poha variety which is deep fried and mixed with various deep fried nuts and spices.The other variety is prepared with the very thin poha variety almost of a paper thickness,which is just roasted along with the nuts and spices.I like to add lots of dry fruits like cashew nuts and raisins which makes it even more delicious.While the addition of saunf(fennel seeds) in the tempering is optional for chivda I prefer to add it as I like the refreshing taste it gives to chivda. You can even jazz up the chiwda with kala namak (black salt) and chaat masala for a variation, today I am posting a basic chiwda recipe.Sometimes I eat it for breakfast by topping it with a ladle of curd mixed with spices and finely chopped onions.If you have not tried your chivda like that, try it, its tasty and makes a simple chaat too.
poha chiwda

Check out various Chivda  and Low fat Snack varieties in my blog here.
Also check out the complete list of recipes for Sree Krishna Janmashtami here.

chivda

Thin Poha Chivda Recipe:
Shelf life:1 month
Prep time:5 mins | Cooking time:25 mins | Total time:30 mins
Cuisine:Maharasthrian-India | Category:Snacks

Ingredients:
5-6 cups very Thin Poha(Chivda poha)
12-15 Cashew nuts,split into halves
1/3 cup Ground nuts
1/4 cup Fried gram(Chutney dalia)
1/4 cup thin Dry Coconut slices
1/4 cup Raisins
8-10 Green chillies
20-25 Curry leaves
1/2 tsp Turmeric powder
1/4 tsp Lemon Salt(Citric acid crystals)
1 tsp Sugar(optional)
2 tsp Fennel seeds/Saunf(optional)
1 tsp Cumin seeds
1 tsp Mustard seeds
2-3 tbsp Oil
Salt to taste

Method:
  • Wash and pat dry green chillies and curry leaves.Cut green chillies into very thin long strips.
  • Dry roast poha in a big kadai on low flame for 3-4 mins until it is crisp.Remove it to a wide dry bowl.Alternatively you can keep it in sun for 2-3 hrs.
  • Heat oil in a kadai and fry ground nuts, cashew nuts, dry coconut slices, thinly slit green chillies , curry leaves , fried gram and raisins separately.Fry each variety separately until done and then remove with a slotted spoon and add to the roasted poha.Deep fry the raisins until they just bulge,do not fry them for long otherwise they will become tough.Deep fry the green chillies until they are crisp and also they should maintain their green color.
  • Now in the same oil crackle mustard seeds,cumin seeds and fennel seeds and remove the kadai from the flame and quickly add turmeric powder, salt, lemon salt and sugar to the oil and mix and add all the fried ingredients along with roasted poha and return the kadai back on the burner and mix it nicely until it is mixed.Taste it and adjust the seasoning if required.Switch off the flame.
  • Let it come to room temperature and then store it in air tight container.You can store this upto a month.
Serve chivda as a snack with a cup of tea/coffee.
poha chivda

Notes:
  1. If you like it slightly chatpata, you can add 1/2 tsp Kala namak(black salt) and 1 tsp Chaat masala along with turmeric powder to the oil.
  2. I prefer to roast each ingredient separately as each ingredients take different time to get roasted.So in this way they get roasted perfectly.
  3. Always dry roast poha on a very low flame otherwise they will shrink and loose their shape.
  4. You can replace poha with murmur(puffed rice) and follow the same process to make Murmur chivda.
  5. The addition of fennel seeds give a refreshing taste to chivda,if you do not like it you can skip it.
poha chivda
 
back to top