Monday, July 26, 2010

Ridge Gourd Peel Chutney /Beerakaya pottu(thokku) pacchadi

Andhra Pradesh is known for the fabulous pacchadi's which are prepared freshly with different kind of vegetables.These pacchadi's taste best when they are pounded in stone mortar and pestle which probably our grand parents and parents would have used.Now a days the usage of those stone one's are restrained only to the villages and some of the few house holds in cities.Many of us discard the peels of ridge gourd while cooking but infact those peels can be used to make this yummy pacchadi.So let us peek into the recipe to see how simple it is to make.

Ingredients:

2 large tender ridge gourd
5-6 dry red chillies
2 tsp urad dal
1 tsp chana dal
1 tsp jeers
2 tsp tamarind pulp
2 tsp oil
salt to taste

for Tadka:
1 tsp ghee/oil
1/2 tsp mustard seeds
a pinch of hing
1 red chili, broken
3-4 garlic pods
7-8 curry leaves

Method:
  • Peel the outer skin of ridge gourds and use the chopped ridge gourd pieces for other preparations like making dal,kootu,pacchadi etc.Check the taste of it as sometimes the ridge gourd can be bitter too,if it is bitter its better to discard it and use another one.
  • Heat a tsp of oil in a pan and add ridge gourd peels and fry until they are tender and keep it aside until it cools.
  • Heat again a tsp of oil in the same pan and add chana dal,urad dal,jeera and fry until turn slight red in color.
  • Add red chillies and fry again and add tamarind pulp at the end and switch off the flame.
  • Grind the fried dal's.red chillies along with tamarind pulp and salt to a slight coarse powder.
  • Now add the fried ridge gourd peels and blend in whipper mode to a coarse paste.Do not grind it to a fine paste.
  • Heat ghee in a small pan and crackle mustard seeds and add garlic pods,broken red chili,curry leaves and hing and fry well and add to the ground paste.
Serve it with hot rice,ghee and papad.

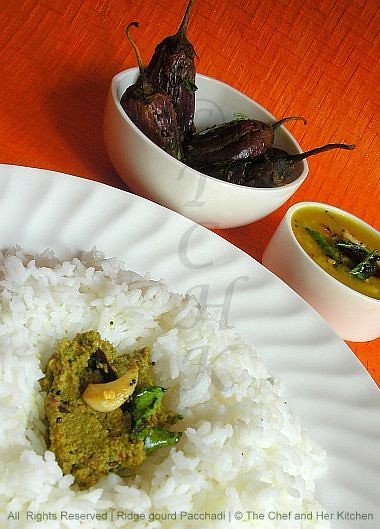
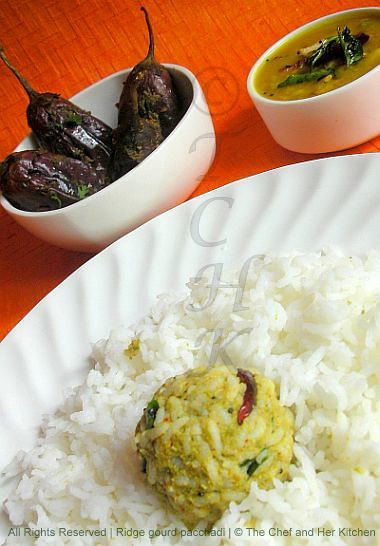
In the above photo you can see the rice ball made with the prepared pacchadi with a dollop of ghee and in the background you can see ridge gourd dal and vankaya kotthimeera karam(stuffed brinjal with coriander) which I will try blogging them soon too.

Notes:

  1. You can follow the same method and prepare the pacchadi with bottle gourd peels and ridge gourd pieces and skipping the peels of ridge gourd.
  2. For a Vegan version use oil instead of ghee for tempering.

Thursday, July 22, 2010

Masala Jolada Rotti

Jowar is one of the most healthiest grains which we should include in our diet.Making Jolada rotti seems very difficult for many people and even I used to find it difficult during my earlier stages of cooking.But with some tips which I learnt from my mom,now I can make very decent jolada rotti even though I have not not mastered still in making it.I will try posting karnataka's the most famous Jolada rotti soon.The speciality of this masala jolada rotti is even a beginner to the kitchen can also make it very easily and enjoy the more tastier version of regular jolada rotti.When I posted Akki Rotti many of you liked and tried my version of akki rotti and thanked me for the tips I have shared there,if you want to expertize yourself in making these rotti's please go through the tips I mentioned here and I am sure you will definitely surprise others with the flaw less crispy and tastier rotti's.You can make this with only jowar flour and avoid using wheat flour,still it comes nice.But addition of little wheat flour in it even the beginners can prepare it without any difficulty.

Ingredients:
1 1/2 cups Jowar/sorghum flour
1/4 cup wheat flour(handful and optional)
3/4 cup grated bottle gourd
1/2 cup finely chopped onions
2 tsp green chilli paste
1 tbsp white sesame seeds
1/4 cup chopped coriander
1 tsp jeera(optional)
salt to taste

Method:
  • Take a wide bowl and mix Jowar flour,wheat flour and salt.
  • Add grated bottle gourd,chopped onions,green chilli paste,coriander,jeera,sesame seeds and mix well until the mixture is completely moistened by the water from bottle gourd and onions.
  • Now add some warm(to medium heat) water if required and mix well until you get the dough similar to the akki roti dough and rest the dough for 10-15 mins.You can even use it immediate if required.
  • Take a handful of dough and make it into round balls of Orange size.
  • Smear the Rotti tawa(Non-stick/normal dosa pan) with little bit of oil all over the tawa and place the rotti dough in center and press it gently with hands and spread into a thin layer by rotating the pan and by immersing the hand in a bowl of water in between which helps in patting the dough evenly and smoothly on the tawa.Make it as thin as possible.do not bother if small gaps are there,that makes the rotti even crispier.
  • Pour little oil over it and cover it with a lid and place it on fire on medium flame.Let it cook for 2 mins.Keep an eye on it to check in b whether it is done or not.Once you see the red patches started forming increase the flame and cook it.Try to rotate the tawa inorder to get an evenly roasted rotti.No need to turn it on the other side.
Serve this right off from the flame and on to the plate with a dollop of fresh white butter and some Thokku(smashed pickle type generally made up of either mango or tomato) and masala dahi.
I served it with Lobia Curry.

Variations:
  • Grated Carrot/Bottle gourd/Cucumber/Beetroot/fresh coconut can be added to the above mixture according to our taste.
  • Greens like Mint/Coriander/Dill leaves/Spinach can also be added according to our taste.
Note:

For more tips to make good rotti and to make different varieties of rotti's check here.

Monday, July 19, 2010

Moong Sprouts Salad

Sprouts are very healthy as it contains more nutrients when compared to other foods and is very essential to include them in our daily diet.Many people do not like sprouts because of the raw smell, but when they are mixed with lots of vegetables and fruits and is mixed well with a sweet and spicy dressing the salad will be very tastier and one can hardly make out the rawness of those sprouts.This is one of the regular variety of sprouts salad which I make at home for breakfast.This sprouts salad goes to the event 'Let's Sprout' hosted by priya and also to siri's "My Legumes Love affair(MLLA) # 25" started by Susan.

Ingredients:
1 cup fresh moong sprouts( I used 1/2 cup moong and 1/2 cup matki/moth sprouts)
1/4 cup finely chopped cucumber

1/4 cup sweet pomegranate kernels

1/4 cup finely chopped/grated carrot

1/4 cup finely chopped tomatoes

2 tbsp finely chopped onions

2 tbsp finely chopped raw mango pieces

1 tbsp chopped walnuts

1 tbsp chopped dried apricots or dates or raisins

1/4 cup chopped fresh coriander


for the dressing:
3-4 finely chopped/minced green chillies
1/2 tsp grated ginger(optional)
1/4 tsp chat masala
generous drizzle of lemon juice

few drops of honey(optional)

salt to taste


Method:
  • Take a wide deep bowl and add the sprouts,carrot,raw mango,tomato,onion,cucumber pieces and mix well.
  • Add chopped walnuts,apricots,coriander and mix well.
  • For the dressing take a small bowl and squeeze in the juice of one lemon and add salt,3-4 drops of honey,chat masala and mix well.Add grated ginger and minced green chillies and mix well.
  • Add the dressing to the sprouts mix and mix well.
Serve it fresh or keep it in refrigerator for 15 mins and serve cold.

Verdict: Clean bowled a bowl of salad within few mins.

Variations:
  • You can avoid onions,honey,ginger in the above salad and add grated coconut instead and also add a tadka of mustard and hing to the salad.
  • You can even add raw soaked groundnuts,chopped fresh grapes,sliced oranges/mosambi for different flavors.

Friday, July 16, 2010

Coconut Poha...Kobbari Atukulu

Poha recipes comes to rescue when nothing is planned in advance for breakfast as they are very simple and hardly takes 15-20 mins to prepare.This is another variety of poha which we prepare at home very often and is equally tasty as the Atukula upma and Gojju avalakki .This is prepared especially on festivals as it does not include any onion and garlic.Even I prepared this long back during a festival (I don't remember which one it was) and also prepared Hayagreeva as a sweet which you can see in the background.Coconut poha has a mild taste and a mix of coconut,cashew and groundnut pieces with a hint of lemon makes it more tastier.If you have not tried this before give it a try,I am sure you will love the simplicity of this poha.

Ingredients:

2 cups poha/flattened rice/Atukulu
3/4 cup grated fresh coconut
7-8 green chillies,thinly sliced
2-3 red chillies,torn roughly
2 tbsp chopped cashewnuts
2 tbsp ground nuts
1 tbsp chana dal
2 tsp urad dal
1/2 tsp mustard seeds
a sprig of curry leaves
juice of 1 lemon
2 tsp chopped coriander
2 tbsp oil
salt to taste


Method:

  • Clean and wash poha in running water once or twice and remove all the water from it and leave it aside for 10 mins until it is soft.Check it in between and if required sprinkle few drops of water over it.
  • Heat oil in a kadai and crackle mustard seeds and add groundnuts and fry until they are red in color.
  • Add cashewnuts,chana dal and urad dal and fry until they turn golden brown and then add curry leaves,green chillies,red chillies and fry for 1-2 mins and then add half the grated coconut and fry for a minute.
  • Add soaked poha,remaining grated coconut and salt to it and mix well and cover it with lid an dcook for 2 mins over low flame.
  • Add lemon juice and chopped coriander to it and mix well.
Serve it hot with some chips/fryums.

Wednesday, July 14, 2010

Gobi Mutter/Matar Sabzi


I know that I am very irregular with this space as I am occupied with other things these days. But seeing the updates from our fellow bloggers I pushed myself to post this even thought not much of cooking is happening in my kitchen other than the usual stuff.I have so many pictures lying in my folder which I will try posting them for a couple of weeks until I come back to my regular routine.
And coming to today's recipe,I need not to exaggerate this very simple Gobi matar sabzi as its very common in most of our house holds.The combinations for this curry can be left to our imaginations like Alu-gobi,gobi-mutter,alu-mutter,alu-gobi-mutter,alu-babycorn, babycorn-mutter etc etc and even the mushroom's can be included for thes kind of curries.

Ingredients:

1 medium cauliflower,cut into thin florets
1 cup fresh/frozen green peas
1 onion,roughly chopped
2 small tomatoes,finely chopped
1 tsp Ginger-Garlic paste
2 tsp red chilli powder
1 tsp coriander powder
1/2 tsp jeera powder
1/2 tsp amchur powder or juice of 1 lemon
1/2 tsp Garam masala
1/2 tsp kitchen king masala(optional)
2 tsp chopped fresh coriander
1/4 tsp kasuri methi,slightly crushed
a pinch of turmeric powder
1/2 tsp jeera/cumin seeds
1 tbsp oil
salt to taste


Method:
  • Blanch the cauliflower florets and green peas separately in salted hot water for few mins until tender and remove them.Do not over cook them.
  • Heat oil in a kadai and crackle cumin seeds and add ginger garlic paste and fry for sometime.
  • Add chopped onions and fry until its translucent and add tomatoes and fry until they are soft and mushy.
  • Add all the masala powder's,turmeric powder and fry for some time.
  • Add blanched gobi florets,peas and slightly crushed kasuri methi and mix well and cover it and cook for 5-7 mins until all the masala's are incorporated.
  • Add finely chopped coriander and remove it from stove.
Serve it hot with roti/chapthi/rice/jeera rice.

I made these small chapthy's to fit in my hubby's lunch box,so thought of taking photo with them.

Monday, June 28, 2010

Dill-Dal Stir fry/Sabsige Soppu Palya and Rasam

It is always confusing for me what to cook for lunch and dinner daily because of the limited variety of vegetables and greens available here.Dill leaves is one of the greens which are abundantly available here but I rarely cook them at home.My mom makes excellent stir fry with the dal and greens mixture which is surprisingly very dry and complements well with both rice and roti.I like to eat this stir-fry especially with roti as it complements very well with it.Even the rasam which is made up of this mixture is very simple and flavorful and the meal with both the stir fry and rasam is simply yummy.If you like the flavor of dill leaves you will definitely like this combo,give it a try to believe my words.

Ingredients:
1 bunch Dill leaves
1 cup toor dal
1 big onion,chopped
1 tsp green chilli paste
1 tbsp thick tamarind pulp
1 tsp sambar powder
1/2 tsp grated jaggery/sugar
1 tsp chana dal
1 tsp urad dal
1/2 tsp mustard seeds
salt to taste

Method:
  • Pressure cook dal and dill leaves for 1 whistle.Do not cook more otherwise the dal becomes mushy.You can even cook this on stove top until the dal is cooked slightly.
  • Strain the water from the above dal-dill mixture and squeeze out the extra water from it.Save the water which is strained and sueezed fom this mixture for making rasam.
  • Heat oil in a kadai crackle mustard seeds and add urad and chana dal and fry until golden in color.
  • Add finely sliced onions and green chilli paste and fry until they are light brown in color.
  • Add the squeezed dill leaves-dal mixture to it and fry for a minute.
  • Add tamarind paste,jaggery,sambar powder,salt and fry until the mixture is dry and all the masala's are well blended.
Serve it hot with rice/chapathi/roti.

Note:
Adjust tamarind,jaggery and spicyness according to your taste.


Dill flavored Dal Rasam :


Ingredients:
2-3 cups of water strained from dill-dal mixture(cooked above)

1/4 cup cooked toor dal(optional)
2-3 tbsp tamarind pulp
1 tsp jaggery
1 1/2 tsp rasam powder/sambar powder
salt to taste

for Tadka:
1 tsp oil/ghee
1/2 tsp mustard seeds
a sprig of curry leaves
a pinch of hing

Method:
  • Heat the water along with the cooked dal and add tamarind pulp,salt, jaggery,rasam/sambar powder to it and boil properly.
  • In a small tadka pan heat oil/ghee and crackle mustard seeds and add curry leaves,hing to it and add the tadka to the boiled rasam and cover it with lid.
Serve it hot with rice and papad.

Tuesday, June 22, 2010

Raw Mango Dal...completely Andhra Style(mamidikaya pappu)

Raw mango dal is one of the few delicious and easy dals which are prepared in Andhra.This dal has a very typical flavor because of the natural sourness of the mango and is complemented well when mixed with hot white rice with lots of ghee and some fry.Here goes the recipe of this simple and yummy dal.

Ingredients:

1 sour Raw mango,peeled and chopped into small thin slices
1/2 cup Toor dal
1/4 tsp turmeric powder
2 tsp red chili powder
salt to taste

for Tadka:
1/2 tsp mustard seeds
1/4 tsp jeera
a pinch of hing
5-6 garlic pods,slightly crushed
2 red chillies
8-10 curry leaves
1 tsp ghee/oil

Method:
  • Pressure cook toor dal mixed with turmeric and mango slices in different containers until the dal and mango pieces are soft.
  • Add the cooked mango pieces to the dal and mash it properly.Add some water to the mixture and let the mixture come to a boil on stove.
  • Add red chilli powder and salt to it and mix well.
  • Mean while in a small tadka pan heat ghee/oil and crackle mustard and jeera and then add smashed garlic pods,hing and fry until they are light brown in color.Add broken red chillies and curry leaves and give a stir.
  • Add the tadka to the dal and mix well and cover the pan wid the lid.
Serve it hot with hot rice and a dollop of ghee(must) wid some fried papad/fritters.

Notes:
  • Always cook dal and mango pieces separately,otherwise dal will not be cooked properly.
  • Add lots of garlic to the tadka,it will give very nice flavor to the dal.
  • If you dont have fresh mangoes,you can even add dried mango pieces to prepare this dal.
  • For a Vegan version use only oil instead of ghee in tempering.

Wednesday, June 16, 2010

Creamy Cauliflower Soup

First of all I would like to apologize for my sudden disappearance and I know its been a very long time that I posted a recipe.These last three months were hectic to us as we were in the process of shifting and was also busy with my parents and inlaws who visited us during the shifting process.Now I got settled down at my new place and I am back to my normal life style and I can promise you guys that I will be active in blogging from now.

In Mumbai the rainy season has started and its pouring like anything from the last few days.Sipping into a hot cup of coffee or a bowl of soup or savoring hot hot pakoda's are few cravings for us to enjoy in this rainy season.Cauliflower is one of my favorite vegetable as it gives a wonderful taste in what ever form it is transformed.The richness of this soup is even doubled by adding cauliflower even though no cream is added to the soup.This is again one of the no fail recipes which I tried from her soup's book.

Ingredients:

1 medium sized Cauliflower
1 big onion,sliced
1 1/2 tbsp butter
1" Ginger
1 Green Chilli
1 tbsp wheat flour
1 1/2 cups Milk
2 tsp Sugar
1/2 tsp pepper powder
salt to taste

Method:
  • Heat butter in a pressure pan and fry sliced onions for 2-3 mins in reduced flame.
  • Add cauliflower florets and continue stirring for few more mins.
  • Sprinkle wheat flour and fry for another one minute.
  • Pour a cup of milk and half cup of water to it.
  • Add ginger and whole green chili to that and pressure cook for 1 whistle in reduced flame.
  • Cool down completely and discard ginger and green chilli pieces and grind the rest into a very smooth paste and pass the same through a sieve.
  • Dilute with half a cup of milk and water .
  • Add enough salt,sugar and let it come to a boil in reduced flame.
  • Sprinkle pepper before serving.
Note:
  • You can serve it hot with grated cheese on top.
  • Discard the ginger piece,otherwise it will create a strong flavor of ginger for the soup.

Monday, April 26, 2010

Eggless Chocolate Banana Bread..a low fat version!!!!!

Hi folks!!!
I am sorry for my sudden disappearance from blogging and not posting regularly and not even doing blog hopping,the reason behind this was just a bit of laziness added after my inlaws visit to our place and then I got stuck with a couple of tasks.
I will try to visit your places soon and will also go through all the yummy posts which I missed.


And coming to today's recipe,I have tried this bread long back almost four months back from priya's blog,and yes you guessed right even these pictures are four months old.The reason behind why I liked that recipe is its low fat version and also a very healthier option as half the portion of refined flour is replaced by whole wheat flour.The recipe was so simple and I absolutely loved this low fat chocolaty and nutty banana bread.


Ingredients:
1 cup All purpose flour
1/2 cup Wheat flour

1/4 cup cocoa powder

1/2 cup Sugar

3 tbsp oil (I used saffola brand )

2 big ripen Bananas

1/2 tsp Baking soda
1/2 tsp Baking powder

1 tbsp Apple cider vinegar

1 tsp vanilla essence

1/3 cup Almonds

2 tbsp chocolate chips

1 cup water


Method:
  • Grease a Loaf pan( 9 x 5 x 3) with butter and dust it with flour evenly or place a butter paper in the pan.
  • Preheat the Oven to 180 deg for 10 mins.
  • Sieve all purpose flour,wheat flour,cocoa powder,baking soda,baking powder all together for 3-4 times until you get a uniform mix of all flours.
  • Grind the almonds to a coarse powder.
  • Mash the ripen banana's into a smooth mixture and add sugar to it and mix well until it melts.You can even grind the sugar to a fine powder and add that to the above mixed dry ingredients.
  • Add oil,water,apple cider vinegar,vanilla essence to the banana mixture and mix well until everything is well incorporated.Use a hand whisker to make this job easier.
  • Add few spoons of dry ingredient mixture and almond powder and fold into the banana mixture carefully.Repeat the process and by using a wooden spoon or rubber spatula mix until the batter is thick and chunky.(Do not over do the process of mixing as that yields in a rubbery bread).
  • Add the chocolate chips which are tossed in 1/2 tsp flour to the above mixture and gently fold into the bread mixture.
  • Gently scrape the batter into the greased loaf pan and place it in the oven and bake at 180 deg for 45-50 mins or bake until the crust is brown and tooth pick should come out clean when inserted.
  • Cool it on the wire rack and slice it and serve.

Note:
  1. You can even add walnuts along with the chocolate chips.
  2. You can even add other dry fruits like raisins,pecans,etc to the batter.

Serving Suggestions:
  1. Toast the banana bread slice and serve it warm with tea.
  2. Apply peanut butter to the toasted slice of banana bread and serve.
  3. Serve it slightly warm(by keeping it in microwave for few seconds) with vanilla ice cream.
  4. Serve it at the room temperature.

Thursday, March 18, 2010

Strawberry Frozen Yogurt(Froyo)....a must do seasonal dessert!!

Strawberries are one of my favorite seasonal fruits which I enjoy eating boxes and boxes of strawberries in this season.I always think of preparing something with strawberries but always end up eating them just like that before they get turned to any other form.So, this time I bought two boxes so that I will definitely use them in making this yummy dessert which I wanted to try from a long time when I saw it here and here .This is a very yummy and easy dessert which does not require any cream and is a very ideal dessert for calorie conscious people.

Ingredients:
1 pound(240 gms) fresh strawberries

2/3 cup(130gms) Sugar

1 cup(240gms) curd/yogurt
1 tsp fresh lemon juice

Method:
  • Tie the yogurt in a muslin cloth overnight(atleast 2-3 hrs) and keep it in the refrigerator to get thick creamy and cheesy yogurt.
  • Roughly chop strawberries and toss them in sugar and keep it aside for 1/2 hr until the sugar dissolves completely and make the strawberries look still red.Toss in between a couple of times.
  • Blend the strawberry mixture and strain it in a strainer.I did not strain as I wanted to enjoy the fruit completely.So,this step of straining is optional to you if you do not like seeds in the dessert.
  • Add lemon juice and hung curd to it and blend again to a smooth mixture.Check the sweetness at this point and add extra sugar if needed according to your taste.
  • Pour the mixture in the ice cream maker and let it run in the freezer until you get thick,creamy and luscious frozen yogurt.The time taken by the ice cream maker depends completely on the brand of the maker but it helps in getting ice free frozen yogurt/ice cream.(If you do not have the ice cream maker,you freeze the strawberry mixture in a plastic box and blend it after it hardens,repeat the process 4 to 5 times until you get ice-free frozen desset.)
  • Remove it from the ice cream maker and store it in a plastic box in the freezer.
Sprinkle some pistachios/ mint leaves on top of the frozen strawberry yogurt scoops and serve it cold.

 
back to top