
 A hidden foodie in me prompted me to give a trial of baking bread some time back but was not successful because of the poor quality of local yeast available here in India.My husband is very fond of freshly baked breads,naan's etc etc which uses yeast in it,so he promised me that he will buy yeast along with other goodies during his next visit to abroad.Thankfully he could manage to pick few boxes of yeast for me during his last visit to Singapore.
In Mumbai every evening the bread waala's knock the doors and delivers fresh bread,buying a loaf of bread is so convenient here that I never thought of baking a simple bread at home,of course I agree freshly baked bread tastes always better.I wanted to make use of the yeast in a more effective way like making goodies which I don't get that easily here in Mumbai.
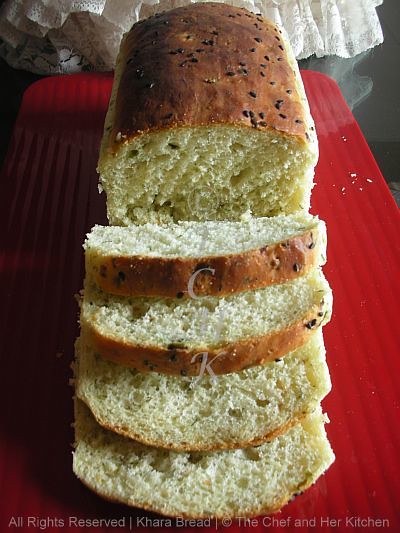
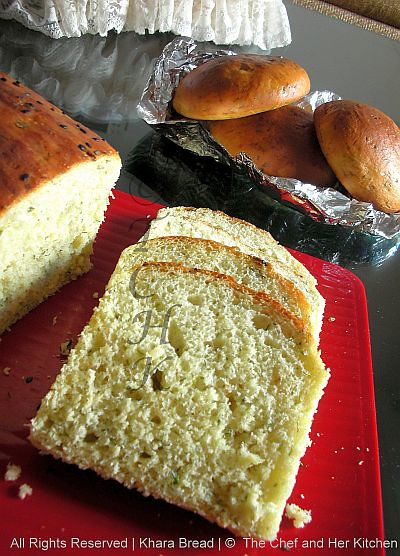
In my earlier post I have mentioned my love for the Iyengar bakery goodies which we get in Bangalore especially their khara bread,khara bun,palya bun,plain cake,toast etc etc.I have made this khara bread some time back by adapting some tips and techniques from here and here and added my personal touch to the recipe.I love the flavor of dill leaves which adds a nice taste to this bread and the bread turned super soft and light.Baking breads has become my latest passion after the successful attempt of khara bread which I have already made quite a lot of times.You will get to see lots of my baking experiments from now on in my blog which are already sitting in my drafts.
 Ingredients:
3 1/4 cups all purpose flour + extra flour while kneading required
2 tsp active dry yeast
1 1/2 tbsp sugar
1 tsp salt
3/4 cup water
1/2 cup milk
2 tbsp olive oil or regular vegetable oil
For the Masala:
1 small bunch dill leaves,finely chopped
1 small bunch coriander leaves,finely chopped
1 big onion,very finely chopped
1 tbsp green chilli paste,coarsely ground
1 tsp cumin seeds
2-3 generous pinches of salt
1 tbsp olive oil or regular vegetable oil
Other Ingredients:
1 tsp black sesame seeds to sprinkle over top
1 tsp butter to brush the bread
1 tsp milk to brush the bread

 Method:
- Microwave water and milk together for 30 seconds until it is luke warm to touch.Pour this into a wide bottomed bowl.
- Dissolve in the sugar and yeast in it and mix thoroughly until dissolved.Leave this aside for 15-20 mins until the yeast mixture becomes frothy.This is the important step in proceeding further to the recipe.If the yeast does not proof throw it and start the process again from the scratch.
- Meanwhile heat olive oil or regular oil in a pan and crackle cumin seeds over low flame and add very finely chopped onion and fry until it is translucent,add a pinch of salt in between to ease the process.Add coarsely ground chilli paste,chopped greens and mix well and stir fry for a minute.Add enough salt to it and do remember that we add salt even to the dough.Keep it aside until the mixture is cooled.
- Stir in the olive oil and salt to the frothy yeast mixture and slowly add cup by cup of flour into it and mix well,I used a wire whisk for this purpose and mix until you get a lump of smooth dough.
- Now put some flour on the broad white board or feel free to use the well cleaned and wiped kitchen platform(like I did) and take the lump in both hands and knead the bread towards you.
- Follow the same method and knead it properly for 10 mins roughly until you get a non-sticky but still smooth dough.Add flour in between when the dough is sticky.
- Now slightly press the dough with your hands to flatten it and keep the masala(fried onion-greens) mixture in the centre and fold it from all the sides like how we do for stuffed paratha's.
- Slowly start kneading again for 12-15 mins until the mixture is very well incorporated in the dough.The dough might become sticky because of the onions,so please feel free to add the flour when required while kneading the dough.
- Cover this place of platform or the board with some cloth or paper as we need to use this place again for kneading.
- Now grease your hands and a empty big bowl with oil and coat the dough with oil slightly and place it in the greased bowl.Cover with a clean kitchen towel and keep it in warm place until the dough doubles almost.It takes almost one to one-and-half hours depending the climatic conditions.I preheated my microwave for 20 seconds and kept the bowl in it.
- After the first rise the dough would have doubled in size,take a knife and cut into two halves for two medium loaves.Otherwise cut into 3/4 and 1/4 th portions to make a big loaf and 4-5 medium sized buns like I did.
- Now again knead the dough gently for 7-8 mins,this process is important as it assures of removing air bubbles formed in the dough.Repeat the process with the other portion as well.
- Shape one portion into a loaf and place it in the greased loaf pan(9"x5").Divide the other portion of dough into 4-5 portion and shape them into buns and place them on a baking tray with space in between.
- Keep them again in the warm place for 45 mins - 1 hour for the final rise.Mean while preheat the oven at 220 degrees for 10 mins when you are about to finish the rising time of bread.
- Brush the top of loaf and buns with milk very gently and sprinkle black sesame seeds over the nicely risen loaf and buns and keep it in preheated oven and bake them at 180 degrees for 15-20 mins until the top portion of the bread turn slightly golden and the bread should sound hollow when tapped the crust with hand.I baked the bread and buns separately as my oven size is small,you should take care when you are baking both the bread and buns at the same time as the buns get baked fast.
- Brush the top of the bread and buns with butter immediately after removing them from oven.This helps in giving the shine to the crust and also makes the crust softer and even the smell of the bread will be nice.
- Run the knife around the edges and slowly remove the bread from the pan and let it cool on the wire rack.
 This goes straight to champa's 'Bake-Off' event,'EFM-Cakes and Bakes' event going on at Srish Kitchen and also to Pari's 'ONLY-Kids' event.

wow..what a soft and delicious bread prathibha...lovely..
ReplyDeleteHy Prathy,
ReplyDeleteBread looks absolutely stunning..so soft n healthy...:)
dill sounds like a great idea in bread
ReplyDeleteThis is so awesome prathiba!...The bread looks so soft and the crust colour is so perfect! Bookmarking this. I still remember the times I used to get this for my grandma for tea. The detailed method is so very helpful...this is a must try!
ReplyDeleteFlavourful bread. Looks perfect.
ReplyDeleteThis is awesome..I love Khara bread,but I am too afraid of the yeast to try it at home!! Perfect colour and even perfect slices!!
ReplyDeleteWonderful!looks soft and perfect!
ReplyDeletePerfectly baked bread dear and I agree with you the yeast you get from abroad gives a better result.
ReplyDeleteFOODELICIOUS
Perfectly made awesome bread...beautiful pics prathibha..loved the recipe too...
ReplyDeleteI love love khara bread..this looks so good..soft, perfect n soooooo professional!!
ReplyDeleteLovely gorgeous bread it is...it's always so satisfying to bake a bread at home...the lovely freshly baked aroma n all..
ReplyDeleteNever heard about khara bread and this masala mix looks great , will make a batch of masala bread next time.
About the yeast i find no problem in finding good fresh yeast here in delhi n have managed to find it in small towns too...you just have to look out for a good bakery n request them for fresh yeast , it comes in 500 gm packs.
The bread looks so soft n spongy ..... absolutely luv this one :-)
ReplyDeleteCheers n Happy Cooking,
Satrupa
http://satrupa-foodforthought.blogspot.com
Wow Pratibha!! Your bread looks wonderfully soft and fluffy! I did not know that the there is a such a huge difference in the quality of yeast available here in India and elsewhere. I must beg, borrow or steal 'imported yeast' somehow:-))
ReplyDeleteA perfectly baked bread...looks so soft and the colour of the crust is awesome!
ReplyDeletewow what asoft bread ...love this masala bread ...bookmarked ur recipe ...thanks for sharing dear
ReplyDeleteSatya
http://www.superyummyrecipes.com
Bread looks beautiful. Buns are good too. Thanks for the entry. It is nice to see people trying to make yeast bread at home since most won't even want to try as it takes time. But I feel it is worth it.
ReplyDeleteThe bread looks so soft, spongy and perfectly baked..adding dill leaves to it sounds like a great idea..thanks for sharing!
ReplyDeleteawesome prathiba! perfectly baked..look so soft..bookmarked..will try & let u know..thx for sharing!
ReplyDeleteWow! yummy yum! looks so delicious dear...am mouthwatering here..lovely pics
ReplyDeletewow the bread looks so soft & wonderful pictures ..........
ReplyDeletelooks beautiful, perfect bread, great
ReplyDeleteBread looks prefect with beautiful texture..awesome crust..
ReplyDeleteWow, such neat slices!
ReplyDeleteso good... thats awesome bread!
ReplyDeletebread looks so soft and yum!!! Great job.
ReplyDeleteLooks super soft and beautiful texture too. My very fav one too..Mouthwatering.
ReplyDeleteThese r called perfect bread.... Yum Yum YUm :)
ReplyDeleteLooks very tempting,sure will go to my To try list :)
ReplyDeleteBread looks soft, yummy and tempting. Very beautifully presented.
ReplyDeleteHi Prathy,
ReplyDeleteMy first time here...lovely explaination!!!!
Great!!!
Sameena@www.myeaytocookrecipes.blogspot.com
What an awesome job prathiba.masala bread looks very soft and clicks are amazing.
ReplyDeletelooks so moist and yummy!!! loved it..
ReplyDeleteSoft and spongy bread...I love most of the items in Iyengar bakeries...:-)
ReplyDeleteabsolutely stunning Prathy.
ReplyDeleteThe masala bread looks divine...can smell the flavour here :) Looks perfectly baked
ReplyDeleteWOW this is must try recipe, bread looks awesome!!
ReplyDeleteBread looks very soft and lovely .I have never tried bread at home .( too lazy)
ReplyDeleteWish you and your family a very Happy Janmashtami.
ReplyDeleteBread looks soft and gorgeous . Home made breads are classic. Looks delicious dear.
ReplyDeletethis is soo nice.. and very bengaluru flava..
ReplyDeleteWOW fabulous bread reminded me backhome,Looks perfect just like bakery ones..
ReplyDeleteLove dill flavor and this looks super.
ReplyDeletegosh! just send the loaf to me. fantastic! great job.
ReplyDeleteit looks so moist and perfect. Im def trying this out. btw have blogged about ur chequered cake which i had made a few months ago...thanks a ton!
ReplyDeleteLovely bread!
ReplyDeletecame to your blog seeing Masala Bread, I come from a family of bakers (Bangalore Iyengar Bakeries), the Bread looks so delicious. Just for a little information I like to pass on as you said you love these Bakery goodies, you don't have to saute the Masala Ingredients in oil and we use powders, no sauting of onions or dill leaves. I have posted a masala Bread swirl bread, these Ingredients you just have to add it to the dough and knead. Please don't mistake me, I thought as you had done, then I called my cousins they told how to do this, I have posted few Iyengar bakery Breads, if you have time check out in my blog. You don't have to post this comment I just wanted to tell you, as like you I love our Bakery goodies, which I don't get it here, so I keep making these :)).
ReplyDeleteGreat texture... lovely bread..
ReplyDeletehttp://krithiskitchen.blogspot.com
The minute I saw this I am in love with it, The texture and softness and spongyness is makes it so attractive.
ReplyDeleteBookmarked to try soon.
-Mythreyi
Yum! Yum! Yum!
Lovely crust.... nice color
ReplyDeleteGreat recipe, I made khara bread, turned out great
ReplyDelete@Anonymous...I am glad that it turned out great
ReplyDeleteI used this recipe to make the bread in a Bread- maker and it turned out perfect.....best part is that I didn't have to knead at all.
ReplyDeleteHi Prathibha,
ReplyDeleteBaked this bread this week on christmas with a few changes like using 50:50 of maida : whole wheat flour and adapted this recipe to my regular whole wheat bread. It came out very nice and flavourful. Everyone liked it. Thank you.
can we use whole wheat flour instead of all purpose?
ReplyDelete