Monday, July 30, 2012

Karida Kadubu | Fried Modak | Kari Kudumulu

As I promised in my earlier post I am here with the Karida Kadubu recipe which I prepared for Varalakshmi festival last friday.Varalakshmi Vratam is an important festival for South Indians and is celebrated on the second friday of Sravan maasa(month).Married women performs this vratam(pooja) for the well being of all the family members,especially husband.
I always look forward to the festival,especially for the spread we get to eat on that day.We prepare a lot of sweet and savory varieties for this festival.You can check out the various recipes for the festivals specials here in my blog.In general,we make Bele Holige for this festival,but I wanted to try this karida kadubu which I love very much.Though I never attempted making it in my own I had helped mom many times before.This is not a difficult recipe to attempt even if you have never attempted it.Check out the notes and I hope those step by step images and recipe would make it simple.

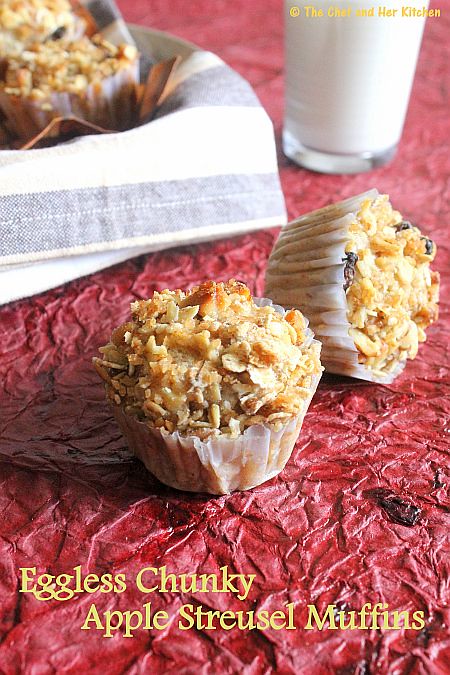
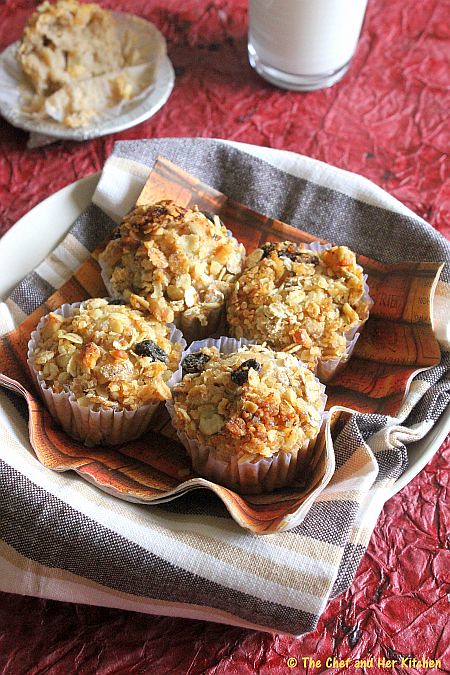
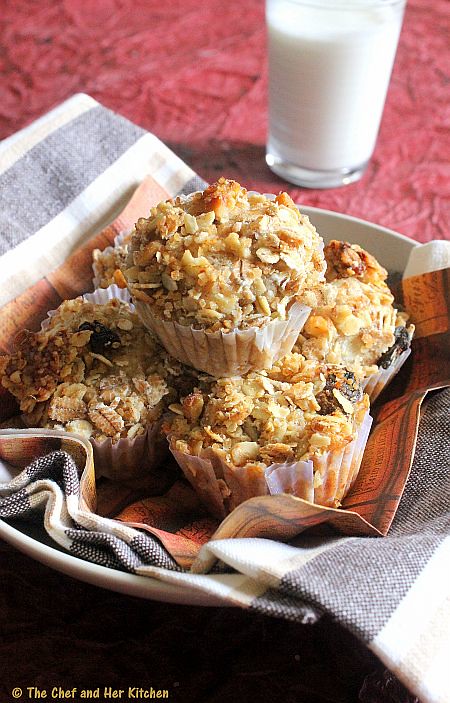
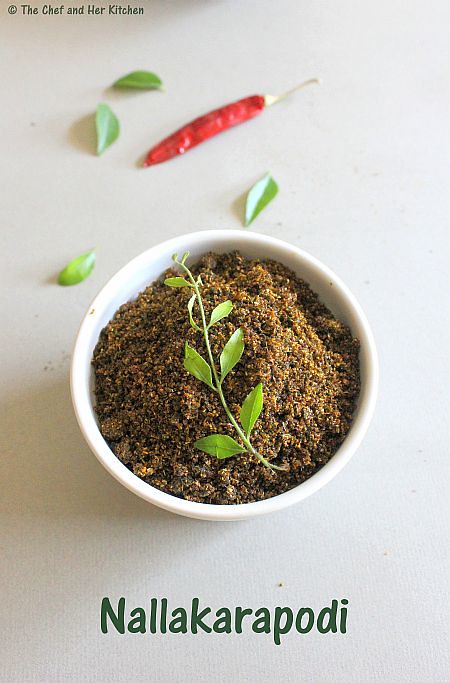
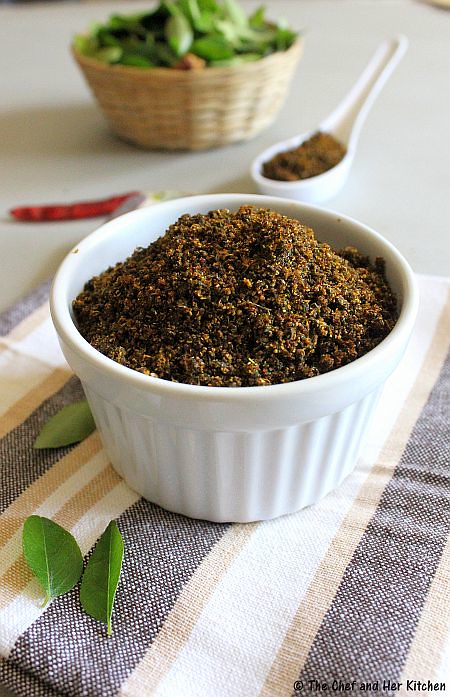
'Karida Kadubu' means 'Deep Fried Sweet Dumpling'; while the outer layer is crispy made up of all purpose flour or chiroti rava and the inner filling is sweet and soft toor dal stuffing(or chana dal).This recipe is very similar to the Karjikai(Karanji) sweet but the filling is different.In Karjikai the filling is made up of a mixture of fried gram,dry coconut,sugar and dry fruits,in Karida Kadubu the filling is made up of toor dal or chana dal or coconut sweetened with either jaggery or sugar.Today I am posting our family version of Hoornada Kadubu,Kadubu with toor dal stuffing.It is very tasty and I just can't stop myself from eating more than one.
Check out other important recipes for Vinayaka Chavithi:
For a complete list of various options for Ganesh Chaturthi menu, check out here.

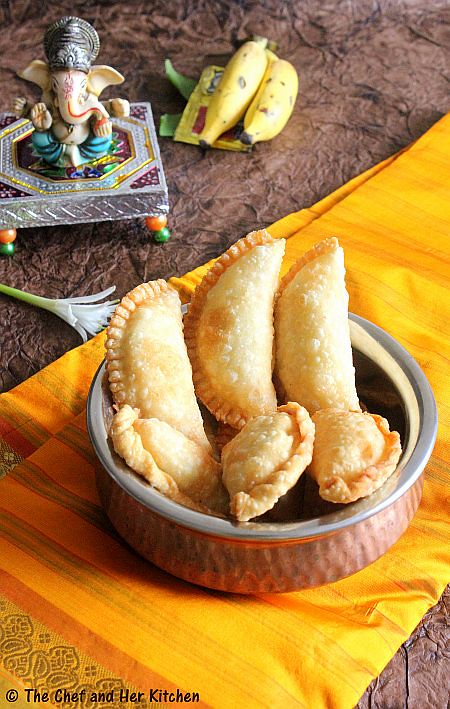
Karida Kadubu | Hoornada Kadubu | Fried Modak | Kari Kudumulu Recipe:
(makes 12-14)

Ingredients:
for outer layer:
1 cup Maida/All purpose flour
1/2 cup Chiroti Rava(fine rava)
a pinch of Salt
1 tbsp hot Oil

for stuffing:
1 cup Toor dal
1 cup grated Jaggery
1/2 cup grated fresh Coconut
2-3 Cardamoms
1 tsp Ghee

Oil,for deep frying
Method:
for covering:
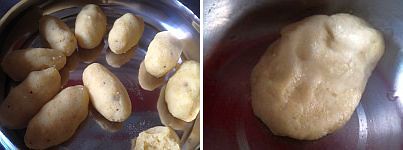
  • Mix maida,rava,salt and oil and add enough water to form a stiff dough.It should be stiffer than the regular chapati/poori dough.
  • Keep aside for 1/2 an hour and cover it with wet cloth.
  • Knead the dough well until it becomes soft and pliable.

for poornam(filling):
  • Soak toor dal for 10 mins
  • Bring 5-6 cups of water to a boil in a deep vessel and add ghee and soaked toor dal and let it cook until you feel it is almost cooked.Dal should hold its shape and should be firm,it should not become mushy.Press a grain of dal with your fingers to get to know whether the dal is cooked properly or not.
  • Strain this cooked dal over a strainer and let it drain the water and cool completely.Reserve this water to use it in making delicious holige saaru.
  • Heat 2 tbsp of water in a kadai and add grated jaggery to it and let it melt over low flame.
  • Now add strained toor dal,grated fresh coconut and let it cook along with jaggery until you get a uniform mixture.Now add elaichi powder and mix well and switch off the flame.Let the mixture cool completely.
  • Grind to a smooth paste( do not add water) in a mixer.
  • Make oval sized balls of 1 1/ inch length with the ground mixture and slightly flatten them and keep them covered until its usage.
for Kari kudumulu:
  • Clean and wipe the kadubu moulds nicely.This picture gives a better idea to show you how these moulds look.If you don't have them you can still follow another process which I mentioned below.

  • Make small balls from the maida dough and roll it out to very thin chapatis of 4-5" diameter.
  • Meanwhile heat oil in a thick kadai over medium flame.
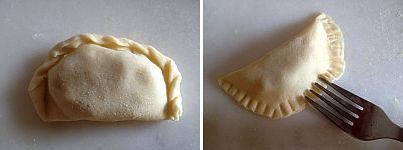
  • Put the rolled chapati on top of greased karjikaya mould.press it on the edges making sure it will sit on the mould properly.

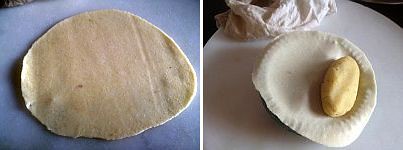
  • Keep the oval flattened hoorna(filling) mixture in it and wet the edges slightly with water.

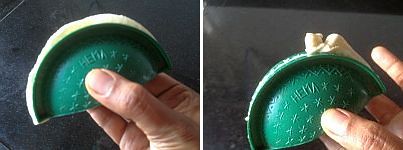
  • Close the mould to seal the kudumulu/modak and remove the extra dough pressed out of the edges.

  • Remove the kudumu/modak from the mould and keep them aside.

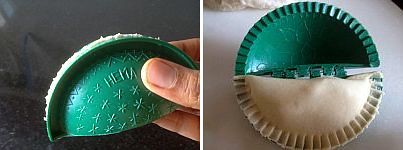
  • If you do not have karjikayi mould you can even take a sharp edged 3" steel lid and cut the chapati using it and then keep the filling inside and close it to the other side forming a half moon and take a fork and make the impressions around the corners or pinch the edges with your fingers or you can even pinch the edges and roll them inwards to form a beautiful pattern.See the image below for better understanding about how to shape them.

  • Drop 2-3 at one time slowly in to the oil and fry them on reduced flame(low-medium) till crisp and golden in color.Try to pour the hot oil from the sides using the slotted spoon on top of the kadubu which helps in puffing up nicely.

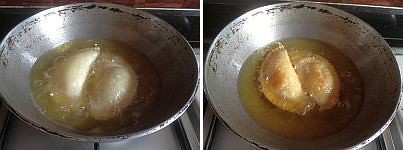
  • Drain them on a paper napkin.

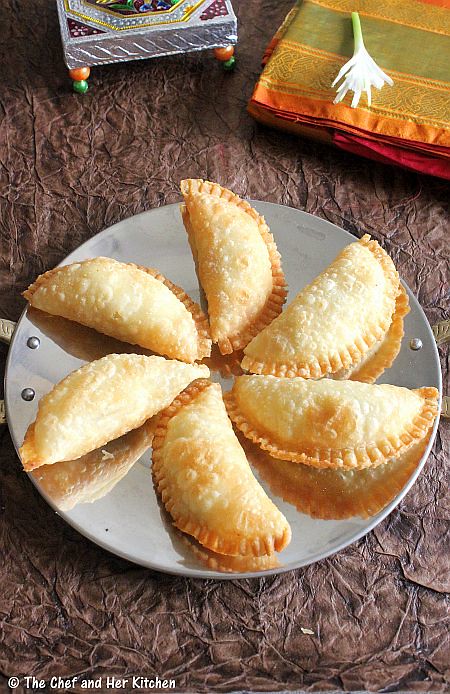
Serve them hot/cold or at room temperature.They would be crispy if you serve them immediately.If they loose their crispness after sometime you can warm them in oven for 4-5 mins,they come out very crispy.
Notes:
  1. The dough for the outer layer should be mixed stiff which gives crisp kadubu.
  2. We generally made the outer layer dough with only chiroti rava(fine variety).You can even make it with all purpose flour or a mix of wheat flour and all purpose flour.
  3. While cooking toor dal,take care not to over cook it.Cooked toor dal should be firm to touch and should be cooked inside properly.
  4. The consistency of the filling should be little tight(not very soft) otherwise there is possibility that the filling might splutter while frying them.If your filling is slightly soft then try to refrigerate it for few hours or place them on kitchen towel to remove extra moisture or you can even microwave the mixture for a minute and leave it aside.This will help in hardening the mixture a bit.
  5. For a Vegan version avoid ghee in the filling recipe.
Variations:
  1. You can replace toor dal with chana dal and follow the same recipe.It is equally tastier as the toor dal version.
  2. You can even replace jaggery with sugar and follow the same recipe.
  3. The outer layer can also be prepared with wheat flour,replace wheat flour with maida in the recipe.
  4. You can use stuffings like coconut-jaggery stuffing,sesame or groundnut filling instead of toor dal stuffing.
  5. For a Vegan version avoid ghee in the stuffing

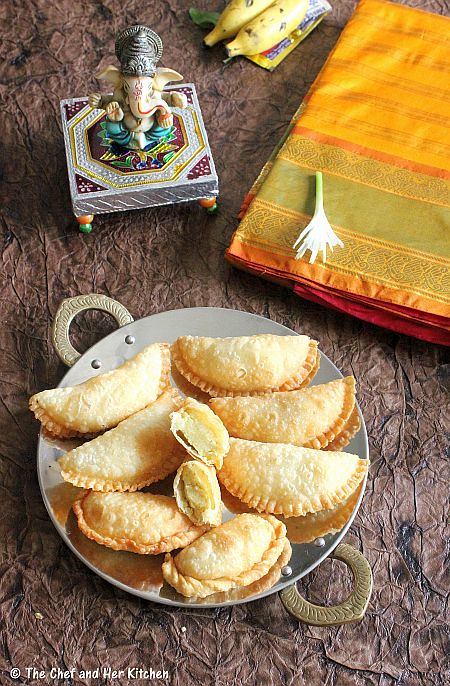
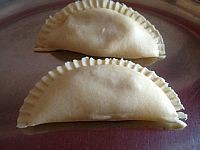
Check out the soft and sweet toor dal filling inside.Want a bite??Make them by yourselves and pamper your taste buds with those delicious fried kadubu.

If you want to make the steamed version of Modak/Kudumulu for Ganesh chaturthi,please check out this recipe.

Friday, July 27, 2012

Lemon Rice | Chitranna | Nimmakaya Pulihora

I wish all my readers and friends 'Happy Vara Lakshmi Festival'.I was busy in the morning with the puja and also cooked various festival varieties.I prepared Kari Kudumulu,a kind of traditional sweet which I thought of posting it today on the eve of festival but I am really exhausted after the festival celebrations and cannot spend more time editing my pics and writing the post.I would definitely post it next week and in the interim thought of sharing another simple lemon recipe which I prepared today.
We all make lot of rice varieties like lemon rice,mango rice, puliyogre, coconut rice, mustard rice etc during festivals as they do not require onions in it and also are very easy to make.Coming to the lemon rice recipe,it is very easy and quick to make as it does not include many items.I am sure everyone knows how to make lemon rice but I would like to share few tips in order to make tasty lemon rice.Nicely cooked soft and fluffy rice,more spicy and tangy rice for extra punch and also mixing the rice while it is hot are the key things one should remember to make yummy and tasty lemon rice.
Lemon Rice | Chitranna | Nimmakaya Pulihora:
(Serves 2)

Ingredients:
1 cup regular Sona masuri or equivalent
1 big Lemon or 2 small Lemons
5-6 Green chillies,slit
1-2 Red chillies(optional)
2-3 tbsp chopped Coriander
a sprig of Curry leaves
2-3 tbsp Cashews,broken
2-3 tbsp Groundnuts
1/4 tsp Turmeric powder
1 tbsp Chana dal
1 tsp Urad dal
1/2 tsp Mustard seeds
Salt to taste
2-3 tbsp Oil

Method:
  • Pressure cook rice(1 cup rice: 2 1/4 cups water) or how you cook your regular rice until it is soft and fluffy.The rice should be comparatively softer to eat and it should not be like how we do for pulav/biriyani.
  • Squueze the lemon and separate the seeds and keep it aside.
  • Heat oil in a kadai and crackle mustard seeds and add ground nuts and fry over medium flame until they are golden brown.
  • Add cashew nuts,chana dal,urad dal,green chilies and fry until they turn golden brown and green chillies wilt.
  • Add curry leaves and mix well and add turmeric powder and switch off the flame.
  • Now take rice in a wide bowl and add the seasoning to it and add enough salt and mix well until everything is mixed.
  • Add squeezed lemon with out seeds and coriander to it and mix well.
Serve it immediately when it is warm/hot.You can even serve it cold.
Notes:
  1. In order to make tasty lemon rice I always mix when the rice is hot and I like to eat it immediately
  2. Do not add lemon juice to the hot seasoning it will turn the rice bitter.Instead add lemon juice after you mix the rice with the seasoning.
  3. I added more number of chillies to the recipe,if you can not bear that much spice level feel free to reduce the number of chillies.
  4. It is always important to taste the rice and add salt,lime/lemon juice to it according to your taste buds.
  5. Always add less amount of turmeric powder and also add directly into the tadka which gives the rice a light greenish color instead of yellow color.
  6. Use regular rice like sona masuri,ponni or equivalent rice and I do not recommend using basmati rice for this.
  7. If you are making the rice ahead always use more lemon/lime and chillies than needed as the rice absorbs it and make it more tasty by noon.

Wednesday, July 25, 2012

Eggless Chunky Apple Streusel Muffins

I think that I have already mentioned in my earlier posts about TH's love for muffins,as apparently his breakfast for over four years in Hong Kong was a muffin and a cup of coffee...and he never got bored of it . In fact, in his trips to Hong Kong he tries visiting the same breakfast joint. He cherishes those moments even now and always asks me to make them on a regular basis.I do bake them, but not as frequently as I am a bit worried on the amount of butter and flour that goes into them.
I had a pack of apples which were lying in my fruit basket for a while so I thought its better to use them in a cake/muffin. After a quick search on the net, I zeroed on Divya's chunky apple muffins.I started off thinking of making her version but changed my mind while making it and replaced egg with a mashed banana and also decided to make a healthy streusel topping and hence I tweaked the original recipe.The soft bites of the apple and a crunchy nutty streusel topping makes this muffin very tasty.Those muffins turned out so moist and fluffy that TH demanded another batch soon . I tried with the egg version next time and was happy to see that even my eggless version turned out as tasty as the egg version. Glad that my changes to the recipe worked.
I also have a very healthy version of Eggless whole wheat banana muffins in my blog,in case you are interested check out the recipe here. These are good as morning breakfast or as a snack anytime.
Eggless Chunky Apple Streusel Muffins:
(makes 9 big or 12 medium sized muffins)
Adapted from : Easy Cooking
Link
Ingredients:
1 1/2 cups All purpose flour
3/4 cup Sugar
1/3 cup Oil
1 large ripened Banana* or 1 1/2 medium sized ripened bananas
1/3 cup Milk
2 Apples,peeled cored and chopped
2 tsp Baking powder
1 tsp Ground Cinnamon
1/2 tsp Salt

for Streusel topping***:
2 tbsp Muesli
2 tbsp Oats
1/4 cup All purpose flour
2 tbsp Walnuts,chopped
1/4 cup Brown sugar
1/2 tsp ground Cinnamon
2 tbsp melted unsalted Butter**
a pinch of Salt
Method:
  • Pulse sugar in a mixer to a powder for approx 10-20 seconds.
  • Sieve flour,cinnamon,baking powder and salt together for 3-4 times until the mixture is mixed properly.
  • Meanwhile preheat your oven at 200 deg C(400 deg F) for 10 mins.
  • Line the muffin molds and grease them with oil lightly.
  • In a bowl mash banana to a smooth paste using your hand.
  • Add milk and oil to it and mix well using a hand whisker until everything is well mixed.
  • Add sugar to it and mix nicely.
  • Add the dry ingredients of flour mixture which we sieved and fold it in the wet ingredient mixture carefully.Just fold in lightly,do not mix it vigorously.
  • Fold in the cored and chopped apples in it and scoop 2-3 tbsp of batter to each muffin mold.Fill upto 2/3rds full.
  • For streusel - mix all the ingredients oats,muesli,flour,chopped walnuts, cinnamon, melted butter and salt in a bowl until you get a crumble mixture.
  • Top the muffins with 1 tbsp streusel mixture and bake them in oven at 160 deg C for 20-25 mins. After 20 mins keep an eye on the muffins and check whether they are cooked or not by using toothpick test.If your pricked toothpick comes clean then they are done.
  • Cool them in the mold for 3-4 mins and then invert them on to the wire rack.While inverting the muffin do it on a plate to avoid the mess of falling streusel(if any).You can pop it into your mouth or use as granola,it taste really yumm.
Serve them warm or at room temperature.It stays good outside for 2 days or 3-4 days when refrigerated.

*With Egg - You can replace banana with 1 large egg in the recipe as the original recipe said.I have baked both the versions with egg as well as with banana and both came out extremely moist and yummy.It is your wish to make either egg or eggless version.
**You can use salted butter and avoid the salt in the recipe.
***The original Streusel topping is made up of 1/2 cup flour, 1/2 cup sugar,5 tbsp softened butter,1/2 cup chopped walnuts and 1/2 tsp salt.You can even follow this recipe for a firm streusel topping.As I used oats and muesli in my streusel,some portion of it was falling off but had a nice and guilt free crunch of oats on top.
Notes:
  • I halved the recipe with the ingredients exactly half of the measurements in the recipe and it worked out nice.Even though you halved the recipe use 1 medium ripened banana or 1 small egg in the recipe,and the other ingredients with exactly half the measurements.It yielded me 6 medium muffins for the recipe.


Monday, July 23, 2012

INSTANT OATS DOSA | INDIAN OATS RECIPES - Step by Step Recipe

I wake up to rainy morning and dark clouds hovering around Mumbai these days-yes monsoons are here- Its not as gloomy as my opening remark might suggest - its actually a very pleasant weather, something to cherish after a phase of mildly hot and humid summer. I like sipping hot tea (chai) sitting across the deck in the TV room, watching the drops of rain falling across the window. This kind of weather demands hot breakfast ,in my view and while I prepare interesting stuff each day, I have been unable to share these recipes as I am unable to take pics because of low levels of light at that time. The worst is that, I would have prepared the entire layout for taking the pic and then rain starts again and with that, it turns darkish - spoiling the chances of taking a pic. Really appreciate my fellow bloggers who are posting recipes without a break and with amazing photographs, even in this dull weather.
As I mentioned earlier Oats can be easily adapted in south Indian breakfast varieties.I have already posted various varieties like Dahi Oats, Oats pongal, Oats Bisibelebath, Oats Kharabath,Oats-fruits shake and I also posted a version of Oats Uthappam,which is very popular among my readers.I am really glad to say that Prathibha Jain,one of the authors of the famous book called "Cooking with Pedatha" had recently tried my Oats Uthappam and posted on her FB wall linking to my page.I want to add more oats recipes to my list of Oats gallery which gives my readers more options to try with those healthy oats.
I am posting an easy version of Oats Dosa which is prepared in a similar fashion to Rava dosa but with a major amount of oats in it.Rava dosa is another post which is quite popular among my readers and you can check my recipe if you are looking for a hotel style Rava dosa at home.If you are already comfortable making rava dosa,this oats dosa would be a breeze to make.I have prepared this oats dosa in a similar way like I make rava dosa and also adapted the same recipe to prepare it.It is one of the best ways to mask the oats and make your family members to eat this healthy oats.This dosa has the full flavor of oats and the addition of rice flour and rava makes it crisp and oats adds its softness to dosa.
Instant Oats Dosa - Step by Step Recipe:
(yields 6 dosas)

Ingredients:
1/2 cup quick cooking Oats
1/4 cup Rice flour
1/4 cup fine chiroti Rava(or regular rava,see notes)
1 1/2 cups Water(see notes)
1 medium Onion,finely chopped
2 tbsp sour Curd,beaten well
1 tsp Ginger,finely chopped
1/2 tsp Green chili paste
1/2 tsp black Pepper corns,coarsely ground
1 tsp Cumin seeds
1 tbsp chopped Curry leaves
1 tbsp Coriander leaves,chopped
Salt to taste
Oil,to roast dosas

Method:
  • Dry roast oats on low flame for 2-3 mins until they are slightly crisp.Cool it and powder into a coarse/fine powder.

  • Mix oats powder with rava,rice flour and curd and add 1 1/2 cups of water to it and mix until no lumps are formed.
  • The batter should be thin enough to pour it over the pan,it should not have spreading consistency.
  • keep this aside for 10-15 mins.

  • Add finely chopped onion, ginger chopped, salt, green chilli paste, chopped coriander, chopped curry leaves, cumin seeds and slightly crushed pepper corns to it and give a proper mix.

  • Now check the consistency of batter as the rava absorbs water,check it and add more water if required to get the pouring consistency as shown in the pic.The consistency of batter should be very thin like how we do for rava dosa.

  • Pour a ladle full of dosa batter from the outward base of the hot tawa in a circular motion to the center,fill the major gaps in between.But do not try to fill all the small gaps,those gaps helps in making the dosa more crispier.This is a very important step in making these kind of oats dosa.The crispyness depends on the way you pour the batter on the tava and the flame you manage while cooking the dosa.
  • Pour 1 tbsp oil approx over it and cover it with a lid.(No need to add more oil if using Non stick pan).
  • Let it initially cook on medium flame for 1-2 mins and remove the lid and increase the flame later and cook for another 2 mins until you see brown/red patches.(No need to turn the dosa).But do not try to remove the dosa in between while it is roasting.We should remove it only when you are sure that the dosa is perfectly roasted.

  • Remove it from the pan and serve it directly and do not drop them in hot boxes.It should be served on to the plate immediately to enjoy the flavor and crispiness of the dosa.
  • Reduce the flame for one minute and start prepare the next dosa.Do not pour the batter on high flame.Always stir the batter before preparing the next dosas.
Serve it hot right from the pan and on to the plate with Coconut chutney/Onion chutney/Tomato chutney or any accompaniment of your choice.
Variations:
  1. You can add finely chopped dry fruits like cashews,raisins and badam to the batter which tastes very nice where you get to taste in every bite of the dosa.
  2. You can add finely chopped tomato and little haldi to the batter and make to get a tangy twist to the oats dosa.It will be more colorful and flavorful.
Notes:
  1. Chiroti rava is best for this dosa,if you don't get it use regular rava.Slightly roast and cool the rava before adding to the batter.
  2. I added 1 1/2 cups of water to the batter to get the desired consistency.However it depends on the kind of rava we used,so feel free add extra water(up to 2tbsp or 1/4 cup) depends on the required consistency.
Link
I have also made a video and this is my first attempt in making a video.Check out the video for how to pour this Oats dosa here.

Friday, July 20, 2012

MANGO LASSI

Lassi is famous in Punjab but liked across most parts of the country . Although we like the taste of sweet lassi , the amount of sugar that goes into it stops us from having it that frequently . We usually prefer the flavored ones (like Strawberry Lassi and Mango Lassi) more than plain lassi and is a must order for us when we have north Indian fare outside . I don't mind preparing lassi especially in the strawberry and mango season, as the sweetness from the fruits reduces the amount of sugar that goes into lassi.This is a very simple recipe which can be made in a jiffy and can make any meal more interesting and delicious.You can pair it with a sandwich or Rajma chawal for a whole and hearty meal.
While most of us like thick and creamy lassi,TH prefers a thinner version of lassi and if it is a fruit lassi he likes the mild flavored one.I know it is a bit strange but every one has their own preferences right ??Initially, I used to make the lassi separately for both of us and now I have also started enjoying the kind of lassi he prefers hence I prepare it the same way for both of us.I reduce the quantity of mango in lassi. which gives it just a flavor and I also add little water to get the desired consistency and that is the reason my lassi has a moderate yellow color.There is no fixed measurements for the recipe,you can play around with the quantities of those ingredients and prepare lassi according to your requirements.
MANGO LASSI Recipe:
(Serves 2)

Ingredients:
1 ripened Mango(Alphonsos or Kesar)
1 cup fresh and slightly sour Curd,chilled
1/2 cup Milk,chilled
1/4 cup chilled Water
3-4 tbsp Sugar
1 cardamom,crushed(only the seeds)
2 Ice cubes(optional)

Method:
  • Remove the skin of mango and cut into pieces.
  • In a juicer/mixer blend chopped mango with curd,milk,water,sugar and cardamom powder to a smooth mixture.
  • Check the sweetness and add more sugar if needed as the amount of sugar depends on the sweetness of mango.Also adjust the consistency by adding more curd/milk to suit your taste buds.
Serve it in a glass topped with ice cubes.I did not add in mine.
Notes:
  1. You can make plain lassi with the same procedure just avoiding mango.You can make a flavored kesar lassi by adding saffron strands while blending.
  2. Mango can be replaced by strawberries for delicious strawberry lassi.
  3. You can add 2-3 tbsp cream while blending mango lassi for a rich and creamier version.
  4. Always use a slightly sour curd for lassi to get that exact taste,otherwise it would taste like milkshake.


Wednesday, July 18, 2012

ANDHRA NALLA KARAM | NALLA KARAPODI

I had posted a version of Andhra Karapodi which is a good accompaniment for Idli/Dosa.Let me tell you why I am posting another version today.When ever I visit my MIL, I would get to taste the freshly made karapodi every time, as she makes a fresh batch for us to savor with Idli/Dosa. In our numerous visits, I noticed that each time the Karapodi used to be different in terms of, texture,taste and color but I never bothered to ask her, as she used to serve it every time mentioning it as Karapodi.This time when she visited us, I asked my MIL to prepare karapodi and she prepared it in the same way that I had posted earlier but this was not the one I wanted. She then told me that the reason why the karapodi's texture used to be different is that at times she used extra curry leaves to get that pitch dark color and also fried in ghee to get that granular texture..She then asked my FIL to bring more curry leaves and made the version which I wanted..so sweet of her!!!
Ideally Karapodi and Nalla karam are the same as the ingredients that go in it are the same and please do not get confused them with Karivepaku podi. Though the amount of curry leaves used in this recipe are more,it is not the traditional way of preparing Karivepaku podi(curry leaves powder) as the procedure is different and also we do not use coriander seeds in traditional Karivepaku podi,I would post my curry leaves powder recipe soon in my space.Every house hold has their own variation of karapodi be changing the proportions of the ingredients. But for me, the word 'Nalla karam' in telugu, which can be literally translated as, 'Black spice powder' should look like one, hence I am posting another variation of Karapodi. The taste of this Nallakaram is much better than the Karapodi which I had posted earlier, in my view.The addition of ghee and extra curry leaves added a nice taste to the powder.
NALLA KARAM | NALLA KARAPODI | KARIVEPAKU KARAPODI:
(makes around approx 1 1/2 cups)
Shelf life : 2 months

Ingredients:
3-4 cups Curry leaves
1 levelled cup Coriander seeds
1/4 cup Urad dal
2 tbsp Chana dal
2 tbsp Cumin seeds
7-8 Red chillies
4-6 Byadige Red chillies
7-8 Garlic Pods
1 big amla sized Tamarind
Salt to taste(approx heaped 1 tbsp)
2 tbsp Oil
2 tbsp Ghee


Method:
  • Clean and wash curry leaves and remove extra water and spread it on a dry cloth to let the leaves dry completely with out any water.Leave it for 2-3 hrs.If you are short of time spread the leaves on the microwave plate and microwave for 3-4 mins checking in between until the leaves turn dry.It turns out beautiful in microwave.

  • Heat 1/2 tsp oil in a thick bottomed kadai and fry chana dal until it is red in color and remove it and keep it aside.Do not burn them but fry upto the maximum red color you can get without burning,this is the key to get good black color for the powder.Follow the same for all the dals and spices.
  • Again heat 1/2 tsp oil and add urad dal and fry until it is red in color and remove it and keep it aside.
  • Again heat 1/2 tsp oil and add coriander seeds and fry until they turn slightly brown and remove it and keep it aside.
  • Heat 1/4 tsp oil and add cumin seeds and red chillies and fry until crisp and remove it and keep it aside.

  • Heat 1/4 tsp oil and add dried curry leaves and fry until they are crisp and remove it and keep it aside.Switch off the flame.
  • While the kadai(pan) is hot add tamarind and fry for half a minute and keep it aside.
  • Once everything comes to room temperature grind fried chana dal,urad dal,red chillies,cumin seeds and coriander seeds to a coarse powder.
  • Add fried curry leaves,salt and tamarind to it and grind again to a coarse powder.
  • Add whole garlic pods(with skin) and run it in whipper mode now or run it just for 30 secs in the regular mode.The powder should be coarse not very fine.
  • Heat ghee in the same pan and add the ground powder and fry for 1-2 mins until all the ghee is incorporated in to the powder.This gives a wonderful aroma and taste to Nalla karam podi.
  • Once it cools remove it and keep it in a air tight container.
  • This stays fresh for long,approx 2 months.
Serve this powder with Idli/Dosa/Uthappam/Paniyaram and also can be served with plain white rice.You can add ghee to the powder and mix if required while serving.
Notes:
  1. Make sure you fry all the ingredients well and let the curry leaves be completely dry.
  2. Always use a dry spoon when taking out the powder.
  3. Keep it in air tight container to seal the aroma of this podi.
  4. I gave the amount of salt approximately,please add the required amount using your judgement.


back to top